Showing posts with label tulip glam it up. Show all posts

iLoveToCreate Retrofabulous Embellished Straw Tote


iLoveToCreate Retrofabulous Embellished Straw Tote
Margot Potter
'These ARE your grandmother's crafts...ya gotta problem with that? 
I didn't think so."

I'm afraid I have always had a serious soft spot for retro beachy looks.  Straw hats, straw totes, sundresses and seersucker rompers all make my little heart go pitter pat.  When I saw this plain straw tote in the dollar section at Target, I could not resist.  I knew immediately how I would DIY it into a retrofabulous summer bag!  Some felt, rick rack trim, pom-pom fringe and a judicious smattering of sparkly crystal accents take a plain bag from drab to fab and with the help of Aleene's Tacky Glues literally in seconds flat!  Now THAT's retrofabulous!

Materials
Plain straw tote
Craft felt in four colors
Coordinating pom pom fringe
Coordinating rick rack trim
Tulip Glam-it-up Crystals in Metallics
Aleene's Quick Dry Tacky Glue
Aleene's Tacky Glue Dots Singles 3/16"

Tools
Scissors
Ruler
Marker
Hand draw a simple 4"lx1.5"w fish shape, cut out to use as a template.


Place template on felt, trace and cut out four fish.
Cut rick rack and adhere to fish.


Glue fish and pom pom trim to tote with Aleene's Quick Dry Tacky Glue.  Finish one fish with metallic crystal accents using Aleene's Tacky Glue Dots.  Allow it all to dry, toss on your favorite vintage or vintage inspired sundress and sunglasses and ta da...go get 'em, you retrofabulous creature, you!

iLoveToCreate Retrofabulous Crafts: Spring Fever Magnet Card and Necklace


Retrofabulous Crafts
Spring Fever Magnet Card with Butterfly Necklace Set
Margot Potter for iLoveToCreate
“These are your grandmother’s crafts, ya gotta problem with that?”


In my stacks of vintage craft magazines there are lots of ads for ‘liquid embroidery’ which have intrigued me endlessly. I thought perhaps you could get the same effect with Tulip and Scribbles paints, and you can! Talk about a time saver! The first project is a super easy to make necklace using pre-cut  felt shapes embellished with metallic Glam-it-Up studs and connected with jump rings and the second project is a card with a fridge magnet attached. I thought these would make a perfect spring cheer gift for a friend. Yes, this necklace is big and bold, which is totally my style, you can use smaller shapes to make something a little less over the top! Nothing says vintage to me more than felt and these cut felt shapes had my name all over them. You could easily use a die cutting machine to achieve the same effect.

Spring Fever Necklace Set

Materials

6 Genevieve Gail Boho Collection for Michaels felt butterflies (4 for necklace and two matching colors for earrings)
54 Tulip Glam-it-Up Iron-On Studs
Aleene’s Turbo Tacky Glue
5 14mm silver tone jump rings
2 10mm silver tone jump rings
Silver tone swivel lobster clasp
2 silver tone ear wires

Tools
2 pairs chain nose pliers
Plastic or cardboard for glue

1. Place a blob of glue on plastic or cardboard.


2. Use chain nose pliers to pick up studs, dip into glue and place on butterfly. Gently press down on the crystal to ensure it is adhered. I placed 12 on each butterfly in a coordinating color. See photo for placement.

3. Allow studs to dry completely.

4. Use two pairs of chain nose pliers to open and close your jump rings with tension. Here is a quick video tutorial on how to do this properly.

5. Add the smaller jump rings to the outer wings on the two end butterflies. Add the clasp to the jump ring on one end. Hang your earrings so you have a left and right earring, using larger jump rings connected to ear wires.


Card:
Materials
White pre-made card
Anna Griffen for K and Company Carmen Collection paper
Felt shapes in vibrant colors (Genevieve Gall Boho Collection) OR die cut your own out of felt sheets (2 butterflies, one cut out flower and one solid flower)
Tulip Slick 3-D Fashion Paint in deep turquoise
Tulip Beads in a Bottle in soft yellow
Scribbles 3-D Paint Pen in kelly green
Aleene’s Turbo Tacky Glue
Aleene’s Tacky Dot Runner
Aleene's Magnetic Tacky Dots

Tools
Fiskars paper cutter
Fiskars edge punch daisy

1. Cut patterned paper to fit front of card. Use paper edge punch to create daisy cut outs.

2. Adhere paper to front of card with glue dot runner.


3. Use paints to create dots and faux stitches on edges of felt shapes. Allow to dry!

4. Stack felt shapes and glue together. I glued the edges of the flowers back to back and glued the center of the butterflies together and to the card. The butterflies are slightly askew to show the color beneath. Place something heavy on top and allow to dry overnight.

5. Attach Tacky Glue magnet to back of felt.

6. Attach felt to front of card using glue dots.

iLoveToCreate Retrofabulous Crafts: Pulp Fiction Thank You Cards


iLoveToCreate Retrofabulous Crafts: Pulp Fiction Thank You Cards
Copyright Margot Potter
"These are your grandmother's crafts, ya gotta problem with that?"


The glitter has faded, the confetti swept away and it's time to start a new year filled with possibility. It's also time to take a moment and thank your friends and family for the lovely gifts they sent. What better way to say, "Thank you" than these Retrofabulous Pulp Fiction cards? The covers are scanned from my collection of ephemera, you can easily find similar books on eBay. I dragged them into Photoshop, color matched the fonts and added some new words to the mix, sized and printed and layered them with coordinating scrapbook papers and cardstock. Tulip Glam-it-up metallic crystals on the corners were the perfect touch of dimension. My first attempt to frame them with glitter was not so fab, so I started over. I've added coordinating sentiments inside. Aleene's AWESOME new glue dot tape runner made quick work of putting it all together.

Materials
Vintage patterned scrapbook papers (I used my fav Carolyn Gavin papers from K&Company)
Coordinating card stock
Tulip metallic Glam-it-up crystals
Aleene's Tacky Glue Dot tape runner
Aleene's Acid Free Tacky Glue

Tools
Paper cutter
Bone folder
Ruler
Scissors
Chain nose pliers or tweezers


1. Use photo editing software to add sentiments.

2. Use Word or similar software to create sentiments for inside of cards.

3. Print. I printed my images at 536x774dpi 150 resolution. It's easy to drag these into publishing software and put them side by side for printing.

4. Cut out images. You are stacking them on a solid cardstock and a patterned paper, each one gets slightly larger. I eyeballed using a paper cutter, you can measure them at 1/4" increasing margins, mark and cut.

5. Fold your card stock, crease with bone folder and cut off 1" from bottom.

6. Layer images starting with patterned paper which is straight, solid card stock on an angle and image straight. Use Aleene's Tacky Glue Dot Runner Tape to attach to card.

7. Cut out a sentiment, add a slightly larger coordinating cardstock paper frame, layer and attach to inside of card on an angle using tape runner.

8. Squeeze out a small amount of Tacky Glue. Use tweezers to careful pick up crystal, dip back in glue (don't over do it here) and attach to corners of image on card. Press gently with finger tips.


Retrofabulous Christmas Craftabration: Upcycled Holiday Cards

Retrofabulous Upcycled Holiday Cards Copyright 2011 Margot Potter for iLoveToCreate

Christmas Helps 1966-Family Circle
From Christmas Helps 1966-Family Circle

From Christmas Helps 1966-Family Circle
iLoveToCreate Retrofabulous Crafts
Upcycled Holiday Cards
Copyright 2011 Margot Potter 

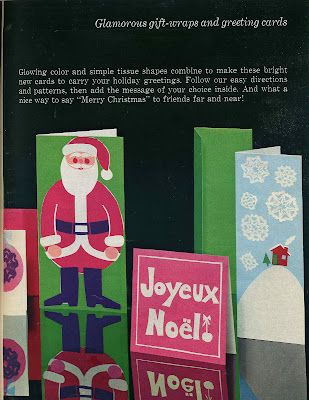
Today's Retrofabulous Christmas Craft is a simply delightful upcycled card project.  In the original project from Christmas Helps 1966-Family Circle they used tissue paper, but I love using recycled magazine images in my work.  Can you guess what the images are on the Christmas balls and candles?  The trees use some old scrapbook paper scraps and text from a magazine.  You could easily cut up last year's Christmas cards, wrapping paper, ad flyers...it's truly endless!  Aleene's new paper friendly glues make quick work of these cards.  Have you seen how expensive cards are?!  This saves money and gives a personalized touch to your holiday greetings. 


Materials
Cardstock in holiday colors
Recycled magazines
Aleene's Tacky Sticker Sheets
Aleene's Tacky Line Roll
Aleene's Tacky Dot Roll
Tulip Glam-it-up Crystals
Paillettes
Wired tinsel
Fine marker

Tools
Bone folder
Scissors
Paper cutter
Circle punches in graduated sizes

1. Select papers for card. Cut card to size on paper cutter. Fold paper in half and use bone folder to make a sharp edge on card.

2. Cut images into shapes (I used graduated circle punches to make the Christmas balls.)

3. Adhere large images to card using Aleene's sticker sheets.

4. Use Aleene's Tacky Line Roll for wired tinsel and Aleene's Tacky Dot Roll for small embellishments.  I used a fine tip marker to draw the thread on the Christmas balls.

Upcycled Holiday Card Detail

Upcycled Holiday Cards Detail

iLoveToCreate Teen Crafts: Hallowe'en Jack-o-lantern Earrings


Hallowe’en Jack-o-lantern Earrings
Margot Potter for Avalon Potter for iLoveToCreate

Avalon was busy with school this past week and I had some free time, so I agreed to make her project for her. We love Halloween around Casa de Potter, but Avalon isn’t into scary stuff. These little vintage jack-o-lanterns were so cute; they seemed like the perfect fit for a flirty seasonally apropos pair of earrings. Permission free images are easy to find and decoupage on Grungeboard allows you to create water resistant and lightweight jewelry. A little touch of Collage Pauge sparkly and some Glam it Up Crystal accents add the perfect dash of sparkle!


Materials
Grungeboard plain sheets
Permission free jack o lantern (image can be downloaded from here)
2 Small Glam it Up crystals
2 10mm silver tone jump rings
2 silver tone ear wires
Traci Bautista’s Collage Pauge sparkly
Traci Bautista’s Collage Pauge glossy
Aleene’s Fast Grab Tacky Glue

Tools
Hole punch (I used a Crop-a-dile)
Sharp craft scissors
Foam paint applicator tool
Computer with publishing software
Printer

Download this permission free pumpkin image to use for your project!


1. The image should be sized correctly, but if you want to print multiples you can size it and put it into publishing software before printing. Print a sheet with at least two jack o lanterns on it. Cut out two.

2. Use glossy decoupage medium to attach images to Grungeboard. Smooth any wrinkles gently with finger tip and allow to dry.


3. Use crop-a-dile to punch a hole in the top center of each jack o lantern.

4. Use sharp scissors to cut out dried jack o lanterns.


5. Paint two thin layers of sparkly decoupage medium on each earring. Allow to dry.

6. Adhere crystals to eyes using glue. Allow to dry.

7. Attach ear wires to earrings using the jump rings.

8. You can decorate the backs of your earrings as you wish, I painted some sparkly dimensional fabric paint on the back of mine.

ILovetoCreate Teen Crafts: Fun Feathered Fascinator by Avalon Potter

Fun Feathered Fascinator by Avalon Potter for ILovetoCreate

Visit us on Facebook!
Craft on!Click here for today's daily giveaway!

ILovetoCreate Teen Crafts
Fun Feathered Fascinator
Copyright 2011 Avalon Potter

Recently I have noticed a fashion trend toward feathers. They are on clothes, jewelry, they are even glued into people’s hair! I didn't feel like the little skinny feather in your hair made much of a statement, so I made this week’s project as an over the top salute to the new feather trend. It’s fun, crazy, and creative so I hope you have as much fun making it as you do wearing it!


Supplies
Aleene's Liquid Fusion
Aleene's Jewel-It Adhesive
Tulip® Glam-It-Up!™ Iron-On Studs™
Multicolor felt bird scrapbook sticker
Black plastic headband
Feathers (Hot Pink, Yellow, Green, Red)

Instructions

1. Attach three feathers together by applying Liquid Fusion to the bottom of the feathers. It should be spread slightly so it has almost a fan effect but no gaps between the feathers. Let dry for 2-4 hours.


2. Next take your felt bird and lay out your seven crystals around the tail to the head. It should go in this order: purple, light pink, red, orange, dark yellow, light blue. Then put a dark blue on the eye. Put a dab of Jewel-It on each crystal, apply to the felt bird in pre-determined spot. I used glue since the felt was made of man made fiber. Allow to dry for 10 minutes.


3. Use the Liquid Fusion to glue you felt bird to the bottom of the feathers and let set for a few minutes before the next step. Now on the back of your feathers apply a line of glue on the middle feather and attach to the side of the headband. Let dry for 2-4 hours.

ILovetoCreate Teen Crafts: Cupcake Sparkle T

It's another fab Teen Craft Project by Avalon Potter for ILovetoCreate!

I Heart Cupcakes!


Cupcake Sparkle T
Avalon Potter for ILoveToCreate Teen Crafts

"Teen crafted, Mom Approved."


I love baking cakes and decorating them with fondant, but I also love making and eating cupcakes! Really, who doesn't love a cupcake? Tulip has these super cute iron on words and embellishments that make it so easy to customize a simple t-shirt to celebrate anything you love!

Ingredients
White T-Shirt
Tulip Glam it Up Iron-on Studs (pink)
Tulip Glam it Up Iron-on Fashion Designs Large Cupcake pack
Tulip Express Yourself Iron-on Applique Cupcake

Tools
Tulip Mini Fashion Iron
Tulip Cordless Heat Setting Tool

1) Large Cupcake Pack – cut the text “cupcake” from the pack and position it on the shirt in the desired placement with the plastic side up. Cover with a thin cloth and press and hold your iron for 45-60 seconds. After it cools remove the plastic.

2) Cupcake Applique – position the cupcake image with the design side up. With your iron at the cotton setting, press and hold for 30 seconds. Turn the shirt inside out and press again with the iron for 30 seconds.

3) Iron-On Studs – I chose the pink studs to match the color of the cupcake text. Position the first stud with the glue side down in the middle of the shirt collar. Use applicator to attach each crystal, one at a time to maintain positioning.

Remember to turn your shirt inside out when you wash it!