Showing posts with label card making. Show all posts

Kids Crafts 1-2-3 and Variations on a Theme


Last year I was bequeathed a lifetime supply of vintage craft magazines.  They're awesome, as you might imagine and I am still gleefully perusing them for techniques and ideas.  I found a set of cards made with simple tissue paper shapes on one holiday magazine that really struck me.  I re-worked the idea to create this set of cards above.

The instructions to make these are here.

iLoveToCreate: Retrofabulous All Occasion Greeting Card


iLoveToCreate Retrofabulous All Occasion Greeting Card
Margot Potter
These are your grandmother's crafts, ya gotta problem with that?

Avalon has been taking advance placement and honors classes and her homework straw pile is epic!  It's my birthday today, so I decided to whip up my own birthday card.  I'm a Leo, we're kooky like that.  You can make one too using layers of coordinating paper, trim and faux rhinestones and a vintage image sized with text added in photo editing software.  I share my birthday with the ever so lovely and talented Miss Cathie Filian, so I used her fabulous Podgeables to add some dimension to the card!  Aleene's Dry Adhesives make putting it all together as easy as 1-2-3!

Materials
Podgeables tag shape
Yellow and orange cardstock
Patterned scrapbook paper (I used Retro Collage from Michaels)
Patterned tissue paper
Genevieve Gail Felt Floral Ribbon Trim
3 large faux rhinestones
3 medium faux rhinestones
Aleene's Tacky Sticker Sheets
Aleene's Tacky Dot Roll

Tools
Paper cutter (largest cardstock layer is 5.5"x11"-folded to make card.)
Scissors
Bone folder

My image came from a vintage Vogue pattern from the early 1950s, Dover books is a great source for permission free images.  I scanned, edited, sized, added the text Retrofabulous and printed it out.  Decide how you wish to frame the image, trace and cut out.

Use a paper trimmer to cut yellow cardstock and patterned scrapbook paper in decreasing size. Cut ribbon to fit card. Use Aleene's Tacky Sticker Sheets to adhere image to front of acrylic frame and tissue paper to back of frame. Layer and stack remaining papers and trim using Tacky Sticker Sheets. Add faux rhinestones with Aleene's Tacky Dots!

iLoveToCreate Teen Crafts: Rage Comics Inspired Father's Day Card


iLoveToCreate Teen Crafts
Rage Comics Inspired Father's Day Card
Avalon Potter

Avalon has become obsessed with Rage Comics memebase.  We have to literally peel her phone out of her hands to get her to focus on something else.  She drew this AWESOME Rage Comics inspired whale recently and we knew it would be perfect for a Father's Day Card.  This is the 'Sudden Clarity Whale'.  You can have your teen draw their own version and scan, size, print and use on a one of a kind greeting card to make Dad feel super special on his super special day.

Aleene's Dry Adhesives make it super easy to make great cards in a flash!

Materials
Blue cardstock
White printer paper
Patterned coordinating paper
Whale image printed to fit front of card
Words: Dude! and I'm literally a Happy Father's Day card!  printed and sized to fit card
Aleene's Tacky Tape Runner

Tools
Small scissors
Paper trimmer
Fiskars Shape Cutter template word bubble and brackets

Print your whale image to fit card.
Cut out printed whale. 

Cut frame, word bubble and waves using shape templates and cutting tool. 

Use Aleene's tape runner to assemble front of card. 

Use tape runner to assemble card interior. 


iLoveToCreate Retrofabulous Crafts: One 'Cool' Mom Mother's Day Card


iLoveToCreate Retrofabulous Crafts
One ‘Cool’ Mom Mother’s Day Card
Margot Potter
“These are your grandmother’s crafts...
...ya gotta problem with that?”

It's almost here...are you ready?  This Sunday is Mother's Day, my fine friends.  No one works harder than mom and no one deserves a day off more than she does.  Take it from this hard workin' mama, we really, really, really appreciate the love.  What better way to show mom how much you love her than with this wickedly funny retrofabulous card you can make yourself using Aleene's FABULOUS dry adhesives?  Take her somewhere special and let her kick her feet up and relax, she's earned it.  Believe me.  

Materials
Dove gray and soft pink cardstock
Damask scrapbook paper
One flat back large faux gem
Vintage images (digital downloads here)
Print out vintage typewriter text  18pt.: “Happy Mother’s Day, to one ‘cool’ Mom.”
Aleene’s Tacky Tape Runner

Tools
Fiskars Shape Templates (Stars and Banners)
Fiskars Shape Template Mat and Cutting Tool
Fiskars Paper Trimmer
Fiskars Scissors
Bone folder

FREE Digital Downloads FOR PERSONAL USE ONLY-NOT FOR RESALE
1.  Print out digital downloads and text.  Use paper trimmer to cut. 

2.  Cut graduated layers of pink and damask paper for backgrounds using paper trimmer, see images for reference.

3.  Use bone folder to crease center of gray cardstock.

4.  Attach paper layers using Aleene’s Tacky tape runner on edges.  Make sure you center each layer as you stack.  No Sweat on front, Relax on inside cover.

5.  Cut out shapes.  Three stars starting with the smallest in grey and graduating in the next two sizes in pink and damask.  Cut thin banner shape in damask. 

6.  Use sticker sheets to layer stars on lower left hand corner of front of card.

7.  Use Aleene’s Tacky Dot to adhere faux gemstone.

8.  Attach damask banner to center of inside of card using Tacky Sticker Sheet, add text with background using glue runner.

iLoveToCreate Retrofabulous Teen Crafts: The Original Hip Hop Easter Card

The Original Hip Hip Mixed Media Easter Card Copyright Margot Potter for iLoveToCreate

iLoveToCreate Retrofabulous Teen Crafts
The Original Hip Hip Easter Card
Margot Potter
"These ARE your grandmother's crafts. Ya gotta problem with that?!"

It's hard to believe, but it's true.  Easter is on the way and Peter Cottontail is not far behind! Miss Avalon is buried in school projects and Miss Mom decided to make what she calls a "retrofabulous" holiday card. Avalon approved heartily, so we're calling this a vintage inspired teen craft. This wonderful image is from the turn of the last century when anyone behind the wheel of a horseless carriage, let alone a rabbit, was truly a sight to see. The original postcard was scanned, the image cleaned up and extracted from the background and new text was added. Ya gotta love technology! I'm sharing the image here for you to download, for PERSONAL USE ONLY. (That means, please don't make something from this image and sell it.)

Aleene's AWESOME dry adhesives make it so easy to whip up fun filled holiday cards in the blink of an eye. Why not make your own "retrofabulous" Easter cards for your friends and family? It's a great way to use up those old trims, buttons and scrapbook papers.


Materials
Coordinating Scrapbook Papers (I used Me and My Big Ideas Mambi Sheets)
Simplicity large orange rick rack trim
One large green or coordinating color button accent
Image and text for front and inside of card (Hippity, Hoppity, Happy Easter) printed. (I used Modern #20 font sized to 26pt.)
Aleene's Tacky Dot Runner
Aleene's Tacky Line Roll

Tools

Fiskars Paper Cutter
Fiskars ShapeCutter Templates (circles for the scalloped edge and brackets for the interior background)
Fiskars ShapeCutter Tool and Mat
Bone folder

1. Print your images and text. The image will be cut to 5"h x 4"w.


2. Use paper cutter to cut image and text. Interior text should be 2.5"h x 2"w.

3. Yellow background paper should be cut to 6"h x 4 3/8"w. Add scalloping to the left edge of the yellow background paper with ShapeCutter template and tool.

4. Cut a strip of striped paper (after using ShapeCutter template and tool to add scalloping to the left edge of paper.) The strip should be 6"h x 3/4"w at the widest scallop.

5. Cut dotted orange cardstock to 6 3/4" h x 5 1/2" w. Fold in half and use bone folder to crease edge.

6. Cut the rick rack trim to fit top and bottom of yellow cardstock, 4 3/8"w.

7. Use wire nippers to cut shank from back of button.

8. The elements are layered as follows: Yellow cardstock, rabbit image centered on cardstock, striped edge on right side of rabbit image, rick rack on top and bottom of yellow cardstock and button in lower left corner. Use Tacky Dot runner for paper elements and Tacky Line roll for trim and button.

9. For the interior, cut a piece of striped paper to frame the text. Striped paper should be 2.5"h x 3" w. Use ShapeTemplate to cut a bracket big enough to fit layered papers. Layer these and attach to inside center of card using Tacky Dot runner.


iLoveToCreate Retrofabulous Crafts: No Kiddin' Around Upcycled Valentine

No Kiddin' Around Upcycled Valentine Margot Potter for iLovetoCreate

iLoveToCreate Retrofabulous Crafts
No Kiddin' Around Upcycled Valentine
Margot Potter


Today's Retrofabulous Craft is another upcycled vintage Valentine idea. I took new scrapbook paper, a glittered gift bag from Christmas, red cardstock and combined them with a section of a vintage card. You can substitute any used Valentine here, it's a great way to re-purpose them! I had a blast making layered hearts with the Fiskars paper cutter and Aleene's dry adhesives made putting it all together a breeze! No waiting for glue to dry. I added some Tulip Beads in a Bottle gems for dimension using Aleene's Acid Free Tacky Glue (I recommend this for paper crafts.)


Materials
Red cardstock
Black and white striped or patterned papers
Small doily
Gold glittered gift bag (or just use Tulip Glitter on gold paper for the same effect.)
2 Red Tulip Beads in a Bottle Studs and Crystals
Aleene's Tacky Dot Runner
Aleene's Acid Free Tacky Glue

Tools
Fiskars Graduated Hearts Shape Template (or measure and hand cut graduated hearts)
Fiskars Interchangeable Scalloped Edge Punch
Bone folder
Paper cutter

1. Cut red cardstock to 7"x11".

2. Fold card in half to 7"l.x5.5"w. Use bone folder to make a sharp crease in edge.


3. Use edge punch on top edge of card.


4. Cut out layered hearts with papers.

5. Cut out your layered hearts. Before you cut, make sure you center the image you want to use! I stacked the 4" heart followed by the 3.5" heart and finally the 3" heart for the center heart. The top right heart stack is 1", 1.25", 1.5" and 2". The bottom left heart stack is 1", 1.5" and 2". For inside of the card stack 1.5", 1.25" and 1" hearts.

6. Print out your sentiments. I wrote "No kiddin' around, Valentine." and "I love you." using a vintage style font.

7. Layer a doily and the center hearts using Aleene's Tacky Dot Runner. Add the top right and bottom left heart stacks. Attach a faux gemstone using Aleene's Tacky Glue to the center of the top and bottom heart stacks. Allow to dry.

8. Cut out your sentiment and layer it on one of your papers, cut and adhere to bottom right of card front using Aleene's Tacky Glue Runner.


9. To make the inside of the card, stack your hearts and add the sentiment to the center.


iLoveToCreate Retrofabulous Crafts: Pulp Fiction Thank You Cards


iLoveToCreate Retrofabulous Crafts: Pulp Fiction Thank You Cards
Copyright Margot Potter
"These are your grandmother's crafts, ya gotta problem with that?"


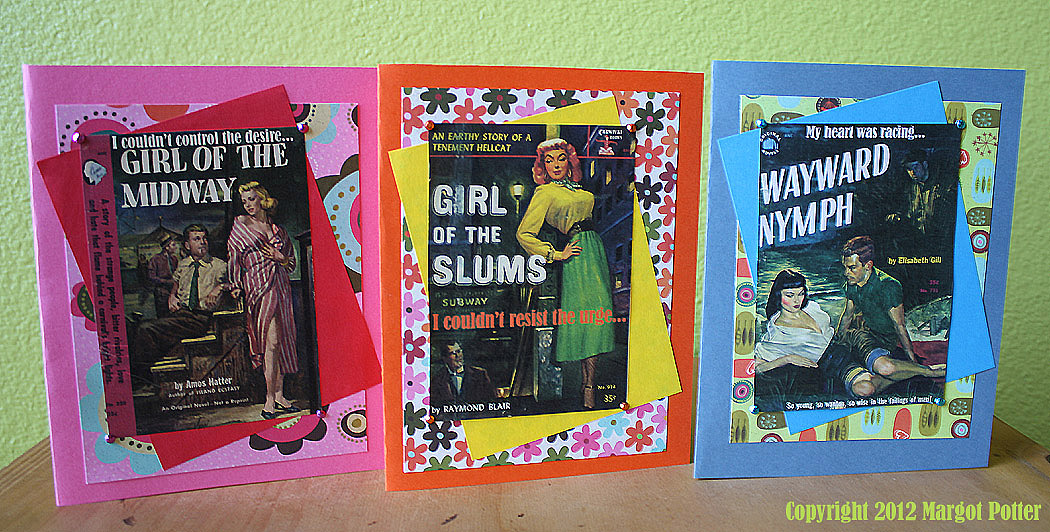
The glitter has faded, the confetti swept away and it's time to start a new year filled with possibility. It's also time to take a moment and thank your friends and family for the lovely gifts they sent. What better way to say, "Thank you" than these Retrofabulous Pulp Fiction cards? The covers are scanned from my collection of ephemera, you can easily find similar books on eBay. I dragged them into Photoshop, color matched the fonts and added some new words to the mix, sized and printed and layered them with coordinating scrapbook papers and cardstock. Tulip Glam-it-up metallic crystals on the corners were the perfect touch of dimension. My first attempt to frame them with glitter was not so fab, so I started over. I've added coordinating sentiments inside. Aleene's AWESOME new glue dot tape runner made quick work of putting it all together.

Materials
Vintage patterned scrapbook papers (I used my fav Carolyn Gavin papers from K&Company)
Coordinating card stock
Tulip metallic Glam-it-up crystals
Aleene's Tacky Glue Dot tape runner
Aleene's Acid Free Tacky Glue

Tools
Paper cutter
Bone folder
Ruler
Scissors
Chain nose pliers or tweezers


1. Use photo editing software to add sentiments.

2. Use Word or similar software to create sentiments for inside of cards.

3. Print. I printed my images at 536x774dpi 150 resolution. It's easy to drag these into publishing software and put them side by side for printing.

4. Cut out images. You are stacking them on a solid cardstock and a patterned paper, each one gets slightly larger. I eyeballed using a paper cutter, you can measure them at 1/4" increasing margins, mark and cut.

5. Fold your card stock, crease with bone folder and cut off 1" from bottom.

6. Layer images starting with patterned paper which is straight, solid card stock on an angle and image straight. Use Aleene's Tacky Glue Dot Runner Tape to attach to card.

7. Cut out a sentiment, add a slightly larger coordinating cardstock paper frame, layer and attach to inside of card on an angle using tape runner.

8. Squeeze out a small amount of Tacky Glue. Use tweezers to careful pick up crystal, dip back in glue (don't over do it here) and attach to corners of image on card. Press gently with finger tips.


iLoveToCreate Teen Crafts: Technicolor Turkey Card

Technicolor Turkey Card Copyright 2011 Avalon Potter for iLoveToCreate

iLoveToCreate Teen Crafts
Technicolor Turkey Card
Copyright Avalon Potter

I needed to make a thank you card for my Mom Mom and with Thanksgiving coming up, a Turkey seemed like a great idea!  My mom helped with the pattern and I picked out the papers, embellishments and colors and put it all together.  It's really simple to make a card like this, one big circle, one oval, rounded and pointed feathers, a funky hat, half circles for wings and bird feet are all stacked together using Aleene's Dry Adhesives.  We added a few 3D embellishments for fun. It's easy to make this project your own with a few changes, have fun with it!


Materials
Coordinated patterned scrapbook papers
Cardstock in light and dark pink and light and darker green
3D embellishments (googly eyes, spoon and fork charms, paillette and Tulip Beads in a Bottle Studs and Crystals)
Aleene's Tacky Sticker Sheets
Aleene's Tacky Dot Roll
Aleene's Tacky Line Roll

Tools
Scissors
Paper cutter
Bone folder
1.5" circle punch

1. Fold an 8.5x11" sheet of dark pink cardstock in half and crease edge with a bone folder. This is the base card.

2. Use circle punch to create light pink card stock turkey head.

3. Fold any paper in half and cut oval body shape, trace this on light pink card stock and cut out.

4. Cut feet out of darker green card stock.

5. Cut hat shape out of patterned paper and make a hat band out of light green card stock.

6. Cut the feathers, there are rounded and pointy feathers, the round go on top and the pointy in between them. Cut beak and wings out of light green card stock and gobbler out of patterned paper. Cut a bib out of patterned paper to fit center of body.

7. Attach the beak and gobbler on face using sticker sheet. Add googly eyes with Tacky Dots. Attach hat to top of head adding hat band with sticker sheet and add embellishments with tacky dots.

8. Attach the bib to the front of the turkey using sticker sheet. Attach wings on either side of bird followed by the head at the top with sticker sheet.

8. Attach feet with sticker sheet. Use Tacky Line Roll to attach silverware.

9. Build feathers around the back of the card using the sticker sheet to attach. Layer the pointy feathers in between the rounded. Attach the turkey to the base card using the sticker sheet.