

Showing posts with label teen crafts. Show all posts
Showing posts with label teen crafts. Show all posts
Upcycled Can DIY and Free Vintage Graphic

Miss Avalon has a super cute upcycled can DIY for iLoveToCreate today. Turn your old tin cans into pretty can-tainers in just a few quick steps! You can get the full tutorial with pictures on the iLTC blog!
So sorry for being MIA this week. Mr. Potter is overseas traveling for business and I fell down the stairs during a power outage and managed to sprain my ankle and possibly fracture my fifth metatarsal bone. You know, for fun. Squee. Getting up and down the stairs is proving challenging, so my DIY output has been diminished considerably. I did get this project shot yesterday and posted today. While I was down in the craft dungeon studio, I scanned and cleaned up this final free Miss Madge's Share the Love Initiative free vintage graphic for your elephantine entertainment and edification.
Sailing, Sailing Decoupage Canvas

Sailing, Sailing Op Art Decoupage Canvas
Avalon Potter for iLoveToCreate Teen Crafts
Avalon made this simply chic op art style canvas using old book pages and cardstock on an inexpensive craft store canvas. This is so easy to make and the variations on this theme are infinite. Fiskars has some great shape cutters that make quick work of cutting squares that are easily halved into triangles. Piece them together and adhere to your canvas with Aleene's decoupage medium in matte finish and you have a fabulous one of a kind work of art. Best of all, you're the artist!
Hooty Owl Halloween Cards

Hooty Owl Hallowe'en Cards
Margot Potter for iLoveToCreate
Avalon has been busy as a little bee getting straight A's in her honors classes! Can you say proud mama? I can! Go Avalon! So I stepped in to whip up some fun and festive Hooty Owl Halloween cards today.
'A' is for Awesome (Avalon and Autumn) DIY Framed Initial

(It's another AWESOME DIY Teen Craft Project from the AWESOME Ms. Avalon Potter!)
A is for Awesome
(Avalon and Autumn)
DIY Framed Initial
DIY Framed Initial
Avalon Potter foriLoveToCreate
'Teen Crafted, Mom
Approved'
Autumn
has always been my favorite season. The way the leaves form a masterpiece of
color, and the crisp air rejuvenates the mind amazes me. Even though I have
never been a large fan of Halloween (I don’t do scary), I still love the thick
textures and shabby chic appeal that pops up during this time. I have a beach
theme throughout my room the blends naturally with this style, so I am always
finding new things I would love to hang up. I decided for this project I would
make something that would go with the theme of my room and the theme of the
season. I hope you enjoy it!
iLovetoCreate Teen Crafts: Toiletry Organizer Cabinet!

iLoveToCreate Teen Crafts
Toiletry Organizer Cabinet
Avalon (and Andrew) Potter
Avalon and her dad had to make this week's project for iLovetoCreate because Mom was at the Southern Women's Show. They did a terrific job with this handy dandy bathroom organizer which makes a stylish storage solution! This is easy to hang on the wall above the toilet or by the sink. Av's plan is to put hair bands, cotton balls and bobby pins in the jars and keep some of her toiletries in the shelf unit. They sell these little cabinets in the wood section of the craft stores and the jars can be found in neighboring aisles. This is a great way to clear sink space and keep organized. Teen girls require a fair amount of beauty supplies, as do their moms who could also benefit from a shelf like this! Using Tulip stencils allowed them to add initials and the pouncers make quick and pretty work of the polka dots.
iLoveToCreate: Ribbon Wrapped Nevermore Halloween Pumpkin

"Once upon a midnight dreary, while I pondered weak and weary,
Over many a quaint and curious volume of forgotten lore,
While I nodded, nearly napping, suddenly there came a tapping,
As of some one gently rapping, rapping at my chamber door."
Over many a quaint and curious volume of forgotten lore,
While I nodded, nearly napping, suddenly there came a tapping,
As of some one gently rapping, rapping at my chamber door."
iLoveToCreate Teen Crafts: Divine Damask Locker Magnets

iLovetoCreate Teen Crafts
Divine Damask Locker Magnets
Miss Avalon started High School this week and I am understandably ferklempt. When did my beautiful baby turn into a gorgeous young woman? She's gorgeous, creative, sweet and smart as a whip to boot! She's taking honors classes this year, which means she's going to be a busy gal for sure. Proud mama? Yes indeedy do!
Have you seen the 'Locker Chic' accessories in the stores this season? They have everything from mini chandeliers to book shelves in an array of styles and colors all designed to work in a school locker using magnets. What fun! Avalon got this lovely damask set at a big box office store and I thought she just might need some coordinating magnets. These are so easy to make with scrapbook papers or even recycled magazine or greeting cards or printed pictures, just use some matte finish Collage Pauge and add some texture with Tulip Beads in a Bottle and attach Aleene's magnetic tape to the back and just like that, instant locker chic! Tres jolie, n'est pas?
Materials
4 2 1/4" diameter 1/4" wide wooden circles
Various coordinating scrapbook papers (or any fun papers you wish to use)
Tulip Fashion Bead Paint or Beads in a Bottle White
Tulip Soft Paint Black
Traci Bautista's Collage Pauge Matte
Aleene's Magnetic Tacky Tape
Tools
2" Circle punch
Paint brush
Sponge brush


iLoveToCreate Teen Crafts: Tres Chic Cupcake Toppers

Avalon and I decided to throw an intimate soiree for #TeamPotter on last night's Craft Wars episode. Friends and family all live far away, so we just made our own little party with Avalon's best friend and the three of us. Av had a project due today for iLoveToCreate and I've been playing with my logo and we decided that cupcakes and decorations were in order. So we made these super cute, super simple cupcake toppers. You can make your own using permission free fashion images or photos or anything you like! Aleene's dry adhesives made it easy and fun and we love how these turned out. I think I may have to make some jewelry out of these! Tune in next Monday and I'll share how I made the cupcake stand topper with the ruffled lace technique and talk about quick and easy ways to personalize your parties.
Materials
Toile/Damask scrapbook papers in coordinating prints
Black and white fashion image printed to fit in a 2" punch
Large wooden or plastic party picks
Flat back plastic rhinestones
Aleene's Tacky Tape Runner
Aleene's Tacky Dot Roll 1/2"
Tools
Fiskars shape cutter and circle templates (2/5" circle)
Fiskars 2" circle punch


iLoveToCreate: Craft Wars Inspired Ocean Dreams Birdhouse

Avalon Potter for iLoveToCreate
"Teen crafted, Mom approved."
My mom is going to be on an upcoming episode of TLCs new show Craft Wars and she's making projects every week with other contestants from the show inspired by the theme of the week before. Last week's Pop Craft challenge was to make a junk drawer themed birdhouse. We had two of these old birdhouses sitting in our yard, so we decided to both decorate one. I used her paint scraping technique in colors that fit my style and added some things from our 'junk drawer', some sea shells from our last trip to the beach, old buttons and a seahorse metal charm. Layers of mixed acrylic paint colors from Crafty Chica, Scribbles and Tulip are all sealed under Aleene's Spray Sealer so this can go outside. I can't wait for a bird to move in!
Materials
Old wooden birdhouse
Seashells
Old buttons in colors to match
Seahorse or ocean themed metal accent
Number tape (7 gypsies)
Blue, black, copper, white and brown paints (Crafty Chica, Tulip and Scribbles brands)
Aleene's Turbo Tacky Glue
Aleene's Spray Acrylic Sealer (matte)
Tools
Scissors
Butter knife or palette knife


Mix up paints to make several shades of blue, grey and tan. Use a butter knife to add paint to house door, roof and sides in layers, starting with the darker colors and continuing until you're happy with how it looks. try not to smash the colors together, layer them on top of each other instead.

Use Tacky Glue to glue shells around your door frame.

Glue buttons around opening using more Tacky Glue.

Glue Seahorse to Door with more Tacky Glue. Yay, Tacky Glue!

Run tape along edge of roof on front and sides. Cut to fit.

Spray with sealer, apply several coats allow them to dry in between each layer.


iLoveToCreate Teen Crafts: Carnival Canvas Covered Notebook

Avalon Potter (a.k.a. NGC-New Generation Crafter) for iLoveToCreate
"Teen crafted, mom approved."
Avalon has been obsessed with tribal prints all summer, from ikat to Native American to African inspired patterns and chevron, she's been showing me pictures of bedding, bags, clothes, shoes all emblazoned with an array of colors and patterns. I trust a teen to know what's really cool and she's a really cool teen. She wanted to make something fun to express her new found love of all things 'pattern-y', and we remembered Claudine Hellmuth's fabulous sticky back canvas. By covering a basic notebook with layers of painted and embellished canvas, she made a truly fabulous one of a kind work of art. This is so much fun to do with the vast array of paints from Tulip and Scribbles brands and with school just around the corner, a great way to help your teen personalize their supplies!


Notebook with hardback cover
Sticky back canvas
Decorative tape
Tulip 3-d fashion paint
Tulip fabric markers
Scribbles brush on fabric paints
Scribbles fabric paint brushes
Tulip sponge pouncers
Tools
Scissors

Cut canvas to fit cover of book, leave a 1" edge, cut edge at corners, fold over book cover and press to remove any bubbles on front of book. Add a decorative tape accent to left side of canvas to conceal edge.

Create three strips of canvas. Peel and press on notebook at top, center and bottom edge. Paint each stripe and the spaces in between a solid color and allow to dry.

Make two rectangular mini-canvas accents using dimensional paint in patterns, press together and adhere to front of notebook.

Use markers and paints to make a variety of patterns along strips.

iLoveToCreate Teen Crafts: Pretty Poppies Pin by Avalon Potter

iLoveToCreate Teen Crafts
Pretty Poppies Pin
Avalon Potter
"Teen crafted, mom approved."
I scored these yummy retrofabulous fabric fat quarters at JoAnn Fabrics a while ago and had them hoarded away in a secret drawer until yesterday. Avalon ferreted them out and turned them into this fabulous pin/necklace! How cool is this? The chain is vintage celluloid from our new site which had been sitting in a box for several years until she dug it out and added the pin. Simply fabulous and so fun to make using Aleene's Stiffen Quick and Fabric Fusion sheets. Teens will love turning fabric, jeans and t-shirts into these stylish pins they can pop on purses, jackets, chains...whatever they like! I'm thinking of making a smaller version to festoon my flip flops!
Materials
Coordinating fabric swatches
Black craft felt
Flat pin back
Aleene's Fabric Fusion Peel and Stick Sheets
Aleene's Stiffen Quick Spray
Tools
Die cutting machine (Avalon used a Sizzix Big Shot)
Floral layered die (Avalon used a Sizzix Big Shot poppy die)
Sponge brush
Round surfaces that fit flowers (Avalon used her snow globe collection)
Plastic wrap to protect round surfaces
Scissors to cut felt
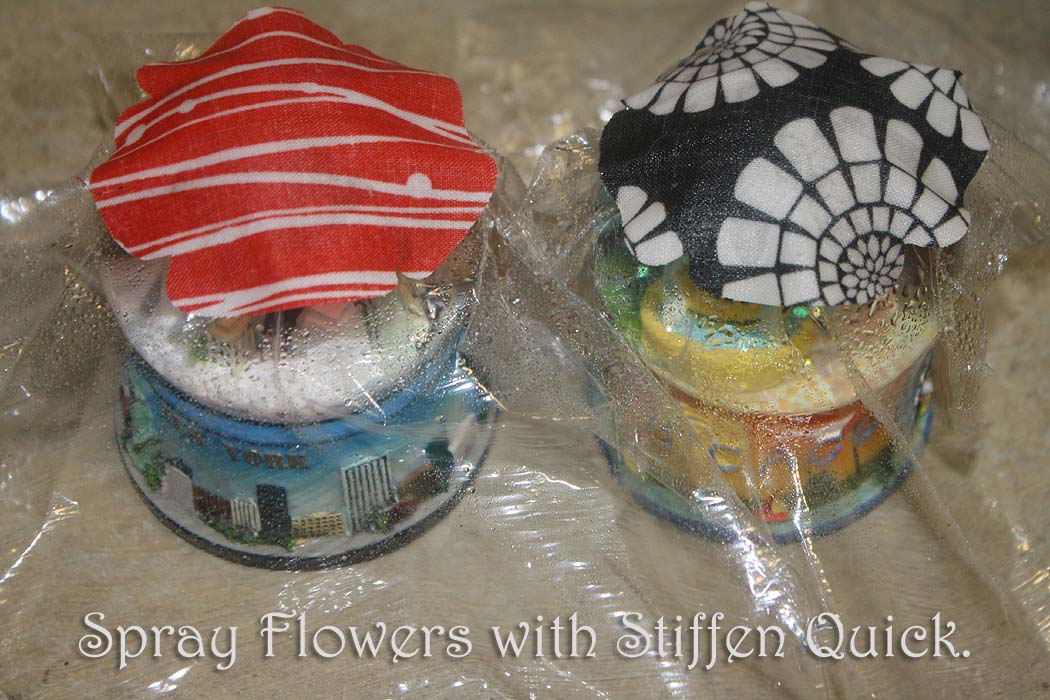
Die cut your flowers making one size of each layer in each flower, this gives each flower a different configuration of layers. Spray flowers with Stiffen Quick and allow to dry over your plastic wrap covered round surfaces. Keep adding layers of spray until the flowers are the stiffness you'd like them to be.

Stack flowers together adhering layers with Peel and Stick sheets.

Adhere flowers to a felt base with Peel and Stick sheets, cut felt to fit bottom of flowers and prevent any felt from peeking out of the sides of flowers.

Adhere a pin back with Peel and Stick sheet. Attach your flower pin to anything you like!


iLoveToCreate Teen Crafts:Funky Flower Tank Top

iLoveToCreate Teen
Crafts
Funky Flower Tank Top
Margot Potter for
Avalon Potter
“Mom crafted, teen
approved.”
Av is in her final week of school and just got home from a
trip to Washington, D.C.
So I stepped in to make this funky tank top. This was my second painted shirt attempt from
yesterday; the first one was so horrid it ended up becoming the paint rag. By the end of the day, I was starting to
think this was heading for the ‘craft fail’ bin too, but now I’m kinda liking
it and Av really liked it. Craftastrophe
or crafty triumph...sometimes it’s a fine line, people. If you really get into a pickle, you can
always cut the fabric up and use it for another project or, as I did with shirt
number one, turn it into a colorful rag! I used the Paint Canon paints to do a
Jackson Pollack influenced splatter background and then the flower stamp added
a little touch of girly whimsy.
Still...it needed something...so out came the dimensional paint and some
faux gemstones. What was cool was the
fabric was so wet, the dimensional paint sort of faded into it in spots. The key here is to really get it layered
without letting it get muddy and to keep dabbing as you work. Ideally you’d dry between layers, but I was
in a crunch for time, so layers just kept going on and the shirt kept getting
wetter. A lot of my best ideas come from
taking being willing to make glorious messes and ultimately, there are no craft
fails, except for the failure to craft.
Materials
Ribbed tank top in grey
Tulip Fashion Graffiti cannon fabric paints in black, pink and white
Tulip Soft Fabric paint in hot pink
Tulip Slick 3-D fashion paint in white
Faux gemstones
Foam flower stamp
Tools
T-shirt or sponge to blot and soak up paint as you work
Tulip sponge pouncer to apply paint to stamp

1. Wash your shirt first. Slide the form inside of your shirt. Use the paint canon paints to drizzle and drip layers of paint straight from the bottles. As you work, dab excess and keep layering and dabbing until you are happy with the results. Allow to dry or leave wet while moving to next step for a more faded look.


2. Apply pink paint to stamp with foam applicator. Stamp flowers randomly on front of shirt. Use a pouncer to add pink paint on spaces between flowers for another layer of color. Allow to dry or leave flowers wet for more faded dots.


3. Use dimensional paints to add dots around flower petals. This is not meant to be perfectly perfect, vary spacing and placement. Add a white ring to center dot on each flower. Carefully glue faux stones to center of each flower using Fabric Fusion. Allow to dry before wearing.
Subscribe to:
Posts (Atom)