Showing posts with label retrofabulous crafts. Show all posts

iLoveToCreate Retrofabulous Embellished Straw Tote


iLoveToCreate Retrofabulous Embellished Straw Tote
Margot Potter
'These ARE your grandmother's crafts...ya gotta problem with that? 
I didn't think so."

I'm afraid I have always had a serious soft spot for retro beachy looks.  Straw hats, straw totes, sundresses and seersucker rompers all make my little heart go pitter pat.  When I saw this plain straw tote in the dollar section at Target, I could not resist.  I knew immediately how I would DIY it into a retrofabulous summer bag!  Some felt, rick rack trim, pom-pom fringe and a judicious smattering of sparkly crystal accents take a plain bag from drab to fab and with the help of Aleene's Tacky Glues literally in seconds flat!  Now THAT's retrofabulous!

Materials
Plain straw tote
Craft felt in four colors
Coordinating pom pom fringe
Coordinating rick rack trim
Tulip Glam-it-up Crystals in Metallics
Aleene's Quick Dry Tacky Glue
Aleene's Tacky Glue Dots Singles 3/16"

Tools
Scissors
Ruler
Marker
Hand draw a simple 4"lx1.5"w fish shape, cut out to use as a template.


Place template on felt, trace and cut out four fish.
Cut rick rack and adhere to fish.


Glue fish and pom pom trim to tote with Aleene's Quick Dry Tacky Glue.  Finish one fish with metallic crystal accents using Aleene's Tacky Glue Dots.  Allow it all to dry, toss on your favorite vintage or vintage inspired sundress and sunglasses and ta da...go get 'em, you retrofabulous creature, you!

iLoveToCreate Retrofabulous Crafts: One 'Cool' Mom Mother's Day Card


iLoveToCreate Retrofabulous Crafts
One ‘Cool’ Mom Mother’s Day Card
Margot Potter
“These are your grandmother’s crafts...
...ya gotta problem with that?”

It's almost here...are you ready?  This Sunday is Mother's Day, my fine friends.  No one works harder than mom and no one deserves a day off more than she does.  Take it from this hard workin' mama, we really, really, really appreciate the love.  What better way to show mom how much you love her than with this wickedly funny retrofabulous card you can make yourself using Aleene's FABULOUS dry adhesives?  Take her somewhere special and let her kick her feet up and relax, she's earned it.  Believe me.  

Materials
Dove gray and soft pink cardstock
Damask scrapbook paper
One flat back large faux gem
Vintage images (digital downloads here)
Print out vintage typewriter text  18pt.: “Happy Mother’s Day, to one ‘cool’ Mom.”
Aleene’s Tacky Tape Runner

Tools
Fiskars Shape Templates (Stars and Banners)
Fiskars Shape Template Mat and Cutting Tool
Fiskars Paper Trimmer
Fiskars Scissors
Bone folder

FREE Digital Downloads FOR PERSONAL USE ONLY-NOT FOR RESALE
1.  Print out digital downloads and text.  Use paper trimmer to cut. 

2.  Cut graduated layers of pink and damask paper for backgrounds using paper trimmer, see images for reference.

3.  Use bone folder to crease center of gray cardstock.

4.  Attach paper layers using Aleene’s Tacky tape runner on edges.  Make sure you center each layer as you stack.  No Sweat on front, Relax on inside cover.

5.  Cut out shapes.  Three stars starting with the smallest in grey and graduating in the next two sizes in pink and damask.  Cut thin banner shape in damask. 

6.  Use sticker sheets to layer stars on lower left hand corner of front of card.

7.  Use Aleene’s Tacky Dot to adhere faux gemstone.

8.  Attach damask banner to center of inside of card using Tacky Sticker Sheet, add text with background using glue runner.

iLoveToCreate Retrofabulous Crafts: Hana Ami Flower Scatter Pins!


Hana Ami Flower Scatter Pins by Margot Potter

Knit Wit Flower Loom Ad from the 1960s!

iLoveToCreate Retrofabulous Crafts
Hana Ami Flower Scatter Pins
Margot Potter

Some crafty days are smooth sailing and then...there are days like today. I was going to whip up some quick and easy yarn fabric flowers on my new Hani Ami loom and...well...virtually everything that could go wrong, went wrong. Ergh. I persevered, because I'm both impatient and stubborn, and eventually I got there. These yarn flowers were all the rage back in the day, there are countless ads in my vintage magazines for looms to make these. This was a new loom, I just wasn't used to the platform and the process and the instructions were confusing, as most instructions seem to be. I ended up making up my own way of finishing the flowers, removing them from the platform and sewing through the centers of the flower petals and around them until I made my way around each flower. It isn't the darning method recommended, but it's the one that worked for me!

Once I finally got three double layer petal flowers finished, Aleene's Tacky Glue made fast work of the rest. I added a button center with an acrylic 'gem' to each flower and a safety pin back to each one and...phew! I did it! You can too!

These are fabulous on hats, jackets, t-shirts, flip flops...you will never run out of places to pin or glue them...and you can attach them together to make a funky scarf or sew them into pillows or garments. Hooray!


Materials

Yarn
Buttons
Acrylic gemstones
Safety pins
Aleene's Turbo Tacky Glue

Tools
Clover Flower Making Loom (with darning needle)
Scissors

Attach yarn and begin winding following manufacturer's instructions. Take your time and keep yarn tight as you wind.

I went around each peg twice for fluffier flowers.


Use needle to sew through and around petals, going into the center of each pair and around into the center of the pair at the opposite side, working your way around flower until you reach the final pair of petals.

Finish flower, tie of ends at back and snip tails.

Attach buttons and crystals with glue.

Attach safety pins, add a dab of glue and allow to dry overnight.


The blogger was compensated for this post.

iLoveToCreate Retrofabulous Crafts: Spring Fever Magnet Card and Necklace


Retrofabulous Crafts
Spring Fever Magnet Card with Butterfly Necklace Set
Margot Potter for iLoveToCreate
“These are your grandmother’s crafts, ya gotta problem with that?”


In my stacks of vintage craft magazines there are lots of ads for ‘liquid embroidery’ which have intrigued me endlessly. I thought perhaps you could get the same effect with Tulip and Scribbles paints, and you can! Talk about a time saver! The first project is a super easy to make necklace using pre-cut  felt shapes embellished with metallic Glam-it-Up studs and connected with jump rings and the second project is a card with a fridge magnet attached. I thought these would make a perfect spring cheer gift for a friend. Yes, this necklace is big and bold, which is totally my style, you can use smaller shapes to make something a little less over the top! Nothing says vintage to me more than felt and these cut felt shapes had my name all over them. You could easily use a die cutting machine to achieve the same effect.

Spring Fever Necklace Set

Materials

6 Genevieve Gail Boho Collection for Michaels felt butterflies (4 for necklace and two matching colors for earrings)
54 Tulip Glam-it-Up Iron-On Studs
Aleene’s Turbo Tacky Glue
5 14mm silver tone jump rings
2 10mm silver tone jump rings
Silver tone swivel lobster clasp
2 silver tone ear wires

Tools
2 pairs chain nose pliers
Plastic or cardboard for glue

1. Place a blob of glue on plastic or cardboard.


2. Use chain nose pliers to pick up studs, dip into glue and place on butterfly. Gently press down on the crystal to ensure it is adhered. I placed 12 on each butterfly in a coordinating color. See photo for placement.

3. Allow studs to dry completely.

4. Use two pairs of chain nose pliers to open and close your jump rings with tension. Here is a quick video tutorial on how to do this properly.

5. Add the smaller jump rings to the outer wings on the two end butterflies. Add the clasp to the jump ring on one end. Hang your earrings so you have a left and right earring, using larger jump rings connected to ear wires.


Card:
Materials
White pre-made card
Anna Griffen for K and Company Carmen Collection paper
Felt shapes in vibrant colors (Genevieve Gall Boho Collection) OR die cut your own out of felt sheets (2 butterflies, one cut out flower and one solid flower)
Tulip Slick 3-D Fashion Paint in deep turquoise
Tulip Beads in a Bottle in soft yellow
Scribbles 3-D Paint Pen in kelly green
Aleene’s Turbo Tacky Glue
Aleene’s Tacky Dot Runner
Aleene's Magnetic Tacky Dots

Tools
Fiskars paper cutter
Fiskars edge punch daisy

1. Cut patterned paper to fit front of card. Use paper edge punch to create daisy cut outs.

2. Adhere paper to front of card with glue dot runner.


3. Use paints to create dots and faux stitches on edges of felt shapes. Allow to dry!

4. Stack felt shapes and glue together. I glued the edges of the flowers back to back and glued the center of the butterflies together and to the card. The butterflies are slightly askew to show the color beneath. Place something heavy on top and allow to dry overnight.

5. Attach Tacky Glue magnet to back of felt.

6. Attach felt to front of card using glue dots.

iLoveToCreate Retrofabulous Crafts: No Kiddin' Around Upcycled Valentine

No Kiddin' Around Upcycled Valentine Margot Potter for iLovetoCreate

iLoveToCreate Retrofabulous Crafts
No Kiddin' Around Upcycled Valentine
Margot Potter


Today's Retrofabulous Craft is another upcycled vintage Valentine idea. I took new scrapbook paper, a glittered gift bag from Christmas, red cardstock and combined them with a section of a vintage card. You can substitute any used Valentine here, it's a great way to re-purpose them! I had a blast making layered hearts with the Fiskars paper cutter and Aleene's dry adhesives made putting it all together a breeze! No waiting for glue to dry. I added some Tulip Beads in a Bottle gems for dimension using Aleene's Acid Free Tacky Glue (I recommend this for paper crafts.)


Materials
Red cardstock
Black and white striped or patterned papers
Small doily
Gold glittered gift bag (or just use Tulip Glitter on gold paper for the same effect.)
2 Red Tulip Beads in a Bottle Studs and Crystals
Aleene's Tacky Dot Runner
Aleene's Acid Free Tacky Glue

Tools
Fiskars Graduated Hearts Shape Template (or measure and hand cut graduated hearts)
Fiskars Interchangeable Scalloped Edge Punch
Bone folder
Paper cutter

1. Cut red cardstock to 7"x11".

2. Fold card in half to 7"l.x5.5"w. Use bone folder to make a sharp crease in edge.


3. Use edge punch on top edge of card.


4. Cut out layered hearts with papers.

5. Cut out your layered hearts. Before you cut, make sure you center the image you want to use! I stacked the 4" heart followed by the 3.5" heart and finally the 3" heart for the center heart. The top right heart stack is 1", 1.25", 1.5" and 2". The bottom left heart stack is 1", 1.5" and 2". For inside of the card stack 1.5", 1.25" and 1" hearts.

6. Print out your sentiments. I wrote "No kiddin' around, Valentine." and "I love you." using a vintage style font.

7. Layer a doily and the center hearts using Aleene's Tacky Dot Runner. Add the top right and bottom left heart stacks. Attach a faux gemstone using Aleene's Tacky Glue to the center of the top and bottom heart stacks. Allow to dry.

8. Cut out your sentiment and layer it on one of your papers, cut and adhere to bottom right of card front using Aleene's Tacky Glue Runner.


9. To make the inside of the card, stack your hearts and add the sentiment to the center.


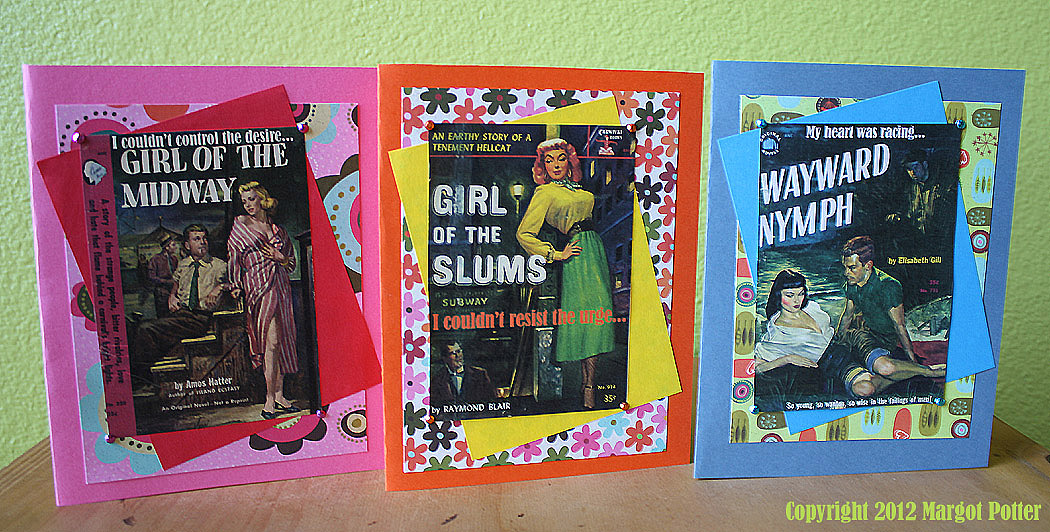
iLoveToCreate Retrofabulous Crafts: Pulp Fiction Thank You Cards


iLoveToCreate Retrofabulous Crafts: Pulp Fiction Thank You Cards
Copyright Margot Potter
"These are your grandmother's crafts, ya gotta problem with that?"


The glitter has faded, the confetti swept away and it's time to start a new year filled with possibility. It's also time to take a moment and thank your friends and family for the lovely gifts they sent. What better way to say, "Thank you" than these Retrofabulous Pulp Fiction cards? The covers are scanned from my collection of ephemera, you can easily find similar books on eBay. I dragged them into Photoshop, color matched the fonts and added some new words to the mix, sized and printed and layered them with coordinating scrapbook papers and cardstock. Tulip Glam-it-up metallic crystals on the corners were the perfect touch of dimension. My first attempt to frame them with glitter was not so fab, so I started over. I've added coordinating sentiments inside. Aleene's AWESOME new glue dot tape runner made quick work of putting it all together.

Materials
Vintage patterned scrapbook papers (I used my fav Carolyn Gavin papers from K&Company)
Coordinating card stock
Tulip metallic Glam-it-up crystals
Aleene's Tacky Glue Dot tape runner
Aleene's Acid Free Tacky Glue

Tools
Paper cutter
Bone folder
Ruler
Scissors
Chain nose pliers or tweezers


1. Use photo editing software to add sentiments.

2. Use Word or similar software to create sentiments for inside of cards.

3. Print. I printed my images at 536x774dpi 150 resolution. It's easy to drag these into publishing software and put them side by side for printing.

4. Cut out images. You are stacking them on a solid cardstock and a patterned paper, each one gets slightly larger. I eyeballed using a paper cutter, you can measure them at 1/4" increasing margins, mark and cut.

5. Fold your card stock, crease with bone folder and cut off 1" from bottom.

6. Layer images starting with patterned paper which is straight, solid card stock on an angle and image straight. Use Aleene's Tacky Glue Dot Runner Tape to attach to card.

7. Cut out a sentiment, add a slightly larger coordinating cardstock paper frame, layer and attach to inside of card on an angle using tape runner.

8. Squeeze out a small amount of Tacky Glue. Use tweezers to careful pick up crystal, dip back in glue (don't over do it here) and attach to corners of image on card. Press gently with finger tips.