Retrofabulous Christmas Craftabration: Dollar Store Christmas Stocking

Retrofabulous Dollar Store Stocking Copyright 2010 Margot Potter

This is a tricked out dollar store stocking I created last year using yet another scanned vintage postcard image from my Victorian postcard stash. The postcard was really beat up, but a little work in Photoshop and a quick resize and it looks simply fabu! (Do not be afraid to get the 'crafter's lot' of vintage post cards on eBay, there are diamonds in the rough lurking there!) I printed it on a sticky back canvas sheet and adhered it to the stocking adding a smattering of various and sundry gee gaws and doo dads I had around the studio. A few judiciously placed glitter accents...and...it was ready to go to the local VA Hospital and hopefully cheer up a vet for the holidays.

I like clean and simple design, a few too many gee gaws or doo dads and you've lost me. It seems hard to believe, I know, that someone so over the top likes simplicity, but it is true. I believe it was Coco Chanel who advised that before you leave the house you remove one accessory. Yes, well, same with crafts. Less is more. Well, more can be more too, but it all has to make sense and have synergy. It's hard sometimes to see things objectively when you've been staring at them for a while, but try taking away one thing and see if it doesn't bring it all to life.

Or perhaps, if you're afraid of gee gaws and doo dads, add one more. All things in moderation, including moderation.

Either way, a dollar store stocking can look quite rich with just the right combination of gee gaws and doo dads. That is all I am trying to say. Perhaps an editor is in order?!

Doo dad, doo dad.

Yes, I am officially losing it and no I have not been drinking egg nog.

Mistletoe Kisses,
Madge

Holiday Gift Giving...SOLVED!

Yes, I have solved your Holiday Gift Giving needs. No need to thank me, it's what I do. I have several options for the discriminating designing diva...or divo. Perhaps a signed copy of one of my books with a piece of ephemera from my personal collection tucked inside? Did I mention the books are being sold at a discount? Just a click on the book and a quick trip to PayPal and...shopping is finished!

Beyond the Bead: A Mixed Media Wonderland Filled with Fun and Easy Projects You Can Make with Ingredients You Already Have at Hand!


New Dimensions in Bead and Wire Jewelry: An Architectural Three Dimensional Exploration of Shaping and Beading Wire.


Bead Chic: Learn How to Customize Your Jewelry Using a Variety of Approaches to Design.


Sparkletastic: Dazzling Designs for the Discriminating Diva


Bead and Wire Jewelry Exposed: A Trio of Talented Designers Show What Happens When You Expose the Elements That Usually Remain Hidden


Margot Potter The Impatient Crafter on Etsy
Or if you'd like a one of a kind handmade work from one of my books...please do visit my Etsy Shoppe where I am adding these treasures at outrageously affordable prices daily!  Huzzah!  Let the holiday cheer spread forth with abandon!


Retrofabulous Christmas Craftabration...Operation Smoky Mountain Christmas!

Victorian Snow Day Canvas Margot Potter for iLoveToCreate Copyright 2009

Operation Smoky Mountain Christmas has begun at Casa de Potter. I obsessive compulsively collected purchased a few (cough, cough) vintage Shiny Brite ornaments a few years back. You can find them on eBay, but the really spectacular ones cost a small fortune. I settled for the semi-spectacular due to budgetary constraints and the knowledge that breaking something that expensive and that old would be tragic. I'm what you might call...a bit spastic.  Quel suprise.

Vintage Shiny Brite ornaments in clear glass jars (got the jars at Michaels last year)

Various and sundry greenery and stuff...methinks this needs some garland and lights yet...

It's part of that whole impatient thing, which is not just a gimmick. It's truly who I am. So here is a sneak peek of where things are at the moment. There is more to come for the tree, I will share when it is complete. We have garland to drape along the loft and stairs. You know if I had my way the entire house would be dipped in glitter, but I shall show some restraint. There are so many vintage ornaments, I am running out of containers, but I shall soldier on and find more places to display them. We are on a budget this year, so I gathered some ever greenery from outside and spray painted some gathered twigs gold.

Tree in progress...

My husband insists the tree is filled with ornaments, but really, there are PLENTY of branches yet to adorn. As you can tell, the dogs completely agree with me.

Hmmm...not sure we like this holiday decorating hub bub...we will get back to you after this nap.

The Retrofabulous vintage inspired canvas above was a project for iLoveToCreate a few years back. I collect vintage post cards and this spectacular image is from the turn of the last century. I just plopped it into Photoshop and sized it to fit the canvas. Then I attached some broken rhinestone jewelry, vintage lace and vintage buttons. You can get the instructions to make something similar here, you can find vintage postcards on eBay. If you don't need them to be perfect, you can get them for a song. I just fix any flaws in Photoshop. Oh and I am a big, big fan of mini canvases!

Until next time...craft on with your bad selves!

Cheers,
Madge

Crafty Blogger's Link Wrap Up!

Here's your weekly dose of crafty inspiration from the Crafty Blogger's Gang.  We've got glue guns and we're not afraid to use them!


iLoveToCreate Teen Crafts: Technicolor Turkey Card

Technicolor Turkey Card Copyright 2011 Avalon Potter for iLoveToCreate

iLoveToCreate Teen Crafts
Technicolor Turkey Card
Copyright Avalon Potter

I needed to make a thank you card for my Mom Mom and with Thanksgiving coming up, a Turkey seemed like a great idea!  My mom helped with the pattern and I picked out the papers, embellishments and colors and put it all together.  It's really simple to make a card like this, one big circle, one oval, rounded and pointed feathers, a funky hat, half circles for wings and bird feet are all stacked together using Aleene's Dry Adhesives.  We added a few 3D embellishments for fun. It's easy to make this project your own with a few changes, have fun with it!


Materials
Coordinated patterned scrapbook papers
Cardstock in light and dark pink and light and darker green
3D embellishments (googly eyes, spoon and fork charms, paillette and Tulip Beads in a Bottle Studs and Crystals)
Aleene's Tacky Sticker Sheets
Aleene's Tacky Dot Roll
Aleene's Tacky Line Roll

Tools
Scissors
Paper cutter
Bone folder
1.5" circle punch

1. Fold an 8.5x11" sheet of dark pink cardstock in half and crease edge with a bone folder. This is the base card.

2. Use circle punch to create light pink card stock turkey head.

3. Fold any paper in half and cut oval body shape, trace this on light pink card stock and cut out.

4. Cut feet out of darker green card stock.

5. Cut hat shape out of patterned paper and make a hat band out of light green card stock.

6. Cut the feathers, there are rounded and pointy feathers, the round go on top and the pointy in between them. Cut beak and wings out of light green card stock and gobbler out of patterned paper. Cut a bib out of patterned paper to fit center of body.

7. Attach the beak and gobbler on face using sticker sheet. Add googly eyes with Tacky Dots. Attach hat to top of head adding hat band with sticker sheet and add embellishments with tacky dots.

8. Attach the bib to the front of the turkey using sticker sheet. Attach wings on either side of bird followed by the head at the top with sticker sheet.

8. Attach feet with sticker sheet. Use Tacky Line Roll to attach silverware.

9. Build feathers around the back of the card using the sticker sheet to attach. Layer the pointy feathers in between the rounded. Attach the turkey to the base card using the sticker sheet.

DIY Beaded Headband!

A cheap plastic headband makes a perfect base for beaded headbands and tiaras. You can score these at any drug store. The great thing about this project is that it's absurdly simple, endlessly versatile and makes a one size fits all, fabulous giftable! All you need is a plastic headband, 20 gauge soft wire and an array of 3-4mm beads and you're ready to roll!  (I used hematite and Czech glass with an a/b finish.)  Start by wrapping the wire around the bottom of the 'teeth' in the headband.  Tuck the wire under with chain nose pliers.  Thread enough beads to cover the exposed part of the headband, wrap tightly and continue making your way around using the teeth to secure the wires.  The layered flower is thick craft felt I die cut my Sizzix Big Shot machine. I wired it on using a 22 gauge wire which I strung with beads and looped in the center, threaded into two holes I punched in the all three layers of felt, then wrapped around the headband base, you could just as easily attach a store bought flower here.

This same technique can be used on all sorts of items, I've seen silverware, tea pot handles, barrettes...

Cheers,
Madge

Retrofabulous Christmas Craftabration: Upcycled Holiday Cards

Retrofabulous Upcycled Holiday Cards Copyright 2011 Margot Potter for iLoveToCreate

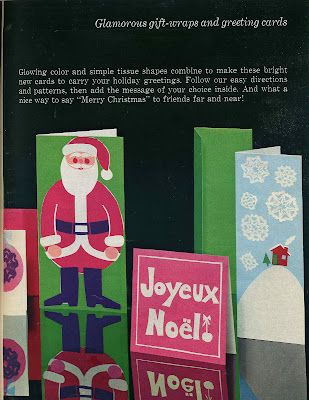
Christmas Helps 1966-Family Circle
From Christmas Helps 1966-Family Circle

From Christmas Helps 1966-Family Circle
iLoveToCreate Retrofabulous Crafts
Upcycled Holiday Cards
Copyright 2011 Margot Potter 

Today's Retrofabulous Christmas Craft is a simply delightful upcycled card project.  In the original project from Christmas Helps 1966-Family Circle they used tissue paper, but I love using recycled magazine images in my work.  Can you guess what the images are on the Christmas balls and candles?  The trees use some old scrapbook paper scraps and text from a magazine.  You could easily cut up last year's Christmas cards, wrapping paper, ad flyers...it's truly endless!  Aleene's new paper friendly glues make quick work of these cards.  Have you seen how expensive cards are?!  This saves money and gives a personalized touch to your holiday greetings. 


Materials
Cardstock in holiday colors
Recycled magazines
Aleene's Tacky Sticker Sheets
Aleene's Tacky Line Roll
Aleene's Tacky Dot Roll
Tulip Glam-it-up Crystals
Paillettes
Wired tinsel
Fine marker

Tools
Bone folder
Scissors
Paper cutter
Circle punches in graduated sizes

1. Select papers for card. Cut card to size on paper cutter. Fold paper in half and use bone folder to make a sharp edge on card.

2. Cut images into shapes (I used graduated circle punches to make the Christmas balls.)

3. Adhere large images to card using Aleene's sticker sheets.

4. Use Aleene's Tacky Line Roll for wired tinsel and Aleene's Tacky Dot Roll for small embellishments.  I used a fine tip marker to draw the thread on the Christmas balls.

Upcycled Holiday Card Detail

Upcycled Holiday Cards Detail

Crafty Bloggers Weekly Round Up!

Trying something new for this week's Crafty Blogger Round Up, a little visual appeal! Tune in tomorrow, I made some really cute Retrofabulous upcycled cards for iLoveToCreate!

xoxo,
Madge

Retrofabulous Upcycled Holiday Place Setting!

Scrabble Place Markers Copyright Margot Potter

Thanksgiving is next week and we're always looking for fresh and fun ways to dress up the table!  I came up with this idea a few years back for Crafts 'n Things Magazine.  I collect ephemera and have lots of old game parts I mine endlessly for craft projects.  This was so easy to do and it looks really lovely on the table.  You can score old Scrabble games at thrift stores, yard sales, flea markets or on eBay.  I used SWAROVSKI ELEMENTS crystal ab flat backs here with a two part epoxy.  (Be careful what kind of glue you use with crystals as some will cloud the finishes.  I recommend a two part epoxy.) The silver was applied with a metal leaf pen, Krylon makes them. They're also great for edging shrink plastic, chip board, grungeboard and wooden mixed media pendants, LOVE!

xoxo
Madge

Have Yourself a Twilight Little Christmas-Bella and Edward Silhouette

Twilight Inspired Silhouette Pendant Copyright Margot Potter

I am pausing for a moment from the Retrofabulosity to re-share a holiday project from a couple of years back that is perfectly suited to this holiday season. With the new Twilight film coming out, this could be a perfect gift for a Twilight fan on your gift list. The image was made from a real silhouette of Edward and Bella.  You can opt to make this as an ornament, or size it smaller to make a pendant.

The silhouette is ready for download on the old post along with detailed step by step instructions. Enjoy!

Cheers,
Madge

I Did It!

Okay I confess, this is only part of the insanity, there is more in the garage...
E...gads.

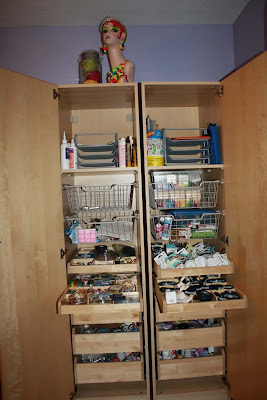
A while ago I made vague promises about becoming one of those 'fancy studio people.'  I have been climbing over boxes and living in a state of denial ever since.  That is until this past weekend when I finally did something about it.  Yes, at least until I manage to mess it up again, and I will, I am a fancy studio person.

Insert trumpet flourish...here!

Ah, order!
Yes, there was a desk under there!
Take that, tiny little bits and pieces!
Okay so the desk is not so fabulous, but it's clutter free at least!
Beads managed.
Wire, adhesives, paints...and more space to fill with that stuff in the garage I mentioned earlier!

Retrofabulous Christmas Craftabration: Tinsel Kickin' Wreath


It's another dose of retrofabulosity inspired by McCall's Christmas circa 1968.  This is one of my favorites, it's really easy and fun to make.  I replaced the cut tin with softer and fluffier tinsel garland and added vintage ornaments from my personal collection along with some handcrafted pretty pink accents.  For the directions follow this link!  Stay tuned, more retrofabulosity to come!  Just dug out more mags yesterday.  Tune in tomorrow when I reveal my newly decked out studio, it was a pleasure not having to climb over boxes on the way to the computer this morning!

Love
Madge

Crafty Blogger's Round Up

 
I'm really excited to be back with the fab folks from the Crafty Bloggers group! Tune in every Saturday for a link wrap up chock full of inspiration for your crafty edification. 

xoxo,
Madge

Craftside-A behind-the-scenes peek at a crafty world This week at Craftside there is a tutorial on how to cut and lay a recycled end grain wood floor, a tip on how to cut tissue paper easier, a recipe for vegan white and milk chocolate and some wild crochet designs.

Crafty Princess Diaries Tammy shares a hand-made gift that someone else makes that is perfect for pet lovers.

Eileen - The Artful Crafter How to make a tubular wine bottle tote from a cardboard mailing tube.

Stefanie Girard's Sweater Surgery How to crochet a cute striped Christmas tree skirt

Mixed Media Artist Cyndi decides to make a companion piece to the hand painted and stitched silk quilt she just finished. Time to get painting again!

Margot Potter The Impatient Crafter Retrofabulous Christmas Craftabration Returns to The Impatient Crafter Blog! Madge makes a retro inspired upcycled gift box!

Craft. You. An inspiring interview with Crafty Mastermind Mark Montano!

Create Your Style with SWAROVSKI ELEMENTS Tucson Show 2012

Hey Howdy Hey, Sparklenistas!

Super excited to share the news that I'll be teaching two classes and hosting an all day design event for the fab folks from Create Your Style with SWAROVSKI ELEMENTS at their Tucson Show! If you're going to Tucson, check out the awesome array of classes they are offering. I'll be teaching two classes: How To Write and Publish a Craft Book and Getting Published (this is focused on magazine work.)

 How to Write and Publish a Jewelry Making Book with Margot Potter

 How to Get Published (in Magazines) with Margot Potter

Creativity and Design Challenge All Day Design Event with Margot Potter

But if you want a real challenge, join me for the all day design challenge event! We will provide you with materials and images for you to design an 'inspiration board', from there you'll create a concept and a finished design. There will be challenges, there will be sparkle, there will be tears, there will be drama and three talented designers will emerge winners! Come and play with us!

Here's a link to the 411 on the show.  

In other news, I'm back on the Beadalon Design Team!  SO EXCITED, I just can't hide it!  My little engine is building up steam...huzzah!

Sparklingly yours,
Madge

Retrofabulous Christmas Craftabration: Perky Pixie Ornaments!

Madge's Inspiration: McCall's Christmas Pixies


Madge's Perky Pixie

Oh yes indeedy do, boys and girls, it's all kinds of kitschy craftacular here at The Impatient Crafter blog this holiday season!  Today's Blast from the Past is one of my favorite holiday projects! Follow this link for instructions on how to make your very own retrofabulous Perky Pixie.  You could make a slightly smaller version into jewelry...I'm just sayin'!

Love
Madge

Avalon Potter for iLoveToCreate Teen Crafts: Onesie, Twosie

Onesie, Twosie Copyright 2011 Avalon and Margot Potter for iLoveToCreate

iLoveToCreate Teen Crafts: Onesie, Twosie
Avalon Potter
"Teen crafted, mom approved."

I was asked to decorate a onesie for an upcoming Baby Shower.  I knew right away I wanted to use a Tulip Iron On transfer and the phrase: "Little Love Muffin."  I know lots of teens have babies in their families and it's really easy and fun to make onesies using products from iLoveToCreate.  My mom was so impressed with my design, she made one too!


Materials
Washed cotton baby onesie
Tulip Fabric Markers
Tulip Iron on Transfers
Tulip Letter Stencils
Small cardboard form to slide inside shirt while decorating

Tools
Tulip Mini Fashion Iron

1. Wash the onesie to remove the sizing. Slide a piece of thick cardboard into the onesie to protect the back from the inks. You can also use a book for this because onesies are so small!

2. Use an iron to attach applique to shirt. Allow to cool.

3. Use the fabric markers and the stencil to write your words.

4. Mom used the Tulip Beads in a Bottle paint to add dimension to her wings, halo and hand written words.

Retrofabulous Christmas Craftabration: Upcycled Holiday Gift Boxes

Retrofabulous Upcycled Holiday Gift Box Copyright Margot Potter for iLoveToCreate 2011
Inspired By:

Images Copyright McCall's Magazine

(Anyone who knows me knows that I love all things retro. I have been thrifting since I was 19 and have a rather large collection of old paper. I have post cards and magazines dating back to the Victorian age and all the way up to the 1970s. I love old fonts, ads, images...it is all intriguing and wonderful to me. I did a series on my blog called Retrofabulous Craftabration a couple of years ago and now I’m teaming back up with the folks from iLovetoCreate to bring you a dose of retrofabulosity on the first and third Monday of every month.)

Retrofabulous Craftabration: Upcycled Holiday Gift Box
Margot Potter for iLovetoCreate

This project was inspired by a 1968 McCall’s Christmas magazine. They took old shoe boxes and upcycled them into festive holiday gift packages. How funny are these?! Also, whatever happened to that awesome thick yarn?!  It totally makes me want to make pom poms and hair bows!  Note to self: get awesome super thick yarn....stat.

To update this idea, I used some scrapbook paper, sparkly trim, a sentiment cut from a vintage greeting card, odds and ends from the studio and a favorite vintage pic from a 1964 calendar combined with the new Aleene’s paper craft friendly dry adhesive glues to create a kitschy upcycled package. This is a great way to reuse old boxes and to give a gift a fellow crafter can use for festive storage in their studio. You can use wrapping paper, fabric, scrapbook paper, newspaper, magazines, catalogs...add paints and dimensional embellishments... I’d love to see what you do with this idea, if you make a retrofabulous inspired upcycled package leave a link in the comments here!

Materials
Image (I scanned and sized mine)
Old sturdy box
Paper or fabric (I used scrapbook paper)
Trims
Embellishments (buttons, beads, old broken jewelry bits...)
Aleene’s Tacky Line Rolls
Aleene’s Tacky Dot Singles
Aleene’s Quick Dry Tacky Glue
Aleene’s Tacky Double Stick Sheets
Tulip Beads in a Bottle Glitter Paint (I used pink to coordinate with my papers)
Double sided craft tape

Tools
Scissors
Pencil
Decorative edge punch (optional)

1. Select a box-it should be sturdy enough to be used as a gift package and later as storage. Begin by covering the box with paper or fabric. I traced the box panels on paper, cut paper and attached the sheets to each panel using Aleene’s Double Stick Tacky Sheet. Just attach sheet to back of paper, cut to fit and then peel backing off and adhere paper to panel on box. I covered the entire box.


2. To hide the corner edges where papers meet, use decorative trimp. I ran double sided tape along each edge, and attached the trim folding it along both sides of the edge.

3. Add an extra layer of trim on each side of the edges. Measure trim to fit and cut. Place along the Aleene’s Tacky Line and cut glue to fit. Peel up trim and attach to box. You will need to put trim along all of the edges on all five exposed panels. I used two styles of trim, one for the side panels and another for the top panel.

4. If you want to add more paper embellishments to the top of the box, attach them using the Aleene’s Double Stick Tacky sheets. I added an image and also a decorative trim using coordinating paper and an edge punch. This also gave me a place to tuck a sentiment that can be removed later.

5. I had some wooden scrapbook embellishments that coordinated with the project and worked perfectly to conceal the four corners where the trim met on the top of the box. You can use buttons, old jewelry components, scrapbook embellishments, bows...whatever you like. Just one Aleene’s Tacky Dot Single does the trick.

6. I like sparkle, so I used a thin schmearing of Tulip Beads in a Bottle in pink on the background paper on the top of my box. You could also use Collage Pauge in Sparkly to get the same effect. While it is drying the paper will bubble up a little, do not freak out. It will flatten again, I promise!