A Bevy of Books and DVDs and Big Changes at Studio Madge!

Hey Howdy Hey!

Behind the scenes here at Studio Madge, there are some pretty big things happening. I can't talk about them yet, but it's been a whirlwind. These things are going to have a huge impact on my career, this blog, my viral marketing efforts, every aspect of my life. There are endless little details to be worked out and clarified and there are huge decisions to be made and quite frankly, it's always unsettling to stand in the face of big changes. I'm just taking it one moment at a time and trying not to let it overwhelm me.

Life just keeps moving forward and we have to either jump on the train or get run over!

I have been so busy this summer that I've not had a lot of time for book reviews. Please forgive me if you've sent me a book and I've not yet posted about it. Since my work load is about to increase ten fold, I'm going to do some book recommendations today. Call them mini-reviews, if you will.

First congrats to Gina Rath for winning the final free copy of my book Bead Chic. Please forward your snail mail to margot@margotpotter.com. I've been buried, but I promise to get all of the prize copies out a.s.a.p.! Hang in there! If you have the book and you like it, please consider leaving a little review for me on Amazon. The more good reviews it gets, the better it's going to sell and my kid really needs some back to school clothes!

Also one of my Bead Chic contributors, Angela Bannatyne of Avenue A is giving away a copy of Bead Chic AND the gorgeous necklace she created for the book. Go to her blog and leave a comment to win.


If you've not met the force of nature that is Shannon Okey a.k.a. Knitgrrl, you've really been missing out. She's not only a smart cookie, a best selling author and one of the top experts in the knitting community, but she's a terrific writer and a superstar at self promotion. Even if you don't knit, her new book The Knitgrrl Guide to Professional Knitwear Design is overflowing with fabulous advice for building a career as a design expert through writing books, magazine submissions, direct sales and online marketing efforts. Shannon talks in frank detail about contracts, publishing and every aspect of what it takes to make your expertise into a full time career. I have a free copy of this book to give away today...and believe me when I tell you you'll love it. Get this book, Shannon knows of what she speaks. Trust me. Leave a comment to win and I'll announce a winner next week.

I DO NOT have 'free copies' of the remaining items, just reviews and links to places you can buy them! Believe me, they're all worth the price of admission. I simply can't part with them...that's how good they are!


I recently received two absolutely amazing DVDs from Interweave created by the uber talented Ronna Sarvas Weltman. These are master classes with a master artist and well worth adding to your craft library. Metalwork is a primer for shaping, texturing and antiquing wireworked jewelry and Mixed Media: How to Make Polymer Clay Beads shares how to condition, shape, cure and texture poly clay beads. Ronna includes information about color, trouble shooting common clay issues and shares a host of innovative techniques. Good stuff abounding in both of these DVDs.


I was also sent a fabulous book to peruse from the fine folks at Interweave Press by renowned author and jewelry designer Lisa Niven Kelly of Beaducation.com. Stamped Metal Jewelry is a must have for any jewelry maker who wants to explore metal working. You'll learn how to stamp, texture, form, punch and rivet metal into designer style jewelry. Lisa shows you how to Link
oxidize, polish, cut, saw and dap metal blanks and sheet metal through gorgeous projects that will ignite your creative imagination. There's even a bonus DVD with the book! If you've been itching to try something new, this book is just what the bead doctor ordered.

Oh and one more thing! My aunt Shane Devine has a song on the rotation at Women of Substance radio! She's hoping to get 'You're a Part of Me' into the top ten, so if you can pop by and give her a thumbs up that would be fabulous! Kudos, Shane!

Love,
Madge

Free Jewelry Making Project #4 from Bead Chic


Steel City Earrings from Bead Chic by Margot Potter ALL RIGHTS RESERVED

I can't believe this is my final free project from Bead Chic! Where does the time go? This one is a little more complex and a little bit funky. You can refine it or make it funkier as you choose. I love the primitive look of annealed iron wire, you can buy it at hardware stores and some places online. It's a little rusty, so you need to clean it before you wear it!

I enjoy bending and shaping wire and the nice thing about a very stiff wire like iron is that it maintains its shape without too much need for work hardening, yet it takes to being hammered beautifully. These earrings are made from three artfully bent wire segments that swing and sway separately from one another. I added freshwater pearls suspended in some organic wire wrapping with a thin gauge of silver plated wire. These, to me, have a Sundance Catalog appeal.

In fact...when I pitched this book here is how I summed it up:

Banana Republic and Sundance Catalog have a latte at Starbucks.

Chic, modern, upscale with just a little edge!

The variation for this project is created by the lovely Ms. Barbe Saint-John. You'll have to buy the book to get the step by step photos and to see Barbe's gorgeous earrings. You can also leave a comment here to win the last free signed copy of the book!

xoxo
Madge

Bead Chic
Steel City Earrings
Chapter One
Scale


Materials
2 8mm faceted cream freshwater pearls
24 gauge silver plated wire
20 gauge annealed iron wire
Gun metal French clips

Tools
Chasing hammer
Mini anvil
Large round dowel (I used a large marker)
Small dowel (I used a metal end of a rat tail comb)
Memory wire shears
Round nose pliers
Chain nose pliers
Wire cutters

Tip: Play with the wire to get a feel for it, different wires have different levels of malleability. These do not have to be perfect...so don’t sweat it if they aren’t!

1. Cut a 3” segment of steel wire using your memory wire shears.

2. Bend the center around a large marker.

3. Hammer the ‘u’ section flat using the flat end of your chasing hammer.

4. Cut a 1 2/8” section of wire and use the tip of your round nose pliers to create a very small loop in both ends.

5. Cut a 1 ¼” section of wire and bend it over the metal end of a rat tail comb.

6. Use your round nose pliers to create a loop in both wire ends.

7. Wrap a 24 gauge wire tightly to one side of the top section of your ‘u’ shaped component as in photo moving the wire down the core.

8. Wrap wire around core in a free form manner.

9. Thread a pearl on end of wire.

10. Thread wire around opposite side tightly and wrap remaining wire moving up the core in a freeform manner as before.

11. Cut off excess wire and use chain nose pliers to tuck your wire tails in.

12. Connect your segments together as follows: Attach the ‘v’ shaped component to the loops on the end of your bar component. Attach the ‘u’ shaped component to the bar. The loops should all face backwards so the components can swing freely when worn.

13. Attach your ear wires to the top of each ‘v’ section.

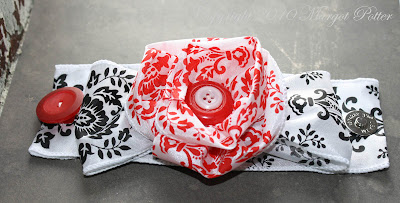
ILoveToCreate Teen Crafts: Flower Child Headband

ILoveToCreate Teen Crafts
Flower Child Headband
Copyright Margot Potter
"Mom crafted, teen approved."

I bought this exquisite Alexander Henry fabric to fashion curtains for my kitchen two years ago. My first attempt was a painful reminder of the old adage "Measure Twice, Cut Once." I adore vintage inspired fabrics and the colors in this are fantastic. I had some scraps left over and a sewn hem from the curtains. This idea popped into my head while I pondered some stretchy headbands I purchased a while back. I've shown how to create these fabric flowers before, in fact at the end of this post are several fabric flower projects I've created for ILoveToCreate.

This is so easy and fun and this headband can either be worn in a Flower Child style or as a traditional headband. Either way, this is the kind if accessory a stylish teen will adore.

Materials
Aleene's Fabric Fusion Glue
Large Floral Print Fabric
Coordinating craft felt
Stretchy headband
Thread

Tools
Sewing needle
Paintbrush

1. Select a flower to feature as the focal of the design. Cut it out, leaving fabric around it in a circle or oval shape.


2. Place fabric on felt and cut the felt just a little bit wider than the fabric.


3. Use a paintbrush and apply a thin layer of Aleene's Fabric Fusion glue on the back of the fabric. Press fabric on felt smoothing gently with your hands. Allow to dry.

4. I had a doubled up and sewn fabric section, but you can just double some fabric over, iron and create your fabric flower. I have a tutorial for this here and here.

5. Once felt has dried, cut felt edge off of flower to get a smooth edge.

6. Sew the fabric flower to the headband.

6. Sew the center of the felt backed flower and a black bead into the center of the fabric flower, the thread should go through to the headband so it's nice and securely attached.


How to Write and Publish a Craft Book-Part Six


You may have wondered what happened to my How To Write and Publish a Craft Book series. Well, I've been a little busy writing a craft book that will be published next spring! I had two months to create 30 projects and 15 variations, write the instructions and the romance copy, write the tools and materials front matter, plan the techniques section, write an intro, bio, dedication and thank you section...and prepare for a week long step by step photo shoot. That's not a lot of time, really. I've had six months or more on some of my past books. Since this book is a little more complex than my more 'impatient' titles, the projects took more time and more effort to conceive and create. The task was daunting and thankfully I rose to the occasion. Ya gotta love when that happens!

When you're working on a craft book, you have to be willing to dive in and make glorious messes. A lot of wire ended up in snargled bundles under my desk, beads were broken, head pins were mangled and I rejected many designs that just didn't quite have what it takes to be 'book worthy.' There is a lot of frustration followed by an occasional moment of Zen and you have to be able to turn off your inner critic and take a few risks. If your book is just like every other book on the subject, how on earth will it sell? It's important as you're working on the text to remember that a distinct voice reflects your distinct personality and that the reader will feel welcome to stick around and explore if you aren't lecturing them. No one, really, likes to be lectured. No one, really, enjoys reading dry and boring instructions. Trust me.

Also it's key that you be aware of trend and try as best as you can to look forward and stay relevant. Things are shifting so much faster these days and there is so much free information on the internet the consumer has become far more savvy and discerning. If your book is filled with stale ideas and out of date designs, it's not going to sell. I get all of the major fashion magazines, I look at what's happening in the craft and jewelry blog world, read the jewelry making magazines and I check out the sites where people are selling their jewelry. What seems to be trending and what seems to be on the way out? How can you take the trends into a new direction? Can you predict, based on Haute Couture and street savvy design where things are heading and can you interpret that in your work? If you can do that, your book will stand out on the shelf.

I've still got a little more writing to do and some instructions to rework, but for the most part, I'm finished and it feels good. Writing a book is a bit like having a baby, except having had one without any anesthesia I can attest that having an actual baby is really, really hard while writing a craft book is only really hard. Both have tremendous rewards and both will eventually leave you and make their way in the world. The best you can do is to prepare them for success. That means you need to look at every aspect of your book with a critical eye and keep fine tuning it until you feel it's ready. Trust your editors, share it with others whom you trust for some input and ultimately, believe in yourself and your vision and do what feels right.

And once your book is published, don't let the nasty trolls who leave crappy reviews on Amazon bother you, until I see THEIR vastly superior and sanctimonious craft book published, I take their nastiness with a grain of salt. Those who can, do. Those who can't, become critics.

Love and Crafty Kisses
Madge

Free Jewelry Making Project #3 from Bead Chic by Margot Potter


Did you know how easy it is to create your own findings? Once you master that skill, you'll find it difficult to buy them ready made! This project from my new book Bead Chic shows you how to create some longer bent and curved ear wires. You can opt to use base metal instead of sterling, but definitely use a 20 gauge wire made from stainless or another more sturdy metal and make sure you sand or use a wire rounder on the ends. I used a rat tail comb to create the sharp bend...I'm of the mind that you use what you have at hand!

I called this design 'Effortless Elegance' because it's just a few lovely beads and an artfully bent wire. This is from the chapter on Pattern and the variation is a little more complex with some hammering of the front part of the ear wire and some simple wire wrapping on a QuickLinks component. You could wrap beads on the front part of the ear wire...or add coiled wire...or add a bead or two...see how this keeps shifting if you make small changes? That's what this book is all about! You'll need to buy the book to get the step by step photos.

If you leave a comment here, I will select one of you to win a signed copy of the new book and a bonus swag sample. I'll announce the winner next Saturday August 28th.

Good luck!

Cheers,
Madge

Effortless Elegance Earrings Copyright Margot Potter 2009

Effortless Elegance Earrings
Bead Chic
Copyright Margot Potter ALL RIGHTS RESERVED

Materials
2 12x17m black onyx polished tear drop beads
6 3mm red coral beads
6 24 gauge sterling head pins
2 ball tip sterling head pins
20 gauge sterling wire

Tools
Round nose pliers
Chain nose pliers
Thin metal dowel (I used metal end of a rattail comb)

1. Cut off two 3” segments of wire.

2. Bend wire over a thin dowel to create a crease or point, this should be not quite in the center of the wire and in the same spot on both wires.

3. Gently round both wire tails into a matching curve.

4. Sand ends of wire.

5. Bend a loop in one end of wire using round nose pliers.

6. Create wrapped dangles using ball tip head pins and onyx beads. Repeat for coral beads using regular head pins.

7. Attach beads to loop at end of ear wire onyx first followed by three coral beads. Use chain nose pliers to open and close loop.

ILoveToCreate Teen Crafts: Felty Good Pencil Toppers


ILoveToCreate Teen Crafts: Felty Good Pencil Toppers
Copyright Margot Potter

"Mom crafted, kid approved."


I can't believe it's almost back to school time around here! Avalon is excited to get her school supplies together. I love felt, and I always have a pile of felt scraps waiting to be used in projects. This pencil topper idea popped into my head and I'm really happy with how it turned out. Avalon squealed with delight when she saw these. You can, of course, make these uniquely yours using different colors, shapes and embellishments. Googly eyes are always fun! Aleene's Fast Grab Tacky Glue makes quick work of this project.

If you're knee deep in the dog days of summer and the choruses of "I'm bored" have driven you half mad, this is a great project to give your teens so they'll have something to do and something fun to take back to school..

Materials
Aleene's Fast Grab Tacky Glue
Various felt scraps in black, hot pink and white

Tools
Fabric scissors
Small disposable paint brush
Link
1. I cut two different length strips of felt for the base of the toppers. The black strip was 4.5"x1.5" and the black strip was 3 1/4"x 1 1/4" (remember these will be folded in half.) Cut out your shapes for the faces, arrange them on the felt strips to size and plan your designs.

2. Use a thin paintbrush to paint a strip of glue on the inside edges of the felt, fold over and allow to try. The center opening needs to be large enough to slide over a pencil top.


3. Use paintbrush to paint glue on the backside of your shapes and apply to felt. Fingers get sticky fast, so wash between embellishments to prevent fuzzy felt or glue splotches. Allow to dry.

Designerpalooza Week #5 Adirondack Chair Challenge


It's the final week of the Designerpalooza Kathy Peterson for The Cedar Store Design Challenge! This week's offering is from creative mastermind, spokesperson, designer, consultant and all around crafty guru Julianna Hudgins. She is, by far, one of the most brilliant and talented folks in the craft industry and her upbeat and positive take on everything she does is infectious in the best possible way.

Bio

Julianna Hudgins is a well-known mover, shaker and influencer in the creative crafting community. Adored by fans worldwide, she has built a loyal following through her regular television appearances on QVC craft and toy hours, TNN’s Aleene’s Creative Living, HGTV’s Carol Duvall Show, PBS Scrapbook Memories, DIY Scrapbooking, Discovery Channel’s Home Matter’s, Shop at Home TV, and the Home Shopping Network.

Julianna’s sincerity, compassion, and genuine enthusiasm for the creative arts has built a loyal viewing and shopping audience for many years. Julianna was selected by the Craft & Hobby Association to present the latest trends and techniques at the Japan Hobby show in Tokyo, has earned recognition as one of the “Top Eight Scrapbooking Authorities” by the DIY Network and has penned four insightful books on various aspects of crafting.

Known by friends and industry professionals as “Jewels”, Julianna is married to Rich and mother to Josh and her boxer dog, Billybob. She enjoys traveling, making jewelry, shopping and spending quality time with friends and family.

Julianna is giving away a FABULOUS prize so please go and leave a comment for a chance to win!

Check out this GORGEOUS chair and then don't forget to visit the blogs of the other participants!

Pat Sloan

Julie Fillo

Margot Potter

Kathy Cano-Murillo

Kathy Peterson

The Cedar Store

Free Mixed Media Jewelry Project: Shakespeare's Garden for Art Beads


Shakespeare's Garden Necklace by Margot Potter for Art Beads ALL RIGHTS RESERVED

View Two Shakespeare's Garden by Margot Potter for Art Beads ALL RIGHTS RESERVED

I received an email while I was in Cincy from the fine folks at Art Beads that a tutorial I'd created for them a while back is live on their site! The necklace above is called Shakespeare's Garden and it features beaded wire circles and stamped resin pendants in a whimsical and sculptural design. What I love most about this is that these circles have dimension, but also fluidity because the wire underneath is not stiff.

I've been playing with these beaded circles for several years and every time I think, we'll that's about all you can do with those, another idea pops into my head. I do love to explore a theme and the circle is such a powerful, archetypal and cross culturally relevant symbol. Endings and beginnings and the journeys we take come around and around and around. Each of us a point on the sacred hoop making our own unique way to the center of higher understanding and universal love. Even Einstein once postulated that if we stood staring into space and could see to the farthest reaches, we'd eventually see the back of our own heads. Round and round and round she goes...

Powerful stuff, that circle. And as for Shakespeare, I've had the pleasure and the privilege of playing some of his greatest female characters...including Viola from Twelfth Night.

If you follow this link, you can get the full tutorial with step by step photos for this design. Enjoy!

"O Mistress mine, where are you roaming?
O, stay and hear; your true love's coming,
That can sing both high and low:
Trip no further, pretty sweeting;
Journeys end in lovers meeting,
Every wise man's son doth know.
What is love? 'Tis not hereafter;
Present mirth hath present laughter;
What's to come is still unsure:
In delay there lies not plenty;
Then, come kiss me, sweet and twenty,
Youth's a stuff will not endure.
"
William Shakespeare-Twelfth Night

Love
Madge

Free Jewelry Project #2 from Bead Chic by Margot Potter


It's Week #2 of the four week bonus Free Projects from my new book Bead Chic! Here's the one from the Make Jewellery feature I showed you last week. You'll need to get the book for the step by step photos.

Enjoy!

Leave a comment for a chance to win a free signed copy of the book!

If you left a comment last week, stop in on Saturday to see if you won, I'll announce this week's winner next Saturday!

Cheers,
Madge

(Image copyright Margot Potter 2009)

Chaos in Pearls Necklace
Bead Chic
Chapter One: Scale
Copyright Margot Potter and North Light Books
ALL RIGHTS RESERVED

Crystal pearls, faceted plastic rounds and gun metal chains are clustered in a chaotic mass at the front of this daring, delightful and decidedly different necklace design. The less you map this one out, the better. You can opt to vary the chain lengths even more dramatically to give this an ‘haute couture’ design flavor.

Materials
13 8mm black plastic faceted rounds
14 12mm SWAROVSKI ELEMENTS cream pearls
39 1.5-3” lengths small gun metal curb chain
18.5” section gun metal oval rolo chain
27 gun metal head pins
1 large silver plated swivel lobster clasp
15 4mm gun metal jump rings

Tools
Round nose pliers
2 pairs chain nose pliers
Wire cutters

1. Cut 39 1.5-3” sections of small gun metal chain.

2. Create looped dangles for every pearl and faceted round.

3. Cut an 18.5” section of rolo chain. Attach a pearl to one end using a jump ring.

4. Attach the lobster clasp to the other end using a jump ring.

5. Starting on the 32nd link in your chain, attach a pearl, a faceted round and three varied lengths of small chain with a jump ring to the link.

6. Move down every link and continue attaching a pearl, a round and three varied lengths of chain on a jump ring. There are 13 pearl, round and chain combos.

ILoveToCreate Pink Splash 3-D Flower Bangle


ILovetoCreate Teen Crafts Pink Splash 3-D Flower Bangle
Copyright Margot Potter
“Mom crafted, kid approved.”

I designed a chain and bead necklace a couple of years ago featuring a similar hot pink die cut flower on it for a class proposal. At the time, this kind of look hadn’t hit mainstream fashion hard and I think it was just a skootch ahead of the curve. Flash forward to 2010 and dimensional floral accents are EVERYWHERE! I’ve re-imagined it attached to this pretty painted pink bangle design using fabric paints, fabric markers and Aleene’s Liquid Fusion glue. I think this is one of those perfect ‘Back-to-School’ accessories for the teen fashionista. It’s flirty and fun and girly and right in step with what’s happening in the fashion mags.

PLUS the flower spins around like a pinwheel, so it’s a kinetic design too! When those crystals get spinning, it’s really quite mesmerizing!

This requires using an electric drill, so a little assistance from mom or dad may be required. You could opt to do smaller flowers and have them circle the wrist, but I’m a big and bold kinda gal and so is Miss Avalon, my resident teen. Take this idea where you like, express your individuality! That’s what crafting and fashion is all about.

Materials
Grungeboard sheet swirls pattern
Tulip Soft Fabric Paint in azalea
Tulip Metallic Dimensional Fabric Paint in white
Tulip Metallic Dimensional Fabric Paint in metallic silver

DIY Bangles small wooden bangle
Inkadinkado lourish stamp
Aleene’s Liquid Fusion glue
Tulip Glam-It-Up™ crystals
Crystal bead for center
Pink or silver-plated head pin
Sizzix Bigz Flower Die

Tools
Tulip Glam-It-up™ tool
Sizzix Big Shot machine
Electric drill with 1/16” bit
Paintbrush
Foam brush or foam applicator
Flush cutters
Round nose pliers


1. Paint several layers of azalea paint on inside and outside of bangle. Allow to dry between layers.

2. Stamp flat oval areas with flourish stamp and white paint. Apply paint with a foam applicator or brush to surface of stamp. Allow to dry.

3. Mark center of one flat oval segment on bangle and drill.

4. Die cut flower out of Grungeboard using the Big Shot and the Bigz flower die.

5. Paint both sides of each layer of flower with azalea paint. Allow to dry.


6. Use foam applicator and flourish stamp to apply metallic silver paint to surface of flower layers. Allow to dry.

7. Use a thin paintbrush or your foam applicator to edge the flowers with the metallic paint. Allow to dry.

8. Glue flower layers together with Liquid Fusion. Allow glue to dry.

9. Use Tulip Glam-it-Up crystals and wand to apply crystals to edges of flower petals.

10. Thread head pin with flat side facing inside of bracelet through drilled hole, hole in center of flower and a crystal bead. Use round nose pliers to turn a loop and secure. (If the head pin head is too small, use a small button to secure it to the back of the bracelet.)

Designerpalooza Week #4 Adirondack Chair Challenge!


I can't believe it's week Four of the Kathy Peterson for The Cedar Store Adirondack Chair Designerpalooza Challenge! Where is the time going?!

This week we've got what I'm sure is going to be an absolutely craftacular design by the amazing Crafty Chica! Intriguing photo, isn' t it? You can click on it to visit Kathy Cano Murillo's blog and see the full design.

Kathy Cano-Murillo Bio: Kathy Cano-Murillo is a writer, artist, and craft product designer. She has sold her "Chicano Pop Art" crafts and products to hundreds of retailers including Bloomingdales, Target and Michaels. She has authored seven books including Crafty Chica's Guide to Artful Sewing and is the founder of www.CraftyChica.com, a wildly popular site crafty lifestyle site. She has a web series on LifetimeTV.com, has been profiled in The New York Times, USA Today, NPR and has an extensive Crafty Chica product line. Kathy's new novel entitled Waking Up in the Land of Glitter debuted in March. Kathy lives in Phoenix, AZ, with her husband, two kids and five Chihuahuas. Her motto for life is "Crafts, drama and glitter".

Don't forget to check out the blogs of the other designers in the challenge:

Margot Potter (of course)

The Cedar Store!

Pat Sloan

Julie Fillo

Julianna Hudgins

Kathy Cano-Murillo

Madge Goes Global

Copyright Make Jewellery Magazine and Margot Potter for North Light Books
ALL RIGHTS RESERVED (pardon the scan, this is an extra large magazine!)

Imagine my surprise and chagrin while leafing through Make Jewellery magazine from the UK and spotting a full page feature with a project from my new book Bead Chic! I did a double take, a Danny Thomas coffee spit take and let out a gleeful little giggle.

Okay really I just said, "Hmmm...that project looks familiar"...and let out a gleeful little giggle.

The rest was just what you might call, artful embellishment.

I'm a Leo, we like to decorate everything. Yay for international press! Yay for people who buy my new book, I heart you! Yay for my birthday month! Yay for exclamation points!

Yay for too many cups of coffee!

Love
Madge

Free Jewelry Making Project from Bead Chic Week #1


Click on image to view close up. Copyright Margot Potter for North Light Books ALL RIGHTS RESERVED

Leave a comment and I'll select TWO people to get signed copies of the book on next Thursday.

This is the first of four free projects I'll be sharing from my new book Bead Chic. For photo step by steps, you'll need to get a copy of the book. It's a really great book, trust me. There are 15 gorgeous variation projects from 13 well known designers in the craft and jewelry making industry and a lot of variety in terms of style and techniques. I give you a bit of everything, including stringing, exposed wire weaving, wire wrapping, metal stamping and hammering, making your own findings...but the focus of the book is on design. You'll explore how you take a design that inspires your creativity and make it your own through small changes in color, scale, pattern, texture, focal elements and foundations.

This is the project we did at my Beadalon make it and take its at CHA and it's very easy and satisfying. I don't know why, but to me, taking some wire and bending, coiling and hammering it into a pair of earrings never fails to blow my mind. It's just a copper wire, until you forge it into something fabulous. Like every project in the book, this is all about making it your own, so think about what you might change to make this project suit your design style.

Bead Chic
Curlicue Earrings
Chapter Three-Texture
Copyright Margot Potter

When coiling wire around a jump ring maker tool I pulled the coil off and gently tugged it apart and got these great little curlicues! They add just the right touch of whimsy to simple hammered copper earrings. You can take this idea so many places...so what are you waiting for?!

Materials
20 gauge copper Artistic Wire

Tools
Jump ring maker tool with ¼” dowel
Round nose pliers
Chain nose pliers
Wire cutters
Chasing hammer
Mini anvil or steel bench block
Bench block pad

(Tools and materials courtesy Beadalon)

1. Cut off a 3” segment of wire. Round over a large dowel or use fingers to create a hoop shape.

2. Create a small loop at one end of the wire.

3. Bend the other end up at a 90 degree angle.

4. Use rounded end of hammer on a mini anvil to add texture to both sides of your ear wires.

5. Adjust shape after hammering.

6. Wrap wire around a jump ring maker with a ¼” dowel.

7. Remove coil and gently pull apart.

8. Move down every four coils and cut off coiled segments.

9. Use round nose pliers to make a small loop in one end and a larger loop in the opposite end. Make fourteen coils.

10. Thread larger end of 7 looped wires on earring. (Be sure coils are all facing the same direction.) Repeat for second earring.

It's My One Year ILoveToCreate Teen Crafts Blogiversary!


Advertisement Copyright ILoveToCreate

As many of you know, this has been a crazy summer around Casa de Potter. Imagine my chagrin when I realized yesterday afternoon that I missed my one year Blogiversary with ILoveToCreate! It was July 16th last year when I posted my first teen craft project. Not to throw out a tired and overused cliche...okay I'm actually going to do that very thing...but time really flies!

Every week, my challenge is to come up with a project that is teen friendly and teen achievable. If it's too complicated or two 'grown up', it's not going to pass muster. Heck even saying pass muster isn't going to fly, teens have no clue what that means, and quite frankly neither do I. Let me search that...okay here! Trends are shifting constantly and I try my best to keep up with them. Silly Bandz were in and out of our schools here in literally one month. Who can keep up with that pace?! I try to combine a little retro sizzle with a modern twist, which is I suppose the trajectory of most of my work.

Luckily I have a fashion savvy teen here who advises me on the cool (or not too cool) factor of my ideas and contributes her own amazing projects to the mix when I need a helping hand. Ya gotta love that!

I've compiled a small smattering of my personal favorite projects here with links to the instructions for your edification, entertainment and enjoyment. If you go to this RSS feed, you can find all of my projects from the past year! These sometimes get lost in the shuffle of older posts and it's fun to take them out for another spin. I hope you enjoy and I look forward with breathless anticipation to sharing more Teen friendly craft ideas featuring the fabulous products for ILoveToCreate in the coming year.

Love
Madge

Madge's Top Eleven (I know, it's not ten, I like too many of them!) Favorite Teen Craft Projects from 2010...in no particular order!

CLICK ON IMAGES FOR INSTRUCTIONS!

Crafty Rock Star Necklace

Upcycled Denim Book Cover

As Time Goes By Necklace

La Tour d'Eiffel Tower Lamp

Mod Girl Chipboard Necklace

Pretty in Pink T-Shirt

Moulin Rouge Tiny Top Hat Headband

Snow Day Christmas Canvas

Halloween Hootenanny Invitation

Pretty in Peeps Necklace

Avalon's Awesome Sweet Dreams Throw Pillow