 ILoveToCreate Teen Crafts
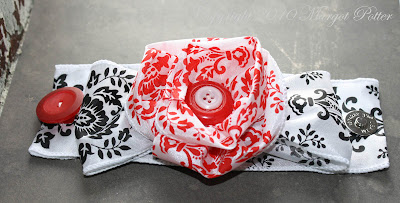
Flower Child Headband
Copyright Margot Potter
"Mom crafted, teen approved."
I bought this exquisite Alexander Henry fabric to fashion curtains for my kitchen two years ago. My first attempt was a painful reminder of the old adage "Measure Twice, Cut Once." I adore vintage inspired fabrics and the colors in this are fantastic. I had some scraps left over and a sewn hem from the curtains. This idea popped into my head while I pondered some stretchy headbands I purchased a while back. I've shown how to create these fabric flowers before, in fact at the end of this post are several fabric flower projects I've created for ILoveToCreate.
This is so easy and fun and this headband can either be worn in a Flower Child style or as a traditional headband. Either way, this is the kind if accessory a stylish teen will adore.
Materials
Aleene's Fabric Fusion Glue
Large Floral Print Fabric
Coordinating craft felt
Stretchy headband
Thread
Tools
Sewing needle
Paintbrush
1. Select a flower to feature as the focal of the design. Cut it out, leaving fabric around it in a circle or oval shape.

2. Place fabric on felt and cut the felt just a little bit wider than the fabric.

3. Use a paintbrush and apply a thin layer of Aleene's Fabric Fusion glue on the back of the fabric. Press fabric on felt smoothing gently with your hands. Allow to dry.
4. I had a doubled up and sewn fabric section, but you can just double some fabric over, iron and create your fabric flower. I have a tutorial for this here and here.
5. Once felt has dried, cut felt edge off of flower to get a smooth edge.
6. Sew the fabric flower to the headband.
6. Sew the center of the felt backed flower and a black bead into the center of the fabric flower, the thread should go through to the headband so it's nice and securely attached.


2 comments:
Margot: I LOVE the projects.Really fun and different.I have to have one of those heads too, LOL!Totally neat.I have your books and am always looking forward to new designs from you.Thanks for sharing.
This is super cute! I'm going to make this for my niece, and then a few for birthday gifts.Thanks for sharing tutorial.
Post a Comment