Showing posts with label aleene's glue. Show all posts

iLoveToCreate Retrofabulous Embellished Straw Tote


iLoveToCreate Retrofabulous Embellished Straw Tote
Margot Potter
'These ARE your grandmother's crafts...ya gotta problem with that? 
I didn't think so."

I'm afraid I have always had a serious soft spot for retro beachy looks.  Straw hats, straw totes, sundresses and seersucker rompers all make my little heart go pitter pat.  When I saw this plain straw tote in the dollar section at Target, I could not resist.  I knew immediately how I would DIY it into a retrofabulous summer bag!  Some felt, rick rack trim, pom-pom fringe and a judicious smattering of sparkly crystal accents take a plain bag from drab to fab and with the help of Aleene's Tacky Glues literally in seconds flat!  Now THAT's retrofabulous!

Materials
Plain straw tote
Craft felt in four colors
Coordinating pom pom fringe
Coordinating rick rack trim
Tulip Glam-it-up Crystals in Metallics
Aleene's Quick Dry Tacky Glue
Aleene's Tacky Glue Dots Singles 3/16"

Tools
Scissors
Ruler
Marker
Hand draw a simple 4"lx1.5"w fish shape, cut out to use as a template.


Place template on felt, trace and cut out four fish.
Cut rick rack and adhere to fish.


Glue fish and pom pom trim to tote with Aleene's Quick Dry Tacky Glue.  Finish one fish with metallic crystal accents using Aleene's Tacky Glue Dots.  Allow it all to dry, toss on your favorite vintage or vintage inspired sundress and sunglasses and ta da...go get 'em, you retrofabulous creature, you!

iLoveToCreate Teen Crafts: Peeps Stenciled Napkin with Jelly Bean Ring


iLoveToCreate Teen Crafts
Peeps Stenciled Napkin with Jelly Bean Ring
Margot Potter for Avalon Potter!

Avalon is on Spring Break and alas she caught a cold.  I stepped in to make this easy peasy stenciled napkin and beaded ring.  I used cardboard to make the stencil, but it's very important to wipe off the excess seepage under the stencil between each use on all four corners.  If you can find 'freezer paper' it makes a much cleaner and easier to use stencil.  We LOVE Peeps around here, this is my third Peeps themed Easter craft!  I had to buy a few boxes for research purposes, but keeping them from being devoured was quite a feat!

Step away from the Peeps.

Tulip Soft fabric paints and Crafty Chica glitter make quick and easy work of this design and the Glam-it-up metallic crystals are perfection for eyes.  Use Aleene's Jewelry Glue to secure the knot on your napkin rings.  This is a great way to get teens off of their cell phones and doing something fun.  Make some coordinating place mats and you'll have a delightfully cheerful Easter table.

Materials
Fabric Napkin
Thicker cardboard for stencil (thicker than a cereal box, but not too thick!)
Chunky colorful beads to make a 4" ring
Tulip Soft Paint in Petal Pink
Crafty Chica glitter in Frida's Fuchsia
Tulip Glam it Up metallic crystals in black (2 for each rabbit)
.8mm clear elastic cord (I used Elasticity)
Aleene's Turbo Tacky Glue 
Aleene's Metal and Jewelry Glue


Tools
Chain nose pliers
Paint pouncer
Craft knife
Fine tip marker


Wash napkins to remove sizing.  Iron to remove wrinkles.  I freehand drew the rabbit, it's very simple.  He should be about 2-3" tall.  You want him to fit the corner of your napkin.  If you need a guide, try using an actual Peep for reference, this also allows you a snack while waiting for the paint to dry.  Use a craft knife to carefully cut the shape out and create a stencil.  Use pink paint and paint pouncer to stencil on napkin corner.  You can also opt to add rabbits along the shorter edge of your napkin, that's up to you.  Hold your pouncer straight and hold stencil firmly to prevent paint bleed.  Be sure to wipe off stencil front and back after each use.


Before rabbits are dry, pour a small amount of glitter on each rabbit, shake around for full coverage and shake off excess. Do them one at a time! The paint should be tacky enough to grab the glitter.


Add eyes using Glam it Up crystals, I use a pair of chain nose pliers to pick up crystal, dip in glue and attach to rabbits. Allow rabbits to dry before using!


Thread beads on elastic cord. Tie ends and pull tightly. Make a double overhand knot and pull tightly. Add a dab of jewelry glue to your knot and let it dry overnight.

iLoveToCreate Retrofabulous Crafts: Spring Fever Magnet Card and Necklace


Retrofabulous Crafts
Spring Fever Magnet Card with Butterfly Necklace Set
Margot Potter for iLoveToCreate
“These are your grandmother’s crafts, ya gotta problem with that?”


In my stacks of vintage craft magazines there are lots of ads for ‘liquid embroidery’ which have intrigued me endlessly. I thought perhaps you could get the same effect with Tulip and Scribbles paints, and you can! Talk about a time saver! The first project is a super easy to make necklace using pre-cut  felt shapes embellished with metallic Glam-it-Up studs and connected with jump rings and the second project is a card with a fridge magnet attached. I thought these would make a perfect spring cheer gift for a friend. Yes, this necklace is big and bold, which is totally my style, you can use smaller shapes to make something a little less over the top! Nothing says vintage to me more than felt and these cut felt shapes had my name all over them. You could easily use a die cutting machine to achieve the same effect.

Spring Fever Necklace Set

Materials

6 Genevieve Gail Boho Collection for Michaels felt butterflies (4 for necklace and two matching colors for earrings)
54 Tulip Glam-it-Up Iron-On Studs
Aleene’s Turbo Tacky Glue
5 14mm silver tone jump rings
2 10mm silver tone jump rings
Silver tone swivel lobster clasp
2 silver tone ear wires

Tools
2 pairs chain nose pliers
Plastic or cardboard for glue

1. Place a blob of glue on plastic or cardboard.


2. Use chain nose pliers to pick up studs, dip into glue and place on butterfly. Gently press down on the crystal to ensure it is adhered. I placed 12 on each butterfly in a coordinating color. See photo for placement.

3. Allow studs to dry completely.

4. Use two pairs of chain nose pliers to open and close your jump rings with tension. Here is a quick video tutorial on how to do this properly.

5. Add the smaller jump rings to the outer wings on the two end butterflies. Add the clasp to the jump ring on one end. Hang your earrings so you have a left and right earring, using larger jump rings connected to ear wires.


Card:
Materials
White pre-made card
Anna Griffen for K and Company Carmen Collection paper
Felt shapes in vibrant colors (Genevieve Gall Boho Collection) OR die cut your own out of felt sheets (2 butterflies, one cut out flower and one solid flower)
Tulip Slick 3-D Fashion Paint in deep turquoise
Tulip Beads in a Bottle in soft yellow
Scribbles 3-D Paint Pen in kelly green
Aleene’s Turbo Tacky Glue
Aleene’s Tacky Dot Runner
Aleene's Magnetic Tacky Dots

Tools
Fiskars paper cutter
Fiskars edge punch daisy

1. Cut patterned paper to fit front of card. Use paper edge punch to create daisy cut outs.

2. Adhere paper to front of card with glue dot runner.


3. Use paints to create dots and faux stitches on edges of felt shapes. Allow to dry!

4. Stack felt shapes and glue together. I glued the edges of the flowers back to back and glued the center of the butterflies together and to the card. The butterflies are slightly askew to show the color beneath. Place something heavy on top and allow to dry overnight.

5. Attach Tacky Glue magnet to back of felt.

6. Attach felt to front of card using glue dots.

ILoveToCreate Teen Crafts: Joyful Christmas Ornament


(Note from Mom: Avalon does it again! Love this sparkly glass ornament using Tulip Fashion glitter and Aleene's Tacky Glue Spray! Check out her latest teen craft project for ILoveToCreate. Am I proud? Does Santa like cookies?!

Uh, yes, yes he does.)

ILovetoCreate: Joyful Christmas Ornament

Avalon Potter
"Teen created, Mom approved."

I thought I would squeeze in one more holiday project because it is one of my favorite seasons. A few years ago my mom took a clear glass Christmas ornament and put crystals inside making a snow globe for your tree. It was one of my favorite projects she ever made, so I thought why not adapt her old project into something new! My project is a clear ornament that you spray wit Aleene's Tacky Spray Glue and coat the inside with Crafty Chica glitter! I enjoyed making these as gifts for my little cousins because it is fun, easy, and you can personalize each ball with different colors and tag to make it special for the person you give it to.

Materials
Clear ornament with opening top (preferably plastic in case of accident)
Aleene’s Fast Grab Tacky Spray
Tulip Fashion Glitter (green and red or colors of choice)
Colored paper to match glitter
White printer paper
Paper to make funnel
Aleene’s Original Tacky Glue Stick
Ribbon to match color of ball

Tools
Printer
Hole punch
Scissors

Instructions

1. Gather your materials.


2. Open up your ornament and lightly coat the inside with the Aleene’s Fast Grab Tacky Spray.

3. Make a funnel with a piece of paper and insert the bottom into the opening of the ball.

4. Pour a sufficient amount of the color(s) of glitter you choose into the ball. Feel free to mix colors or choose different colors then I used.


5. Close the ornaments top and shake until the ball is completely coated with sparkles. Shake the excess sparkles out of the ball.

6. Using a font you like print out in large letters the word or name you want as the tag. Use a similar color as the one you used in the ball. If you used two or more colors chose one for the font and another for the colored paper behind it.

7. Cut out the word and cut out your colored sheet of paper a slightly bigger into a rectangular card for the word to sit on.

8. Use your Aleene’s tacky glue stick to glue the word to the colored paper.

9. Punch a hole in the corner of the tag.

10. String some colored ribbon that matches the ball through the hole and tie a knot.

11. Tie onto the top of the ornament in a bow to complete the ornament.


ILoveToCreate Teen Crafts: Spooktacular Party Invitation


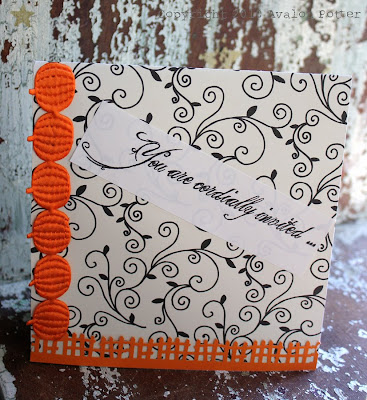
Spooktacular Party Invitation by Avalon Potter for ILoveToCreate Teen Crafts

Avalon has another fab teen craft for you this week. She made a gorgeous Halloween pop up party invitation that is perfect for the season. Pop up cards are surprisingly easy and fun to make and this design could easily be modified for any number of holidays and special occasions. Avalon loves working with paper to make dimensional projects and this one really rocks!

Spooktacular Party Invitation

Avalon Potter for ILoveToCreate
“Teen crafted, mom approved”

With September coming to an end I thought it was time to do a Halloween craft. At my age more of us go to parties then trick or treat so I decided to create a Halloween party invitation. This is fun to make and then a few weeks later you will have even more fun at your party! Making cards is simple, enjoyable, and a great way to kick off October.


Materials
Decorative black and white scrapbook paper
Orange cardstock
Halloween themed ribbon
Martha Stewart rickety fence edge punch (or other decorative Halloween themed edge punch)
Googly eyes
Aleene’s Tacky Glue
Aleene’s Tacky Glue Stick

Tools
Computer
Printer
Paper cutter
Craft Knife
Paper Scissors
Bone Folder

Step one: Once you have all of your materials cut your decorative scrapbook paper to 11 ¼” x53/8” inches. Fold your cut cardstock in half, the card fold is in the center of the 11 ¼” length. Make sure there is some of the decorative cardstock left over you will need it later. Use a bone folder to crease the card.

Step Two: Punch the fence from the orange cardstock. Make sure you have punched a little over 5 3/8 inches so if by accident you trim a little more paper off of your fence it won’t be a problem.

Step three: Cut the fence to fit the bottom edge of your card, attach with Aleene’s Tacky Glue stick. Any excess fence can be trimmed with your scissors.

Step four: Now get your ribbon, Aleene’s Tacky Glue, and scissors. Cut your ribbon so it won’t overlap your rickety fence, around 5 inches long. Apply it to your card by putting Aleenes tacky glue on the back then sticking on the left hand side of the card.

Step five: Take your orange cardstock and scissors. You will cut a piece of cardstock about 4 ½ inches long and 4 ¾ inches wide and then the paper about ¼ of an inch long on both sides so that you can use those flaps to attach the paper to the card


Step six: Now take the flap from and bend the ends into flaps. Bend a 1” fold and a 2.5” fold. This becomes the base for your pop up element. Use the glue stick to attach one flap on the bottom of the card and one on top so that when the card is open it makes a rectangle. See photo. Make sure when the card closes it bends with the card.

Step seven: Now take your remaining orange card stock and cut out a pumpkin to about 3 ¼”x4 ¼”. You could switch the pumpkin to a skull, spider, or black cat. This is the part where you can feel free to be creative.

Step eight: Use your craft knife to cut out a jack-o-lantern mouth with a small tooth at the top. You could also add a nose if you want to.

Step nine: Adhere the googly eyes to the pumpkin using Tacky Glue. Allow to dry.

Step ten: Using a fancy font (I used King and Queen font from dafont) write You are cordially invited... in 16 pt.. Then write the date, the address, the time span of the party and the R.S.V.P date in 8 pt.. Print. Don’t feel obligated to use black as the font color try red or maybe orange.

Step eleven: Use your paper cutter to cut out the printed material. The larger front element is 4.5”x1.25”. The invitation information is 3”x2.5”. Use the glue stick and glue the invitation into the pumpkins mouth with the tooth overlapping at an angle. Glue the pumpkin onto the front of the pop out piece of paper you glued to the card in step six, the invitation should almost rest on the bottom of the card when fully opened.

Step twelve: Apply the greeting on the front of the card with your glue stick. Glue it on an angle to give it a creepy affect.

Step thirteen: Punch a second fence element using the decorative scrapbook paper. Glue this to the inside of the card at the bottom.

ILoveToCreate Patriotic Flip-Flops!


ILoveToCreate
Patriotic Flip-Flops
Copyright Margot Potter
"Mom crafted, kid approved."

Who doesn't like to feel patriotic without feeling like a dork? Teens, that's who! I'm a fan of seasonal accessories as long as you don't start too look like someone on The People of WalMart blog. It's a fine line, people. These festive flip-flops are the perfect combination of '4th of July festive' and 'fashionista friendly.' They can be modified to suit the rest of the summer months with a little color change, so don't feel like they're only good for one day. Though for me, being patriotic isn't a one day event. Your teens will have a blast making these. Avalon pounced on them before the glue was even dry. I guess I'll have to make my own pair before the holiday!


Materials
Rubber Flip-Flops (I got my classic pair at Target)
3/10" wide navy blue ribbon with white stitching
1/4" wide dark red rick rack trim
2" wooden craft stars
2 silver-plated head pins or 20 gauge silver-plated craft wire
Aleene's Liquid Fusion Glue
Aleene's Jewelry and Metal Glue
Tulip Fashion Graffiti Big Phat fabric marker blue
Crafty Chica Little Chica Paint Pack paint white
8492-L Dawn Hauser Star rubber stamp from Inkadinkado
Elasticity clear stretch elastic cord

Tools
Brayer
Round nose pliers
Flush cutters
Non stick craft sheet
Electric drill with 1/16" bit


1. Use fabric marker to color star top and sides blue. Allow to dry.


2. Use brayer or foam applicator to spread paint on a non-stick sheet or directly on surface of stamp. Test print. Stamp on the stars. Allow to dry.


3. Glue blue ribbon trim to center of flip flop straps, starting at the bottom of the strap, tucking the ribbon into the space at the bottom and working your way to the center. It doesn't have to be pretty, the stars will cover it.


4. Glue rick-rack trim to center of blue ribbon again starting at the bottom of each strap, tucking the ribbon in and working to the front. Allow to dry.

5. Drill a hole in the center of each star.

6. Wrap rick rack trim around three times to create a 1 3/4" ribbon shape. There should be two loops on each ribbon.


7. Make a large loop at the top of a head pin, thread the center of your ribbon into the loop and secure it with the chain nose pliers. Thread this into the center of the star.


8. Use round nose pliers to create a loop flush to the back of each star, cut off excess wire before looping. The wire should be approximately 1/4" long before you grasp it with your round nose pliers at the end and wrap it around the jaw creating a round loop. Make sure the loop is secured closed.

9. Thread a 2.5" segment of Elasticity into the loop at the back of the star and around the front end of one side of the strap on your flip-flop. Tie it into a double knot (follow link for image.) Dab the knot with some jeweler's glue. Repeat for the other side of the same strap to secure the star. Repeat for second flip flop. Allow glue to dry before wearing flip-flops.

ILoveToCreate Teen Crafts: Totally 80s Pollack Inspired Tote Bag


ILoveToCreate Teen Crafts
How To Make a:
Totally 80s Pollack Inspired DIY Tote Bag

Margot Potter The Impatient Crafter™
“Mom crafted, kid approved.”

Sometimes you make crafty gold and sometimes you make...this purse, but whatever you do, own it fully and more importantly, enjoy the journey. By the end of several hours of earnest crafting, I was convinced I was staring at a full on craft fail. Then the buzzer sounded and I was staring at this tote bag, thinking...really, Madge? Is this your teen craft project for this week?!

All in all, this just might be a bit of a hot mess, but Avalon came home from school and absolutely loved it. Who knew?! I have to remind myself sometimes that my focus here is 'teen crafts', which means the projects can be quirky! This has definitely got a modern art meets the 80s appeal. It’s fun to let all propriety go and squeeze paint with abandon on a canvas. I can see why Jackson Pollack enjoyed it so much. In this case, the canvas is a tote bag and the paint is Tulip dimensional fabric paint. It’s the perfect medium for this kind of design because it won’t run and stays dimensional after it dries. After layering on paints, I carved out some floral shapes with the tip of a paint tube and embellished them with metal chain and the foil side of some old faux gemstones. Aleene’s glues make it easy to stick just about anything to just about anything else! The floral trim is from Prym-Dritz, I gave it an edge using a Tulip Fashion Graffiti Big Phat marker.

I think other teens will dig this too. (Yeah, I said dig it.) Send them outside with some canvas totes, markers, stencils, trim, adhesives and a bin full of fabric paints and sprays and let them make some glorious messes of their own!


Materials

Fuchsia Canvas Purse
Raveled Rosettes Fabric Trim
Tulip Fashion Graffiti Big Phat Marker
Tulip
Dimensional Fabric Paint Metallic Silver, Matte Black, Slick Fuchsia
Ranger Alcohol Ink Mixative Silver
Aleene’s Liquid Fusion Glue
Aleene's Jewel-it Glue
Flat back silver faux gems or the foil side of old faux gems

Tools
Scissors
2 pairs chain nose pliers


1. Layer Dimensional Fabric Paints on canvas by squeezing the tubes about 8 inches from canvas and moving the paint stream into circles and lines and squiggles. Keep making layers until you’re pleased with the results.


2. Use the tip of one of your paints to carve floral swirls out randomly.

3. Squeeze and shake silver mixative over paint layers randomly. Squeeze into the center of your carved floral areas (a little goes a long way.) Allow the paints to dry.


4. Use the marker to darken the frayed edges of the flower trim.


5. When the paints have dried, use Aleene’s Jewel-it to add gems to center of carved flowers.

6. Place chain around flower to determine length needed. Remove segment from core chain using pliers. Add a line of glue around flower and glue down chain. Repeat for each flower.

7. Glue the flower trim across the top of the purse using Liquid Fusion Glue. Allow to embellishments to dry.

ILoveToCreate Teen Crafts: Pretty in Peeps Pendant


ILoveToCreate Teen Crafts: Pretty in Peeps Pendant
Mixed Media Jewelry Project
Margot Potter
“Mom crafted, kid approved.”
Copyright 2010 All Rights Reserved

I loves me some Marshmallow Peeps candies! How about you? Last year I bought a huge pile of them just to stack them up and stare at the fabulous colors. They’re so happy and fun filled. My daughter Avalon loves Peeps too. She loves them so much I can’t buy too many or she’ll turn into a Peep.

No, seriously.

I spent the better part of Easter season last year contemplating how to turn a Peeps candy into a bead. I thought about leaving one to sit for a few months and get nice and hard and then spraying it with a sealant...and heck that might work if you didn’t live in a 130 year old school house with a small mold problem. Methinks a moldy Peep bead would lack some appeal.

I finally settled on Sculpey Ultra Light polymer clay embellished with Crafty Chica paints and glitter and Tulip Glam It Up Studs. This could become a pin or a pendant or you could make a whole bunch of these on dowels and do a fun Peeps flower pot centerpiece like my edible bouquet from last year. I decided to make mine into a necklace and just added a bunch of springy Vintage and new Lucite and wood beads for a super cute necklace. If you really want to go to town, try making some Sculpey egg beads to coordinate...or add some polka dots and squiggles to large wooden beads...or do a collar of several Peeps that circle the neckline. I am not exaggerating in the least when I tell you that making these is so much fun, you’re going to look for reasons to make more!


Materials
Sculpey Ultra Light
Crafty Chica Little Chica Paints Red and White
3 Tulip Glam-It-Up Iron-On Studs Black
Crafty Chica Glitter Sunset Pink
Aleene’s Jewel-It Glue
Aleene’s Fast Grab Tacky Spray
Aleene’s Matte Finish Spray Sealant

Tools
Paint Brush
Polymer Clay Dedicated Toaster Oven
Sheet of Brown Kraft Paper

(To Make the Necklace:
Various Coordinated Beads in a Pattern That Makes a 16” or Longer Finished Length (I got the clear Lucite with green filament beads in NYC but here’s a source online and Beadin’ Path has a plethora of great vintage and new Lucite beads), 49 Strand .018 (or thicker) Beadalon Wire (always fill the holes of your beads with the wire), Beadalon EZ-Crimp Fancy Sterling Toggle Clasp, Mighty Crimp Tool and Wire Cutters)


1. Soften clay in your hands or by running it through a clay dedicated pasta machine until it is malleable. Use a real Peep as your guide to create a clay version. I bought some for research so I could get the size right...that’s my story and I’m sticking to it.


2. Use a sharp pointed object to create a hole in the middle of your rabbit’s head. This hole is threaded side to side so you can string the pendant on a necklace. Skip this step if you’re not making a bead.


3. Place rabbit on a sheet of Kraft paper on the baking tray and into a pre-heated 275 degree Toaster Oven. Watch the clay to be sure it doesn’t burn...it shouldn’t take very long to set. Mine took about 7 minutes...after I burned the first one. Oops.


4. Allow rabbit to cool. Mix red and white Crafty Chica paints to get a nice shade of pink. Paint rabbit. Allow to dry.


5. Place rabbit on a sheet of kraft or scrap paper. Spray with Aleene’s Tacky Spray. Pour a generous helping of pink glitter all over rabbit front and sides. Tap off excess and pour back into jar. Allow to dry.

6. Spray rabbit with Aleene’s Matte Finish Spray Sealant. Allow to dry.


7. Adhere the three Glam It Up studs to the face of your rabbit with the Jewel-It Glue. You’ll need to have a good dollop of glue so it fits into the recess on the stud. Use the handle of your paintbrush or a toothpick to remove any excess glue. Allow to dry.

Design Note: Do not eat this Peep.  It won't taste very good.  Trust me.