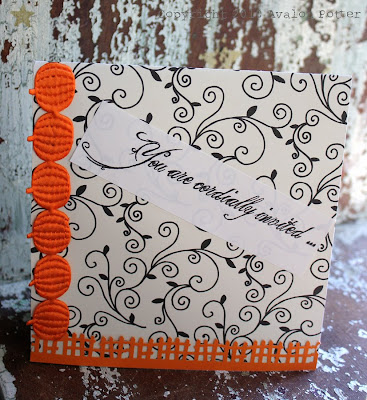
Avalon has another fab teen craft for you this week. She made a gorgeous Halloween pop up party invitation that is perfect for the season. Pop up cards are surprisingly easy and fun to make and this design could easily be modified for any number of holidays and special occasions. Avalon loves working with paper to make dimensional projects and this one really rocks!
Spooktacular Party Invitation
Avalon Potter for ILoveToCreate
“Teen crafted, mom approved”
With September coming to an end I thought it was time to do a Halloween craft. At my age more of us go to parties then trick or treat so I decided to create a Halloween party invitation. This is fun to make and then a few weeks later you will have even more fun at your party! Making cards is simple, enjoyable, and a great way to kick off October.

Materials
Decorative black and white scrapbook paper
Orange cardstock
Halloween themed ribbon
Martha Stewart rickety fence edge punch (or other decorative Halloween themed edge punch)
Googly eyes
Aleene’s Tacky Glue
Aleene’s Tacky Glue Stick
Tools
Computer
Printer
Paper cutter
Craft Knife
Paper Scissors
Bone Folder
Step one: Once you have all of your materials cut your decorative scrapbook paper to 11 ¼” x53/8” inches. Fold your cut cardstock in half, the card fold is in the center of the 11 ¼” length. Make sure there is some of the decorative cardstock left over you will need it later. Use a bone folder to crease the card.
Step Two: Punch the fence from the orange cardstock. Make sure you have punched a little over 5 3/8 inches so if by accident you trim a little more paper off of your fence it won’t be a problem.
Step three: Cut the fence to fit the bottom edge of your card, attach with Aleene’s Tacky Glue stick. Any excess fence can be trimmed with your scissors.
Step four: Now get your ribbon, Aleene’s Tacky Glue, and scissors. Cut your ribbon so it won’t overlap your rickety fence, around 5 inches long. Apply it to your card by putting Aleenes tacky glue on the back then sticking on the left hand side of the card.
Step five: Take your orange cardstock and scissors. You will cut a piece of cardstock about 4 ½ inches long and 4 ¾ inches wide and then the paper about ¼ of an inch long on both sides so that you can use those flaps to attach the paper to the card

Step six: Now take the flap from and bend the ends into flaps. Bend a 1” fold and a 2.5” fold. This becomes the base for your pop up element. Use the glue stick to attach one flap on the bottom of the card and one on top so that when the card is open it makes a rectangle. See photo. Make sure when the card closes it bends with the card.
Step seven: Now take your remaining orange card stock and cut out a pumpkin to about 3 ¼”x4 ¼”. You could switch the pumpkin to a skull, spider, or black cat. This is the part where you can feel free to be creative.
Step eight: Use your craft knife to cut out a jack-o-lantern mouth with a small tooth at the top. You could also add a nose if you want to.
Step nine: Adhere the googly eyes to the pumpkin using Tacky Glue. Allow to dry.
Step ten: Using a fancy font (I used King and Queen font from dafont) write You are cordially invited... in 16 pt.. Then write the date, the address, the time span of the party and the R.S.V.P date in 8 pt.. Print. Don’t feel obligated to use black as the font color try red or maybe orange.
 Step eleven: Use your paper cutter to cut out the printed material. The larger front element is 4.5”x1.25”. The invitation information is 3”x2.5”. Use the glue stick and glue the invitation into the pumpkins mouth with the tooth overlapping at an angle. Glue the pumpkin onto the front of the pop out piece of paper you glued to the card in step six, the invitation should almost rest on the bottom of the card when fully opened.
Step twelve: Apply the greeting on the front of the card with your glue stick. Glue it on an angle to give it a creepy affect.
Step thirteen: Punch a second fence element using the decorative scrapbook paper. Glue this to the inside of the card at the bottom.


No comments:
Post a Comment