Showing posts with label aleene's fabric fusion. Show all posts

'A' is for Awesome (Avalon and Autumn) DIY Framed Initial

(It's another AWESOME DIY Teen Craft Project from the AWESOME Ms. Avalon Potter!)


A is for Awesome (Avalon and Autumn) 
DIY Framed Initial
Avalon Potter foriLoveToCreate
'Teen Crafted, Mom Approved'

Autumn has always been my favorite season. The way the leaves form a masterpiece of color, and the crisp air rejuvenates the mind amazes me. Even though I have never been a large fan of Halloween (I don’t do scary), I still love the thick textures and shabby chic appeal that pops up during this time. I have a beach theme throughout my room the blends naturally with this style, so I am always finding new things I would love to hang up. I decided for this project I would make something that would go with the theme of my room and the theme of the season. I hope you enjoy it!

iLoveToCreate Retrofabulous Craft Wars Inspired Twister Lampshade


iLoveToCreate Retrofabulous: Craft Wars Inspired "Twister" Lampshade
Margot Potter
"These are your grandmother's crafts, ya gotta problem with that?"

Last week on Craft Wars the contestants had to DIY a lamp from an array of sun and safety glasses and craft closet schtuff for the Pop Craft challenge. I am on a mission these days to use up the vast and ridiculous amount of craft supplies that I already own. I could not justify buying new glasses and taking them apart to make a lamp. I also wasn't so excited about building a lamp. I'm impatient, have I mentioned that?

I put on the old thinking cap and began pondering lamps, iLoveToCreate adhesives and glasses...which morphed into a bag of glass pebbles, cardstock and a super cheap lamp from Target. I'm fond of repetition in design and I have a proclivity for circular shapes. I selected some colors from my pile of paper, punched out small circles and started mapping out a design. Mr. Potter joined the fun and we came up with this shade.
I couldn't figure out what was so familiar about these circles in these particular colors and then...it hit me! TWISTER! YAY!

And that's...how my mind works.  Scary, isn't it?!

(GLUE NOTES:  To attach the circles, we punched out Aleene's Fabric Fusion sheets, but it does make the punch sticky, so alternately you can try using *Aleene's Fabric Fusion tape cut with non-stick scissors in strips across back of circles.)

Follow the links at the bottom of this post to see what the other Craft Wars Vets made this week!

Materials
Small table top lamp with white shade
Cardstock in orange, blue, light yellow, dark yellow, green
Small clear glass flat back pebbles
Aleene's Fabric Fusion Sheets or *Tape
Aleene's Super Thick Tacky Glue

Tools
Fiskars 1" round circle punch
*Scissors


Cheryl whipped up a fabulous Day Bed Cover!
Andrea turned some zippers into a Perky Pillow!
Pattye shares lots of lovely DIY lamps!
Angela turns a skirt into an adorable upcycled lampshade!

iLoveToCreate Teen Crafts:Funky Flower Tank Top

iLoveToCreate Teen Crafts
Funky Flower Tank Top
Margot Potter for Avalon Potter
“Mom crafted, teen approved.”

Av is in her final week of school and just got home from a trip to Washington, D.C.  So I stepped in to make this funky tank top.  This was my second painted shirt attempt from yesterday; the first one was so horrid it ended up becoming the paint rag.  By the end of the day, I was starting to think this was heading for the ‘craft fail’ bin too, but now I’m kinda liking it and Av really liked it.  Craftastrophe or crafty triumph...sometimes it’s a fine line, people.  If you really get into a pickle, you can always cut the fabric up and use it for another project or, as I did with shirt number one, turn it into a colorful rag! I used the Paint Canon paints to do a Jackson Pollack influenced splatter background and then the flower stamp added a little touch of girly whimsy.  Still...it needed something...so out came the dimensional paint and some faux gemstones.  What was cool was the fabric was so wet, the dimensional paint sort of faded into it in spots.  The key here is to really get it layered without letting it get muddy and to keep dabbing as you work.  Ideally you’d dry between layers, but I was in a crunch for time, so layers just kept going on and the shirt kept getting wetter.  A lot of my best ideas come from taking being willing to make glorious messes and ultimately, there are no craft fails, except for the failure to craft. 

Materials
Ribbed tank top in grey
Faux gemstones
Foam flower stamp

Tools
T-shirt or sponge to blot and soak up paint as you work
Tulip sponge pouncer to apply paint to stamp


1.  Wash your shirt first.  Slide the form inside of your shirt.  Use the paint canon paints to drizzle and drip layers of paint straight from the bottles.  As you work, dab excess and keep layering and dabbing until you are happy with the results.  Allow to dry or leave wet while moving to next step for a more faded look.


2.  Apply pink paint to stamp with foam applicator.  Stamp flowers randomly on front of shirt.  Use a pouncer to add pink paint on spaces between flowers for another layer of color. Allow to dry or leave flowers wet for more faded dots.


3.  Use dimensional paints to add dots around flower petals.  This is not meant to be perfectly perfect, vary spacing and placement.  Add a white ring to center dot on each flower.  Carefully glue faux stones to center of each flower using Fabric Fusion.  Allow to dry before wearing. 

iLoveToCreate: Retrofabulous Christmas Craftabration Bedecked Christmas Stocking

Madge and Her Retrofabulous Christmas Stocking!

Better Homes and Gardens 1966 Christmas Helps (Note the doodle someone did on the candle flames back in the day...hee.)

The stockings are hung...inspiration from BHG 1966 Christmas Helps

iLoveToCreate Retrofabulous Crafts
Vintage Inspired Christmas Stocking
Copyright Margot Potter

"These are your grandmother's crafts™...ya gotta problem with that?"

Ho, Ho, Happy Holidaze! It's time for another Retrofabulous Christmas Craft project inspired by the crafts of yore! Huzzah! This project was inspired by a simply lovely set of burlap stockings from a 1966 Better Homes and Gardens Christmas Helps magazine. I used a pre-made wool felt stocking and some vintage inspired trim and within moments (and without a sewing machine) had a simply fabulous stocking with a little help from Aleene's Fashion Fusion products! We have a brand new The Impatient Crafter video coming with both the stocking AND the gift tag project (featuring Aleene's AWESOME Dry Adhesives) included...so stay tuned!

Materials
Fabric Christmas Stocking with plain folded top
Ribbon trim thick enough to fit top of stocking (mine was 2.5" and from a big box craft chain)
Fuzzy trim (I used wired trim from a big box craft chain, but you can also use faux fur here)
Beaded tinsel trim (you could also use pearl swags or any similar trim, mine came from a big box craft chain)
4 red tinsel pom poms
Aleene's Fashion Fusion Glue Pen
Aleene's Fashion Fusion Peel and Stick Tape
Aleene's Fashion Fusion Peel and Stick Sheets (These can be used in place of tape)

Tools
Scissors (mine are Fiskars holiday themed scissors)
Ruler


1. Begin by measuring, cutting and applying your thick ribbon to the top of stocking. The ribbon will overlap in the back, be sure to leave enough to fold so you don't have the end exposed, this will prevent it from fraying. Use the tape or the sheets to attach. The handle of your scissors can help as you press the tape or sheets down to create a strong bond.

2. Measure and cut a length of fuzzy trim to fit around top of stocking. Use tape to adhere.

3. Measure and cut your swag, my stocking was 7" and the swag was 14". Remember to leave space between swags for pom poms.

4. Place swags under the cuff of your stocking, use glue or tape to adhere stocking cuff over swags and secure them in place.

5. Use glue or tape to adhere your pom poms. Depending on the porosity of your fabric and how much of the glue it sucks up, you may need to use Aleene's Fast Grab Tacky Glue!

Bonus project on video...coming soon!
6. Use a vintage card to make a matching gift tag...stay tuned for the video!

Avalon Potter for ILoveToCreate Teen Crafts: Tie Dye Tulip Socks


Tie-Dye Tulip socks

ILoveToCreate Teen Crafts
Tie Dye Tulip Socks
Avalon Potter
"Teen crafted, mom approved."

I have a confession to make; I have a knee high sock obsession. They fill my drawers, they are scattered across my room, and they are even on my feet right now! I had been trying out an idea with tie dye and I had so much left over I scoured my room for something else to dye. After I had dyed the socks and another white shirt I put it the wash and anxiously awaited the result. When I saw the original shirt I realized it was not going to work out so I grabbed my socks and thought up a new design!

Materials:
One Step Tie-Dye Classic
Scissors
White knee high socks
Aleenes fabric fusion
Needle
Thread
White shirt (Use an old white shirt since you will be cutting it)
Ruler

Tools:
Washer
Dryer


Instructions:

1. Follow the instructions in the kit for the folding technique on your pair of socks.

2. Next for your shirt follow the swirl technique instructions in the kit.

3. Let the shirt and socks sit for 5-6 hours as per instructions. Take the rubber bands off and wash and dry them.

4. Take your shirt and cut off the seam on the bottom (this will be the flower). It should be about 12 inches long and ¾ inch wide. You will need two pieces.


5. Tie a knot at the end of the strip and begin twisting and rolling the strip around the knot, dabbing glue as you roll.


6. Continue rolling, twisting and gluing until you reach the end then attach the end to the back of the flower.


7. Sew the back of the flower to the top of the sock.

8. Enjoy wearing your amazing tie dye socks!


ILoveToCreate Teen Crafts: Flower Child Headband

ILoveToCreate Teen Crafts
Flower Child Headband
Copyright Margot Potter
"Mom crafted, teen approved."

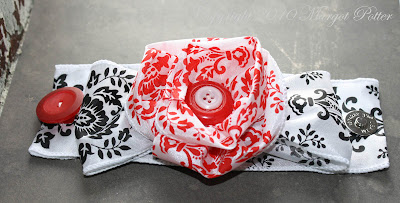
I bought this exquisite Alexander Henry fabric to fashion curtains for my kitchen two years ago. My first attempt was a painful reminder of the old adage "Measure Twice, Cut Once." I adore vintage inspired fabrics and the colors in this are fantastic. I had some scraps left over and a sewn hem from the curtains. This idea popped into my head while I pondered some stretchy headbands I purchased a while back. I've shown how to create these fabric flowers before, in fact at the end of this post are several fabric flower projects I've created for ILoveToCreate.

This is so easy and fun and this headband can either be worn in a Flower Child style or as a traditional headband. Either way, this is the kind if accessory a stylish teen will adore.

Materials
Aleene's Fabric Fusion Glue
Large Floral Print Fabric
Coordinating craft felt
Stretchy headband
Thread

Tools
Sewing needle
Paintbrush

1. Select a flower to feature as the focal of the design. Cut it out, leaving fabric around it in a circle or oval shape.


2. Place fabric on felt and cut the felt just a little bit wider than the fabric.


3. Use a paintbrush and apply a thin layer of Aleene's Fabric Fusion glue on the back of the fabric. Press fabric on felt smoothing gently with your hands. Allow to dry.

4. I had a doubled up and sewn fabric section, but you can just double some fabric over, iron and create your fabric flower. I have a tutorial for this here and here.

5. Once felt has dried, cut felt edge off of flower to get a smooth edge.

6. Sew the fabric flower to the headband.

6. Sew the center of the felt backed flower and a black bead into the center of the fabric flower, the thread should go through to the headband so it's nice and securely attached.


ILoveToCreate Teen Crafts: Playful Pom Pom Necklace


ILoveToCreate Teen Crafts
Playful Pom Pom Necklace
Copyright Margot Potter
"Mom crafted, kid approved."

Pom poms have a habit of proliferating in my studio. I just keep buying big bags of them with vague thoughts of projects to come. This idea has been rolling around my brain for a while now and yesterday, with a lot of help from my wonderful husband, this necklace was born. Kooky? Yes, yes it is. Fabulous? Well, of course! It's also lightweight, soft and fluffy. It's not for stuffy, stodgy, conservative folks, this is for the teen with a sense of fun. Much like the designer, who, while not a teen, likes playful accessories with a heaping helping of whimsy.

This is so easy and fun to make and you can take it in so many directions. Pom poms come in all sorts of sizes and colors, so if neon isn't working for you, change up the color palette! A nice black and white story would be striking! These pom pom circles can decorate purses, t-shirts, jeans, headbands, flip flops...where you put them is entirely up to you. After trying this on, I added a final layer of pom poms to the back of the earrings. So you can decide how you prefer to wear it. I'll be sporting this at CHA (a big craft trade show I'm attending this week) and Avalon will take it over afterward. She thought it was adorable and her opinion, as a stylish and fashion forward teen, is the one that counts. This is so affordable, so easy and so fun to make, it's the perfect antidote to the mantra of summer, "Mom...I'm bored."

Materials
Black craft felt
Multiple sized neon pom poms
Aleene's Fabric Fusion glue
11 10mm silver plated jump rings
QuickLinks Oval Chain
2 silver plated swivel lobster clasps
2 silver plated ear wires
2 2" silver plated head pins
(all jewelry making supplies and tools provided by Beadalon)

Tools
White fabric tracing pencil
3 round objects (1.5", 1.75" and 2" diameter)
Fabric scissors
Crop-a-dile or other 1/16" hole punch
2 pairs chain nose pliers
Round nose pliers
Flush cutters


1. Trace circles on felt using white pencil and your round objects. You will need four small and two of each of the other sizes.


2. Lay out circles to finalize pattern.


3. Glue various sizes of pom poms to circles using Fabric Fusion glue. If you make a small puddle of glue and dip the pom poms in, it makes quick work of this step. Allow to dry.

4. Reinforce outer edges of outer circles with a second small layer of felt, this will keep the felt from tearing when you wear the necklace. Allow to dry.


5. Turn circles over to determine placement of jump rings. Mark with fabric pencil. Rings need to completely connect each circle.

6. Use punch to place holes for jump rings. Make sure you aren't right on the edge of your circles to prevent felt from tearing when you wear the necklace.


7. Connect the felt segments using your jump rings and 2 pairs of chain nose pliers.


8. Attach a lobster clasp to the jump rings on the outermost circles on your bib section. Connect chain to clasps.


9. To make matching earrings, thread a head pin into the center of a small pom pom, coil and loop on each end. Attach this to an ear wire and a pom pom circle with jump ring. Repeat for second earring. (For more information on the basic jewelry making techniques in this project , please visit my YouTube channel and look for my Crafty Quickies videos!)

ILoveToCreate Teen Crafts Sweet Dreams Throw Pillow by Avalon Potter


ILoveToCreate Teen Crafts

Sweet Dreams Throw Pillow
Copyright Avalon Potter
"Kid crafted, mom approved."

I am quite positive that I gave birth to the world's best kid 12.5 years ago. My lovely daughter came home from camp today knowing that I'd been away for nine days at a medical center and was feeling worn down and under the weather and she jumped right in and made this FABULOUS project. She even took the step by step photos! Way to go, Avalon!

We bought the blank throw pillow several weeks back and she had a crafty plan. I decided not to direct her vision, but to allow her to create a design that was entirely hers. Okay, so I did suggest using felt for the facial features...but other than that and a little help with cutting the eyelashes, this is all Avalon. The companion piece is a creation by monster maker Jenny Harada.

Kids will amaze you if you let them. I think that's the key to great teen crafts. Instead of asking them to make the same thing you did, giving them tools to express their individuality and creativity challenges and empowers them. ILoveToCreate has an arsenal of tools to fuel their creativity and there are a host of fabulous ideas on the website for inspiration. Gather some up and step back and let your teens express themselves.

Materials
Blue cotton throw pillow (Target)
White craft felt
Fuchsia craft felt
Black craft felt
Aleene's Fabric Fusion Glue

Tools
Fabric friendly scissors
Sizzix Big Shot die cutting machine
Sizzix Bigz Die Wedding Flower

1. Use Big Shot and die to cut 8 flower centers from white felt. If you cut small sections of felt, you won't waste any in the die cutting process.

2. Cut out lips and lip center line from fuchsia felt.

3. Cut out eyelashes. Use scissors to cut into felt and create lashes.

4. Glue flowers to pillow.

5. Glue lips and eyelashes to pillow. Allow glue to dry.

ILoveToCreate Teen Crafts: May Flowers Embellished Tank Top


IloveToCreate Teen Crafts
May Flowers Embellished Tank Top

Margot Potter

“Mom crafted, kid approved.”

Summer is almost here and it’s time for tank tops, flip flops and shorts. Yippee! Here’s a fun project teens can do in the back yard with their friends. Just buy a bunch of inexpensive tanks or t’s and give them a pile of Tulip 3D Fabric paints andTulip Fashion Graffiti Big Phat markers and let them make their own wearable works of art. This isn't a 'make it perfect' kind of project, it's meant to be playful, so don't worry about coloring inside of the lines.

My color palette and design were inspired by the charming new graphic buttons from La Mode. Tulip fashion paint comes in virtually every color so it’s easy to match the button colors. I had so much fun with this; I think I’m going to have to make one for myself!

Materials
Cotton tank top (pre-wash to remove sizing)
3 Blumenthal Lansing La Mode buttons
Tulip 3D Fashion Paint poppin' purple, deep turquoise, yellow and clover green
Tulip Fashion Graffiti Big Phat fabric marker black
Aleene’s Fabric Fusion glue
Coordinating DMC Color Infusions embroidery threads

Tools
Embroidery needle
Paint brushes
T-shirt form

1. Slide a t-shirt form under your tank top. (Secure the back with safety pins to tighten if the shirt is too loose.)

2. Using the button pattern as inspiration, paint three flowers with graduated circles of color in pink, teal and yellow. Change the brushes out between colors. Allow paints to dry.

3. Use the marker to draw graphic circles to define the flowers. Draw stems and add leaves. Use green paint to color inside of leaves. Allow to dry.


4. Glue buttons to center of flowers. Allow glue to dry.

5. Add embroidery thread accents to each button, one yellow, one teal and one pink.