Freaky Friday: Crystal Web Necklace for SWAROVSKI ELEMENTS

Crystal Web Collar Necklace for SWAROVSKI ELEMENTS Copyright 2010

Here it is, Friday again, and I don't have a new project for you because I've been buried with design work for the new job. Sorry about that, chief. So in lieu of new, I thought I'd re-post one of my favorite Halloween projects...ever. This is so pretty on the neck and it's such fun to make. Bring a generous helping of patience though, this will take a few hours.

Crystal Web Collar Necklace
Copyright 2008
Margot Potter for Create Your Style-SWAROVSKI ELEMENTS

ALL RIGHTS RESERVED-PERSONAL USE ONLY

This intriguing web of metal and crystal floats around your entire neck in a web of glamour and intrigue. Whether the basis for a Spider Queen costume or a striking seasonal necklace, it’s made from affordable materials that are brought to life with the beauty of SWAROVSKI ELEMENTS and Beadalon silver plated wire.

Materials
30 6007 7x4mm crystal moonlight briolettes (you can substitute another small crystal bead if you prefer)
66 5000 3mm jet rounds
72 5000 5mm jet hematite rounds
SS2006 ss12 foiled light Siam flat back crystal (you may substitute a 2028 ss12 here)
Remembrance silver finish Beadalon memory wire choker
2 packages silver plated Beadalon small cable chain
3 large silver plated Beadalon swivel lobster clasps
38 6mm silver plated jump rings
66 clear Beadalon bead bumpers
44 silver plated size 1 crimp tubes
Beadalon 19 strand .024 silver color wire
Jeweler’s Glue (available at most craft stores)

Tools
Round nose pliers
2 pairs chain nose pliers
Memory wire shears
Wire cutters
1/16” drill bit and electric or battery operated drill

1. Use wire cutters to snip spider off of ring base.

2. Use a small drill bit to drill a hole in the top of the spider’s abdomen.

3. Attach a red flat back crystal of your choice to the spider’s abdomen using jeweler’s glue. Allow to dry.

4. Create memory wire choker by cutting off a 17” length using your memory wire shears. (Never, ever, ever use regular wire cutters on memory wire, it’s tempered steel and it will become razor sharp.)

5. Use round nose pliers to bend one end of memory wire into a loop. (You can adjust the necklace for size, but you will need to increase all of your materials, you can also opt to add more jump rings to the closures.)

6. Thread 5mm jet hematite crystals around wire and cut off excess wire leaving a 1/8” tail.

7. Bend tail into a loop using your round nose pliers.

8. Add a 7” section of silver color wire on every sixth 5mm bead on choker using a flattened crimp tube to secure wire around memory wire base. You should have 11 wire sections hanging from choker.

9. Snip off excess wire tail with cutters.

10. Place your choker on a flat surface so it is splayed out as you work.

11. Slide a bead bumper to approximately 7/8” from top of a wire.

12. Add a single 3mm bead.

13. Slide the first link in your chain on the wire behind the bead.

14. Add a second 3mm bead.

15. Add another bead bumper.

16. Slide a crimp tube on wire to bottom of bead bumper and smash flat with chain nose pliers.

17. When you attach the chain next, make sure it is 2” from the first attached link.

18. Continue around the ‘web’ repeating this process until you reach the final strand and cut off excess chain.

19. Move down the wire about an inch and repeat the established process working around your web carefully adding bumper, bead, chain link, bumper and bead. For the second two sections, the chain should be 3” in length from attached link to attached link.

20. When you reach your final sections on each wire, cut off excess wire from bottom of crimp tube using cutters.

21. Attach a swivel lobster clasp to the right side of your memory wire with a jump ring. Attach a second jump ring to the opposite side. This will help secure the web around your neck.

22. Move down to first chain section and attach a jump ring to the right side, threading it into the first link in your chain and around the beaded section before attaching your clasp. Add two jump rings to the opposite side using the same jump ring through first chain link process. Repeat for the second chain section. (Leave the bottom section free standing to allow the web to fan around your neck.)

23. Attach a 5.5” section of chain between the fourth and the fifth beads to the right of center using a jump ring. Attach the spider to the bottom of the chain using a jump ring.

24. Attach a small crystal on a jump ring to the center of each chain swag using a jump ring.

ILoveToCreate Teen Crafts: Spooktacular Party Invitation


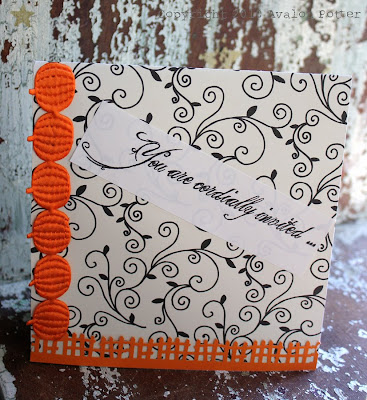
Spooktacular Party Invitation by Avalon Potter for ILoveToCreate Teen Crafts

Avalon has another fab teen craft for you this week. She made a gorgeous Halloween pop up party invitation that is perfect for the season. Pop up cards are surprisingly easy and fun to make and this design could easily be modified for any number of holidays and special occasions. Avalon loves working with paper to make dimensional projects and this one really rocks!

Spooktacular Party Invitation

Avalon Potter for ILoveToCreate
“Teen crafted, mom approved”

With September coming to an end I thought it was time to do a Halloween craft. At my age more of us go to parties then trick or treat so I decided to create a Halloween party invitation. This is fun to make and then a few weeks later you will have even more fun at your party! Making cards is simple, enjoyable, and a great way to kick off October.


Materials
Decorative black and white scrapbook paper
Orange cardstock
Halloween themed ribbon
Martha Stewart rickety fence edge punch (or other decorative Halloween themed edge punch)
Googly eyes
Aleene’s Tacky Glue
Aleene’s Tacky Glue Stick

Tools
Computer
Printer
Paper cutter
Craft Knife
Paper Scissors
Bone Folder

Step one: Once you have all of your materials cut your decorative scrapbook paper to 11 ¼” x53/8” inches. Fold your cut cardstock in half, the card fold is in the center of the 11 ¼” length. Make sure there is some of the decorative cardstock left over you will need it later. Use a bone folder to crease the card.

Step Two: Punch the fence from the orange cardstock. Make sure you have punched a little over 5 3/8 inches so if by accident you trim a little more paper off of your fence it won’t be a problem.

Step three: Cut the fence to fit the bottom edge of your card, attach with Aleene’s Tacky Glue stick. Any excess fence can be trimmed with your scissors.

Step four: Now get your ribbon, Aleene’s Tacky Glue, and scissors. Cut your ribbon so it won’t overlap your rickety fence, around 5 inches long. Apply it to your card by putting Aleenes tacky glue on the back then sticking on the left hand side of the card.

Step five: Take your orange cardstock and scissors. You will cut a piece of cardstock about 4 ½ inches long and 4 ¾ inches wide and then the paper about ¼ of an inch long on both sides so that you can use those flaps to attach the paper to the card


Step six: Now take the flap from and bend the ends into flaps. Bend a 1” fold and a 2.5” fold. This becomes the base for your pop up element. Use the glue stick to attach one flap on the bottom of the card and one on top so that when the card is open it makes a rectangle. See photo. Make sure when the card closes it bends with the card.

Step seven: Now take your remaining orange card stock and cut out a pumpkin to about 3 ¼”x4 ¼”. You could switch the pumpkin to a skull, spider, or black cat. This is the part where you can feel free to be creative.

Step eight: Use your craft knife to cut out a jack-o-lantern mouth with a small tooth at the top. You could also add a nose if you want to.

Step nine: Adhere the googly eyes to the pumpkin using Tacky Glue. Allow to dry.

Step ten: Using a fancy font (I used King and Queen font from dafont) write You are cordially invited... in 16 pt.. Then write the date, the address, the time span of the party and the R.S.V.P date in 8 pt.. Print. Don’t feel obligated to use black as the font color try red or maybe orange.

Step eleven: Use your paper cutter to cut out the printed material. The larger front element is 4.5”x1.25”. The invitation information is 3”x2.5”. Use the glue stick and glue the invitation into the pumpkins mouth with the tooth overlapping at an angle. Glue the pumpkin onto the front of the pop out piece of paper you glued to the card in step six, the invitation should almost rest on the bottom of the card when fully opened.

Step twelve: Apply the greeting on the front of the card with your glue stick. Glue it on an angle to give it a creepy affect.

Step thirteen: Punch a second fence element using the decorative scrapbook paper. Glue this to the inside of the card at the bottom.

Crochet it. Love It. Wear It. Book Review!


I must confess, when I think of crochet, I think of granny square quilts and open weave slouchy berets with boho floral accents. What I don't think of is Haute Couture. This is perhaps the 70s kitsch prejudice that all crochet enthusiasts battle. Crochet is often perceived as knitting's kooky cousin. Yet, Drew Emborsky has once again created a collection of crocheted designs that defy any misguided stereotypes about what you can actually do with a crochet hook in his gorgeous new book Crochet it, Wear it, Love it!

If you don't know The Crochet Dude yet, trust me, you will. Drew Emborsky is poised for crafty superstardom. His talent, passion, enthusiasm and pithy prose pulls you in from page one and even if you, like me, have beginner skills, Drew is the perfect teacher to guide you on your journey from novice to expert. This book is jam packed with fashion forward, runway friendly ideas that I'd sport in a hot second.

I want the saucy Hesperas corset dress in the worst way possible and I'm completely smitten with the outrageously impressive Budapest Nights faux fur trimmed full length coat. The Angel of Music jacket is so perfectly proportioned...heck even I might take a stab at making something bigger than a crocheted flower!

I'm a huge fan of Drew's and it's been such fun to watch his meteoric rise in the craft industry. He's one of the good guys and he's an immense talent. It's really nice to see nice people succeed.

To order the book,
follow this link to Amazon. To read Drew's absurdly popular blog click here. Look for Drew's Crochet Dude product line to debut soon at a craft store near you!

The Crochet Dude Mystery Word Clue: Granny Square (yeah, it's two words, so?!)

Freaky Friday with Madge-Free Halloween Craft Projects and Ideas!

Drop Dead Gorgeous Copyright 2009 Margot Potter ALL RIGHTS RESERVED

Welcome to 'Freaky Friday with Madge'. Every Friday until Halloween I will post a new project, permission free vintage image or a project from my crafty coffers with a Halloween theme! Insert evil laugh...here. Halloween is one of my favorite holidays and I love working to a theme.

So tune in every Friday and prepare to be scared craftless!

This week I'm reposting a link to a project and a scary story from last year. Please note that these stories and projects are under a copyright. The stories are not reprintable without written permission and the projects are for PERSONAL USE ONLY. That means you may not make them and sell them on Etsy or anywhere at all. Okee dokee, artichokee?

Click here for instructions and a most frightful tale.

Love
Madge

ILoveToCreate Teen Crafts: School Spirit Tie Dye T

ILoveToCreate Teen Crafts
School Spirit Tie Dye T
Copyright Avalon Potter
“Teen crafted, mom approved”


(Note from Mom: I’m so incredibly proud to announce that my talented 12 year old daughter Avalon will be doing bi-weekly blog posts for ILoveToCreate right here at The Impatient Crafter™ and at the ILoveToCreate blog. She’s joining the super fabulous Maya Murillo as they split up the teen craft post duties. Without further ado, here’s Avalon!)

School is back and school spirit is higher then ever. I thought for my first project I would do something for spirit week. At Twin Valley we have a school spirit day were we wear our school colors. It helps get everyone excited for the new school year. So I thought what better way to get the readers excited for not only school but my first blog?

This project is great if you want an intro to the ILovetoCreate Custom Dye Color Kit!

Materials
Cotton t-shirt
Rubber bands
Tulip Custom Dye Color Kit
Disposable rubber gloves
Salt
Tulip Fabric Markers (bright)
Ribbon

Tools
Fabric scissors
Large pot or bucket
Large wooden spoon


1. Select your shirt. Wash shirt to remove sizing. Make sure you’ve got your mom or dad with you, the dye can irritate your eyes or your skin. Follow directions on package carefully.


2. Protect work surface with plastic bags and newspaper. Wearing rubber gloves, prepare 2 gallon dye bath in a large pot or bucket following recipe in the pamphlet that comes with the dye kit. I used Shamrock.


3. Use rubber bands to tie off shirt to create patterns. You can fold and secure or twist and secure, each new way of securing the shirt fabric will create unique designs. You can find a lot of great techniques on the ILoveToCreate website.


4. Place shirt in dye bath and stir for 15 minutes. Keep shirt in bath for one hour, stirring every ten or so minutes.

5. Remove shirt from dye bath and remove rubber bands. Wash shirt on hottest setting with laundry soap. Wash separately from other clothing for the first few washings.

6. Use fabric markers to write the name of your school across front of t-shirt.

7. Cut off sleeves, cut off bottom of shirt and cut off the collar to create a boat neck style.

8. Use coordinating ribbons to tie the tops of each arm hole.

Fall Stringing Issue Projects!

Fashionista Copyright 2009 Margot Potter

I have been meaning to share here and with all of the balls I've been juggling, I'm afraid this one got left out of the circus. I'm so excited to have a necklace in the Fall issue of Stringing Magazine. The focal pendant is from Auntie's Beads, isn't it fab?! I'm really happy with how this design turned out.

Hootenanny Copyright 2009 Margot Potter

There's a second necklace I created which is featured as a web project and it's perfect for Fall and of course, for Halloween! This is available as a free download on Beading Daily! I'm a fan of vintage plastic beads and these owls from The Beadin' Path make me so happy I can hardly stand it!

You can follow this link for instructions for the Hootenanny Necklace and find the instructions for Fashionista in the issue that is on newsstands right now!

xoxo
Madge

How To Write and Publish a Craft Book Part Seven

Phineas Taylor Barnum by Mathew Brady Public Domain Image from the National Portrait Gallery

I realized after I published my last How To Write and Publish a Craft Book Series post that I'd not really finished the series. Why is that? Well, my little chickadee, that is because after you write and publish your craft book you will have to promote your craft book. Yup, put on the PR and Marketing hat my friend, it's P.T. Barnum time!

"Without promotion something terrible happens...nothing!" P.T. Barnum

I am currently working on an e-book about personal branding, viral marketing and self promotion and I hope to have it finished very soon. Until then, here are a few tips and tricks about marketing your book. As I mentioned at the start of the series, the publisher is not going to do the bulk of the marketing. That is up to you. I like to think of it like this. If I spent months and months planning the perfect party, decorations, food, music, theme...and I never sent out any invitations...who would I blame if no one showed up?

Me. I'd blame me. While I slumped in a chair making pouty faces in my fabulous frock, I would blame me.

Yes, my fine friend, it is up to you to send out the invitations. That means promotions on your blog, your social networking sites and your website. If you don't actually have a blog, social networking presence or website, I suggest that you start by building these before you write and publish any book. People aren't just going to find your book, you need to tell them about the book and why they simply can not live without it. Get them excited and make it easy for them to find and purchase your amazing creation.

Make sure Amazon has the "Look Inside" feature activated, join Amazon Associates to get a referral fee, offer free books to colleagues to giveaway on their blogs, promote the book through Facebook and Blog freebies and sneak peeks. Generate buzz and excitement. If you send out a newsletter, make sure you start promoting the book before it goes to print, maybe even give your fans a little incentive, if you sell your book on your website, offer them a special fan discount. Have review copies sent to prominent people in your industry. If someone reviews your book positively, post a link to the review in your blog and on your social networking sites. The more you create threads that lead back to your book, the more people will find it, which is, of course, why it was called the World Wide Web once upon a time and why some folks still jokingly refer to it as the 'interwebs.'

Once the book is 'born' your job is to teach it to walk and then help it to run. If not, your book is not likely to succeed. Like every aspect of this process, it ultimately falls on you to make it happen. Resting on one's laurels, even if you've had a few successes, is never a good plan. I work each and every single day to build my brand, promote awareness and to generate buzz about my books.

If you don't like hard work and you don't want to put the time in to make your book a success, I suggest you refrain from taking the journey. There is nothing worse that pouring your heart and soul into something and then watching it shrivel up and die. You and only you can make the party a success, so make sure you get those invitations in the mail and get ready to pop open that champagne! Huzzah!

Oh and to those who believe they're 'too old' to reinvent themselves, PT Barnum didn't start his first circus until he was 61 years old! It is never too late to become the person you've always wanted to be.

Love
Madge