How To Raise a Flock of Chickens-Part Two


Our Baby Chicks Get a New Home

Brooding Dog Crate for Baby Chicks


Remember those adorable little baby chicks we got in the mail? They're teenagers now! It's amazing how quickly they grow up. We've moved them from the dog crate in the coat room in our house into a section of the outbuilding where our other chickens live last week. They're separated and they've still got a heat lamp, but they're on their way to becoming full grown birds.

The Yard Shack and Pig Cottage

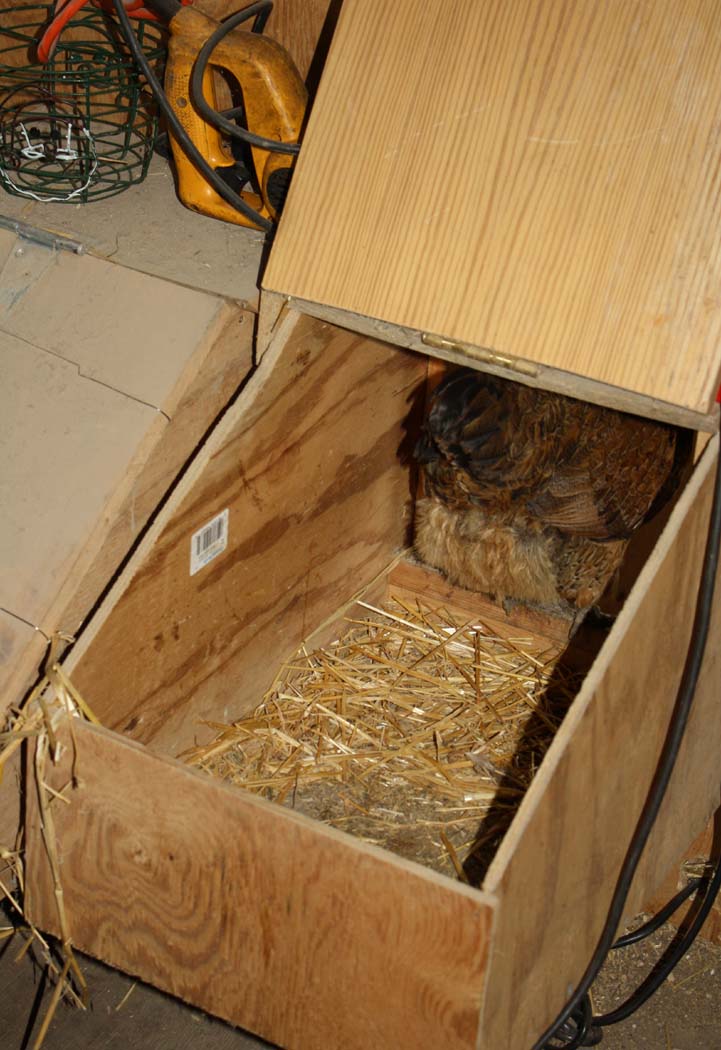
Nesting Box with an Exiting Annoyed Chicken...

We keep our chickens in the back half of an outdoor shed we jokingly refer to as 'the yard shack.' The larger building belongs to the chickens and the cottage is where our pot bellied pigs live. There is a full size door that opens into the chicken's area in the shed with hanging feed bins, a heated water dispenser and dowels for them to roost on at night. My husband built the wall that separates the front of the shed for storage and the back where the chickens live. He also built some nesting boxes in which they lay their eggs. We keep those filled with clean straw. We can access the boxes from the outside so we don't have to worry about that mean old rooster when we gather the eggs. Chickens lay on average once every 1.5 days, so during the heavy laying season that's a lot of eggs! If you don't provide a light for them, they 'go on strike' during the shorter days of winter. As I mentioned in my last post, it's a matter of getting the eggs up front or getting them over time. A chicken only has so many eggs.

Our baby pullets are getting fresh water and starter feed daily. The older chickens get water, oyster shells (which help provide calcium), layer feed and access to the outside world for yummy bugs and grasses. It's important to remember that baby chicks are a tasty treat to many predators, including hawks. If you do give them access to the outdoors without supervision, bird netting on top of their run is important. Dig the fence in about 3 feet deep to prevent raccoons and other stealthy predators access. Make sure the fence openings are small enough to prevent the chicks from getting loose. When we first moved in here six years ago, I had many a chicken chasing episode before leaving to go on-air at QVC. I know my Amish neighbors got a kick out of watching me all dolled up for TV running around the yard after errant chickens.

Pickles the Friendly Chick

These Ameracauana chickens are super sweet, Avalon has befriended one bird she's named Pickles. Pickles loves to come out of the coop and sit on Avalon's arm. It's really cute. We've had absolutely no picking problems. After the last time we brooded and the bins of injured chicks, it's been a relief.

I'll keep you posted as these little chicks grow up. Having backyard chickens really is a wonderful family activity. You can't beat farm fresh, free range eggs either!

Cheers,
Madge

ILoveToCreate Teen Crafts Proenza Schouler Inspired T-Shirt Flower Necklace


ILoveToCreate Teen Crafts
Proenza Schouler Inspired T-Shirt Flower Necklace
Margot Potter
"Mom crafted, kid approved."

If you recall last week I posted an altered t-shirt dress inspired by the Proenza Schouler graffiti jeans for J Brand. I decided it needed a little accessorizing, so I whipped up this fun fabric necklace to wear with it. I like that it matches...but not too much. You can use any layered flower die to get this effect and the Grungeboard gives it structure, but it's the fabulous Tulip dimensional fabric paints that bring this design to life! Every teen has a pile of old t-shirts they can't wear anymore, so this is a great way to make your own upcycled Haute Couture. Make another set of flowers to attach to some flip flops if you want to rock a total look!

Materials
Black t-shirt
Tulip 3-D fashion paints spearmint green matte, clover green pearl
Tulip Soft matte fabric paint azalea
LinkAleene's Fabric Fusion Glue
Tulip Fashion Graffiti Big Phat fabric marker in black
Grungeboard sheets
3 8mm faceted black beads
3 silver plated star tipped head pins
Textured silver plated chain
3 silver plated jump rings
Silver plated swivel lobster clasp

Tools
Sizzix Big Shot die cutting machine
Layered Flower die
Crop-a-dile or other heavy duty hole punch
Fabric scissors
T-shirt form


1. Slide form into t-shirt. Paint stripes of pink and green across t-shirt in a loose plaid pattern.

2. Press a large piece of cardboard across surface of t-shirt, compressing paint. Gently press across surface of cardboard to ensure all paint is compressed. Remove cardboard and allow shirt to dry.


3. Use your die as a template to cut t-shirt squares.


4. Roll t-shirt squares through die cutter to create flowers.


5. Roll grungeboard through die cutter to create flowers.

6. Use marker to make grungeboard flower surfaces black.


7. Use adhesive to attach fabric to grungeboard. Allow to dry.

8. Thread a headpin and the bead into the holes in the center of your three layered die cut flowers (if your die doesn't have center holes, use a sharp pointed tool to create them first.


9. Bend wire flush to back of flower, cut to 1/8" and use round nose pliers to create a small loop. Repeat for all three flowers.


10. Mark and punch holes in flower petals with Crop-a-dile. (Make sure they will fall properly when connected by moving flowers around for best placement before marking and cutting.)

11. Use jump rings to connect flowers and add one jump ring to the outer petal on each outer flower.


12. Measure chain to desired length and connect with a jump ring to one end of flowers.

13. Attach a second jump ring and the clasp to the opposite end of chain.

Saturday TastyLinks!

The BQOTU™

It's Saturday!

I'm working!

I'm wearing a tiara today!

I've had one too many cups of coffee!

I'm using far too many exclamation points!

Huzzah!

The tiara is a prototype design for the new book. It has a few nit picky little glitches I need to fix for the finished project. Ergh. That means I must make another tiara, I tried my best to cover up the glitches, but alas, I do have SOME quality standards. Wrapping a tiara with crystals takes a very, very long time. One must be patient. In fact this is a book of projects that all require patience. I'm averaging one a day on a good day. Yes, the impatient one is making a book of projects that require patience...and the willingness to attempt to defy physics...and to try and try again when the laws of physics get in our way. Damn time-space continuum.

Slowing down to create these projects has become a sort of a moving meditation. I'm feeling a Zen like sense of channeling the creative force. I can almost hear chanting monks in the background as I work.

Or is that mooing cows from the dairy farm across the street?

Please understand that a project that takes me all day to complete is as far as I'm willing to take the aforementioned Zen like meditation. For you, a day spent wrapping a tiara might not seem like a very, very long time. In Madge years, it is an eternity. I'm simply not spending a month on one project. I'm not that obsessive compulsive. Or I am...because I need to keep moving forward.

Or I'm just blathering on and on here because I'm avoiding diving back into the tiara.

I occasionally jokingly refer to myself as the BQOTU™ or Bead Queen of the Universe™. Mostly because I can and because I know it really irks some people who feel me undeserving of the title. Tee hee. They could have crowned themselves BQOTU™ prior to my claiming it. Today I am reclaiming my BQOTU™ crown. Because I can. Insert trumpet flourish here.

The BQOTU™ has spoken.

Now go forth and make stuff people. What the heck are you doing reading this drivel?! Before you go though...please peruse the plethora of pleasing projects and posts from the Crafty Bloggers Gang. "We've got glue guns and we're not afraid to use them."™

The Artful Crafter
How to sew felted wool boxes to organize odds and ends.

Stefanie Girard's Sweater Surgery
See how to make a Steampunk button and recycled 80's earring into a cool new necklace

Margot Potter The Impatient Crafter
So you want to write a craft book? Here's part five in Madge's series on how to do it!

Crafty Princess Diaries
After seriously losing sleep over taking photographs for her Etsy shop, Tammy has a eureka jewelry photography moment.

Craftside-A behind-the-scenes peek at a crafty world
Craftside's got a recycled book page mobile from the book-Playing With Books and a chance to win a free copy of it, a new Look, Learn, and Create video on how to make a box stitch ribbon bracelet with Elaine Schmidt, tips on painting Rembrandt style, and some "Graphic Stew" line and shape ingredients!

Cathie Filian
It is fashion time for dad! Check out Cathie's father's day ideas.

Beading Arts
Chapter two of Cyndi's e-book is available for download! "Altered Surfaces" begins the exploration of the exchange between mixed media and bead embroidery!

Aileen's Musings
Aileen shows you how to make vivacious vivid shipping tags to use on your gifts and in your art!

About Family Crafts
Father's Day is just around the corner. What will you do for all the other special dads you know? This year, why not make a special, home-made gift for all of the guys in your life!

Check out this wonderful profile of yours truly written by the lovely Marjorie Miller of The Land of Odds Jewelry Spotter Blog!

Bid on some signed Margot Potter books and original artwork at the KENW auction!

Get the hell outta here already!

How To Write and Publish a Craft Book Part Five


I sold my seventh book. I negotiated and signed the contract. I have begun the tedious process of creating the projects. Everyone has a different approach to this. Mine begins with an idea. Then I write my introduction, which fleshes out my idea. Then I create the outline. I determine the focus of each chapter. I don't work from chapter to chapter because I like to bounce around to the design that captures my fancy at any given moment.

My daughter started watching Cake Boss on Netflix. What a brilliant show, what an amazing artist! What I love is the moment in each show where Buddy's brain kicks into overdrive and he comes up with the concept. The thing I love is the graphic visual representation they create of what he's thinking. That is exactly how I design. I am inspired by something...an image, a motif, a pattern and then my brain begins to form an idea. So let's say it's a turret from an iconic building in Russia. I begin to think about how I can take some beads and wire and make a turret?

Then I make the design. It's never as easy as just thinking about it and making it...because there are basic laws of physics that I am defying with every twist of the wire. Just like the Cake Boss has to deal with fondant and icing and cake that may not cooperate, there may be a carnage of epic proportions around my desk...bits of wire, broken beads, funked up findings all sprinkled liberally with juicy expletives, but eventually with persistence, my vision becomes reality. Then my husband looks under my desk and shakes his head.

How in the heck do you do that in one day?!

It's Hurricane Madge!

Now if only I had a team of minions to do my bidding. Hey make this wire curl on the jig for me! You, hammer out this sheet metal! Over there, stop slacking and get this wire wrapping started!

Sigh.

I'm a team of one. One stubborn, impatient and determined woman who when inspired with an idea will insist on seeing it to completion. Therefore, in reality, my determination trumps my impatience every time.

If you want to write a craft book, you'll need to find out how to take your ideas and make them real. You'll need to fine tune your design and writing patterns and make them work to your advantage. You'll have deadlines, sometimes insanely short ones, and you will have to meet them. Deadlines are not arbitrary. Deadlines revolve around the entire team who is, in fact, waiting patiently to take your finished pieces and your concept and make a book. So...in reality...there are minions. They aren't your minions though because they're working for the publisher.

Damn.

I need to work on that.

I will be insanely busy for the next two months. This is the shortest deadline I have ever had. I am doing my best to take it one design at a time, but in light of the other things on my plate, it's a daunting task to say the least.

E...gads.

Enough blather, I have a book to make!

Love
Madge

ILoveToCreate Teen Crafts: Proenza Schouler Inspired Sundress


ILoveToCreate Teen Crafts
Proenza Schouler Inspired Sundress
Margot Potter

"Mom crafted, kid approved."

I got a few cotton sundresses at Tar-jay this weekend for working in the studio. They were really inexpensive, but with that being said, they aren't exactly top notch quality. Since they came in solid colors, I thought maybe I'd craft one up and see how it looked. These are perfect for summer camp or beach cover ups for teens and they can have a blast using Tulip 3-D paints to make graffiti inspired patterns. I'm going to get a dress for Avalon to decorate this week!

I keep seeing these Proenza Schouler graffiti jeans for J Brand in all of the fashion mags and I thought I'd give this concept a whirl. I remembered the fab Rorschach test themed dress Pattie Wack did for ILoveToCreate and I thought a variation on her paint smooshing technique with a faux plaid effect would give me the Proenza look. And it did!

Use a variety of paints in different colors, cover an entire shirt or dress, mask out circles or other shapes to create little decorative graffiti sections, do an entire pair of jeans! It's easy, it's fun and it's one of those...you never know how it's going to turn out until you peel up the cardboard techniques! You'll need a lot of paint for this, so stock up and keep shaking the tube to create a consistent paint flow.

I feel like this needs a little more...somethin', somethin' so stay tuned and I'm going to make some matching accessories for next week's ILoveToCreate post!

Materials
Cotton Sundress (wash to remove sizing)
Tulip 3-D Fashion Paints black, green
Tulip Fashion Graffiti Paint Tagger black
Foamboard or cardboard insert cut to fit entire bottom of dress
Cardboard scrap wide enough to fit area you are painting and entire bottom of dress
1. Wash dress to remove sizing. Iron if too wrinkled. Slide foam or cardboard into bottom of dress. Smooth out and wrinkles. You can opt to pin the back of the dress so the fabric is tight across the front. Place cardboard scrap along top edge of area you want to decorate.

2. Start with black paint tagger. Create a series of diagonal slashes from bottom of dress to bottom of cardboard scrap.


3. Use second color to create thinner slashes in the same direction as the tagger. Create slashes in opposite diagonal direction to start making a faux plaid.


4. Add third color adding more thin slashes in both directions in between existing slashes. Add as much paint as you like, but leave spaces in between so you maintain the plaid effect and the paints don't blend and get 'muddy.'


5. Gently fold cardboard scrap over paint. Gently press down across cardboard working your way back and forth to compress paint. Continue for about one minute. Pull cardboard up from bottom and remove. If there are any raised paint areas, use a clean section of cardboard to compress until all areas have been fully compressed. Allow to dry. Repeat for back of dress if desired.