iLoveToCreate Teen Crafts: Carnival Canvas Covered Notebook

Carnival Canvas Covered Notebook
Avalon Potter (a.k.a. NGC-New Generation Crafter) for iLoveToCreate
"Teen crafted, mom approved."

Avalon has been obsessed with tribal prints all summer, from ikat to Native American to African inspired patterns and chevron, she's been showing me pictures of bedding, bags, clothes, shoes all emblazoned with an array of colors and patterns.  I trust a teen to know what's really cool and she's a really cool teen.  She wanted to make something fun to express her new found love of all things 'pattern-y', and we remembered Claudine Hellmuth's fabulous sticky back canvas.  By covering a basic notebook with layers of painted and embellished canvas, she made a truly fabulous one of a kind work of art.  This is so much fun to do with the vast array of paints from Tulip and Scribbles brands and with school just around the corner, a great way to help your teen personalize their supplies!

Materials
Notebook with hardback cover
Sticky back canvas
Decorative tape
Tulip 3-d fashion paint
Tulip fabric markers
Scribbles brush on fabric paints
Scribbles fabric paint brushes
Tulip sponge pouncers

Tools
Scissors

Cut canvas to fit cover of book, leave a 1" edge, cut edge at corners, fold over book cover and press to remove any bubbles on front of book.  Add a decorative tape accent to left side of canvas to conceal edge.


Create three strips of canvas. Peel and press on notebook at top, center and bottom edge.  Paint each stripe and the spaces in between a solid color and allow to dry.

Make two rectangular mini-canvas accents using dimensional paint in patterns, press together and adhere to front of notebook.

Use markers and paints to make a variety of patterns along strips. 

The Problem with Paint Chips


Over the past few years there has been a surge in crafts made from paint sample chips you get at the paint or hardware store. I see them all over Pinterest, in books, on crafty and design TV shows, in blogs and in magazines. They're very cool, because paint chips are very cool.  Each chip a lovely gradation of opaque colors neatly stacked on one long paper strip.  I'm sure it began with a creative type who took a bunch of chips home to review while planning colors for painting.  Innocent enough, yes?

They had a bunch of these chips sitting around and looked at them and found them fair...and a new crafty creation was born.  Upcycled, repurposed and quirky in its charm.

Hooray!

Then they told two friends, and they told two friends...and pretty soon paint chip crafts were everywhere.

Hooray!

Yet, I have begun wondering how a truly upcycled idea morphed into one that involves basically stealing paint chips to make art.

Someone has to pay for those paint chips and I am quite sure they're not cheap.  Each chip has to be painted with the actual paint colors and the hardware or paint store foots the bill to keep them stocked with the intention of customers taking them as they plan their paint colors.  Then the customer returns and hopefully buys some paint to offset the cost of the samples.  I'm sure they never thought paint chips would become a craft and interior design trend.  One wonders if paint chip replacement costs are soaring!  Will it reach the point where you have to pay for paint chips?

It's a crafty conundrum indeed.

If you are truly upcycling chips you took while looking at paint colors, that's a different story.  Why toss them out when you can make something fun with them? Still, I hate to be a Debbie Downer here, taking a bunch of paint chips to make crafts if you have no intention of buying a can of paint is not upcycling, it's theft.  I bet a lot of people haven't even thought about this, but as a former retailer I think about this stuff a lot.  It's amazing how easily people can convince themselves that it's okay to take a whole lot of something for free, I mean it's there on a shelf and all and it is technically free.  No one stops you from taking them.  You can't pay for them.  So what's the big dealio? 

I don't know if the big hardware chains are addressing this phenomenon or if it's big enough to make a significant difference in their cost of business, still, it's the kind of thing that rolls around in my noggin' and makes me go...

Hmmm...

Any thoughts from the peanut gallery?

Love
Madge


iLoveToCreate Retrofabulous Crafts: Burnt Offerings Decoupage Necklace


iLoveToCreate Retrofabulous Crafts
Burnt Offerings Decoupage Necklace
Margot Potter

In 2009 I published a book called Beyond the Bead.  It is by far my favorite book.  I had a blast making beads and components out of all sorts of wonderful things I found in the aisles at the craft and hardware stores.  One of the projects in the book used old book pages, wooden craft stars and a wood burning tool to create the look of aged and burned charms.  I loved making it, I love wearing it and I thought I'd share it with you.  I've seen some similar projects making the rounds on Pinterest, but this is my version from a few years ago.  Aleene's Collage Pauge is an amazing medium with endless uses and here you can see how nicely it seals the old paper to create charms that look fragile, but are tough and durable.  Add a little Aleene's sealer spray and you've got a necklace that will last a lifetime.

Materials
Old book pages
Wooden craft stars
Traci Bautista Aleene's Collage Pauge Matte
Aleene's Spray Acrylic Sealer Matte
Tiny key charms
Crystal beads
Aged brass chain
Clasp
10mm gold tone or aged brass jump rings

Tools
Chain nose pliers
Bent nose pliers
Wood burning tool

Attach paper to star using Collage Pauge. Make all five stars at the same time, cutting the paper around them after they dry with scissors. 

Seal the top of the star with decoupage medium, after it dries repeat. Turn star over and repeat the process 
for the opposite side.  

Use a wood burning tool to CAREFULLY burn the edges of the stars and add some burned areas in the centers. Work in a ventilated area, take your time and be careful, the tool gets very hot. Did I mention it gets hot? Because it does. So be careful. After burning, spray with Aleene's Spray Sealer in matte.

If your stars are not pre-drilled, use a 1/16" drill bit to drill a hole at the top of one point on each star. Attach the stars and the charms and beads to the chain using jump rings and your bent and chain nose pliers.

iLoveToCreate Teen Crafts: Pretty Poppies Pin by Avalon Potter


iLoveToCreate Teen Crafts
Pretty Poppies Pin
Avalon Potter
"Teen crafted, mom approved."

I scored these yummy retrofabulous fabric fat quarters at JoAnn Fabrics a while ago and had them hoarded away in a secret drawer until yesterday.  Avalon ferreted them out and turned them into this fabulous pin/necklace!  How cool is this?  The chain is vintage celluloid from our new site which had been sitting in a box for several years until she dug it out and added the pin.  Simply fabulous and so fun to make using Aleene's Stiffen Quick and Fabric Fusion sheets.  Teens will love turning fabric, jeans and t-shirts into these stylish pins they can pop on purses, jackets, chains...whatever they like!  I'm thinking of making a smaller version to festoon my flip flops! 

Materials
Coordinating fabric swatches
Black craft felt
Flat pin back
Aleene's Fabric Fusion Peel and Stick Sheets
Aleene's Stiffen Quick Spray

Tools
Die cutting machine (Avalon used a Sizzix Big Shot)
Floral layered die (Avalon used a Sizzix Big Shot poppy die)
Sponge brush
Round surfaces that fit flowers (Avalon used her snow globe collection)
Plastic wrap to protect round surfaces
Scissors to cut felt

Die cut your flowers making one size of each layer in each flower, this gives each flower a different configuration of layers.  Spray flowers with Stiffen Quick and allow to dry over your plastic wrap covered round surfaces.  Keep adding layers of spray until the flowers are the stiffness you'd like them to be.

Stack flowers together adhering layers with Peel and Stick sheets.

Adhere flowers to a felt base with Peel and Stick sheets, cut felt to fit bottom of flowers and prevent any felt from peeking out of the sides of flowers.

Adhere a pin back with Peel and Stick sheet.  Attach your flower pin to anything you like!

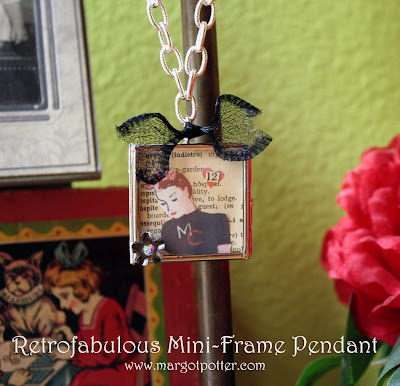
iLoveToCreate Retrofabulous Mini-Frame Pendant


iLoveToCreate Retrofabulous Mini-Frame Pendant 
Margot Potter 
"These are your grandmother's craftshttp://www.margotpotter.com/collections/yourgrandmotherscrafts, ya gotta problem with that?"

Making these miniature wearable paper artworks is easy peasy and a ton of fun.  Old book pages make great collage backgrounds and you can find images in Dover Books titles or do this with upcycled new magazine pages for a more modern look.  No matter how you do it, Aleene's Dry Adhesives and Jewelry Glue make this a breeze!

The Craftabration Continues!  Day two of Margot Potter: Live Handmade! I'm sharing a project I created for iLoveToCreate.  These are my collage jewelry frames.  I make them for myself, family and friends and they're just divine.  I can not claim to have invented this art form, but I can tell you it's a ton of fun making these mini-collages.  The images I use are from vintage pre-1940 magazines I found at a flea market in Paris...and soon...my little crafty chickadee...you will be able to buy them as PDFs from my new site!  YAY!  I'm still working on the logistics of that, so until then, here's a little project to whet your whistle with a free vintage image for you to use!  We've got lots of old book pages for your collage backgrounds at the new site...I'm just sayin'.

(This image is sized to fit in a 1.5x1.5" frame. For personal use only.) 

Materials
Miniature Frame (HHH Enterprises)
Tiny metal Tim Holtz idea-ology flower
4mm crystal AB SWAROVSKI ELEMENTS round
Old book page
Red construction paper
Artistic Wire mesh black
Aleene's Tacky Tape Runner
Aleene's Tacky Sticker Sheets
Aleene's Jewelry and Metal Glue
Chain
Clasp
Jump rings

Tools
Chain nose pliers
Small scissors
Pencil
Trace background paper to fit frame and cut with small paper scissors. 

Cut out and adhere tiny collage elements using Aleene's dry adhesives.

Use Aleene's Jewelry and Metal glue to attach flower and crystal.  (Be sparing, a little goes a long way!)

Cut a small section of mesh and tie a bow, pull mesh tubing on both sides to create bow shape.