Pages
▼
We Do Stuff: How To Rehab Old Furniture
We are launching a new video series called: We Do Stuff!
We'll be moving beyond crafts into cooking, gardening, home decor...lifestyle! Woot! I wrote a dorky theme song for the videos, which we will eventually do in a variety of musical styles. It's one of those kinds of tunes that just stick in your head, even my daughter's friend started singing it this weekend! In fact, my daughter would really, really like us to stop singing it. She said she's been humming it at school. I think we're on to something here...
So here's the scoop on We Do Stuff: How To Rehab Old Furniture video! It's embedded in this post below, and it's under four minutes, so take a moment to watch! Drew did a really nice job with edits. Plus there's a super funny cameo by our musically inclined terrier Sir Charles Barkly. We know the sound is not up to par, but we're lacking in funds for fancy microphones and doing the best with what we've got.
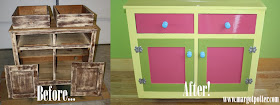
We have been staring at these two tired furniture pieces and this boring lampshade for several years. The table is a dumpster find from behind our old store (it's amazing what people throw away) and the cabinet is from an estate sale. They have nice bones, nothing spectacular, but interesting simple shapes just begging for a new finish or some paint. I have been meaning to paint them since we got them. Yet, time slips away and good intentions fade.
After painting our new home with vibrant colors all grounded by the plethora of pine on floors and ceilings, the time came to tackle these pieces. I wanted bright and saturated color, but not neon or pastel, and we found four lovely Krylon colors that worked perfectly. Yellow needed several more coats than the rest, keep that in mind if you decide to make something similar.
Begin by taking the furniture apart, remove hardware, knobs and lay pieces out for sanding and painting. Sand them...with a belt sander...and really take your time here. If you don't remove the old finish, the new finish will not adhere.This is the number one thing that happens with old furniture rehabs. The one piece had a big oily stain on top, we sanded it down thoroughly and then used a Kilz primer and stain blocker. This did the trick. We sealed the cabinet with Minwax water based polycrylic sealer with light sanding in between coats, the top was coated with 3-4 coats for a really high sheen, the rest 2 coats. We intend to seal the table too.We used Krylon Indoor/Outdoor in bright idea, ivy leaf and watermelon and Krylon Short Cuts in turquoise for the knobs.
I wouldn't paint really fine or antique furniture like this, but sturdy pieces you might find for a song at flea markets, yard sales, thrift stores or even discount stores like Ikea are great fun to paint and refinish. You can add stenciled or hand painted accents too. We went for high shine and bright color, but you could sand the edges lightly after painting, skip the sealer and have a more 'shabby' antiqued look if you prefer. I am a big fan of that look too.
The lamp was easy, just two coats of the yellow spray paint, acrylic paint in orange pounced with a round foam pouncer and Aleene's Fast Grab Tacky Glue to attach the yellow pom pon trim. I know they're a little ticky tacky, but they fit the folksy style we're going for here that I have dubbed Folk Art Chic.
We're slowly, but surely, decorating our rustic mountain home. As we progress, I'll share more projects and pics. We're thinking about tackling the porch with some flower boxes next!
Cheers,
Madge
1 comment:
I'm delighted to share your thoughtful comments with my readers. I'm not happy to share spam or hot links or fake comments merely intended to drive traffic to your site. I don't publish mean spirited attacks or unwarranted negativity. If you must be a Johnny Crappleseed, feel free to get your own blog.


I have been looking to build a good professional opinion on the topic. Your post got me a step further in the right direction. Many thanks :-)
ReplyDeleteCotton Bags