
iLoveToCreate Retrofabulous Crafts: Pulp Fiction Thank You Cards
Copyright Margot Potter
"These are your grandmother's crafts, ya gotta problem with that?"
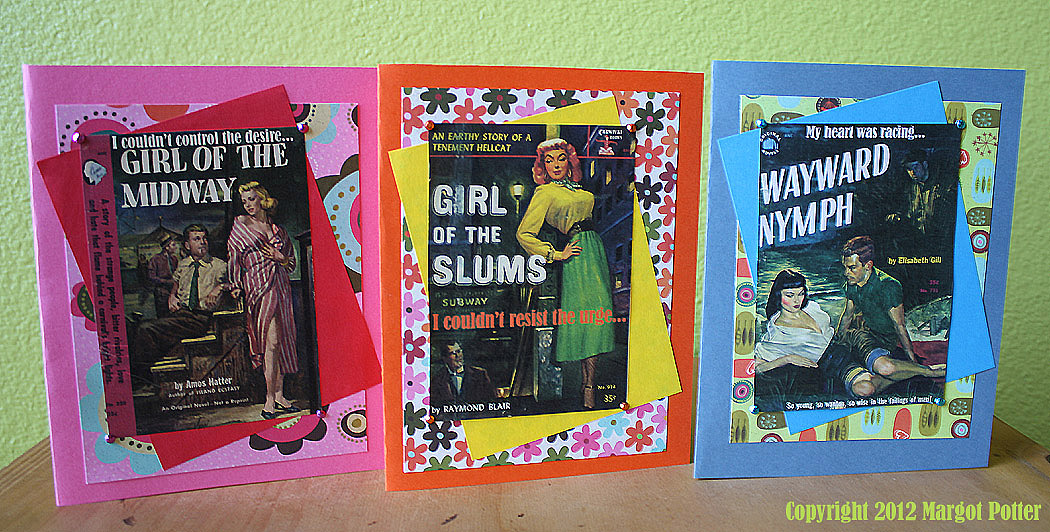
The glitter has faded, the confetti swept away and it's time to start a new year filled with possibility. It's also time to take a moment and thank your friends and family for the lovely gifts they sent. What better way to say, "Thank you" than these Retrofabulous Pulp Fiction cards? The covers are scanned from my collection of ephemera, you can easily find similar books on eBay. I dragged them into Photoshop, color matched the fonts and added some new words to the mix, sized and printed and layered them with coordinating scrapbook papers and cardstock. Tulip Glam-it-up metallic crystals on the corners were the perfect touch of dimension. My first attempt to frame them with glitter was not so fab, so I started over. I've added coordinating sentiments inside. Aleene's AWESOME new glue dot tape runner made quick work of putting it all together.

Vintage patterned scrapbook papers (I used my fav Carolyn Gavin papers from K&Company)
Coordinating card stock
Tulip metallic Glam-it-up crystals
Aleene's Tacky Glue Dot tape runner
Aleene's Acid Free Tacky Glue
Tools
Paper cutter
Bone folder
Ruler
Scissors
Chain nose pliers or tweezers


1. Use photo editing software to add sentiments.
2. Use Word or similar software to create sentiments for inside of cards.
3. Print. I printed my images at 536x774dpi 150 resolution. It's easy to drag these into publishing software and put them side by side for printing.
4. Cut out images. You are stacking them on a solid cardstock and a patterned paper, each one gets slightly larger. I eyeballed using a paper cutter, you can measure them at 1/4" increasing margins, mark and cut.
5. Fold your card stock, crease with bone folder and cut off 1" from bottom.
6. Layer images starting with patterned paper which is straight, solid card stock on an angle and image straight. Use Aleene's Tacky Glue Dot Runner Tape to attach to card.
7. Cut out a sentiment, add a slightly larger coordinating cardstock paper frame, layer and attach to inside of card on an angle using tape runner.
8. Squeeze out a small amount of Tacky Glue. Use tweezers to careful pick up crystal, dip back in glue (don't over do it here) and attach to corners of image on card. Press gently with finger tips.


7 comments:
These cards are simply divine! Happy New Year to you & yours Madge.
Love them! So you, So perfect! Xoxox
Thanks, gals! Michele your cards are amazing! Jewels you know I loves ya!
xoxo
Madge
Absolutely love these, but where do you get the cool pulp fiction mag images? Are they copyright free? I guess for personal use it's ok, right? I have 2 of your books, by the way, I love your quirky style!! :)
Personal use only and not for resale, this is why I did not offer them for download. In the post I mentioned eBay, I saw several auctions there the other day and they go fairly inexpensively.
Cheers,
Madge
"Girls of the Slums"? Whoever can you give that to?!
They're a hoot.
I didn't see your sweet compliment when you posted it so I shall say it now...thank you Madge. I love cut & paste...it keeps me out of the biker bars. haha
Post a Comment